Sunday, August 30, 2009

Pesto!

Pesto spoon

I planted a lot of basil this year. A whole lotta basil. My basil patch was about four foot long and five feet high (that's as high as me!). I know, it's a lot of basil. Why did I plant so much?? Well to cook with of course. It's one of my favorites to cook with, but the main reason for the copious amount was...... I wanted to make my own pesto and that requires a whole hecka of a lot of it.

Friday I had the day off so I recruited the kids to help me harvest (I had Sara too so that was an extra set of hands as well). Off we went to give the basil patch a real good thinning. We put a big dent in those plants I tell ya. We came back in the house with some overflowing baskets of the green stuff.

We sat pulling all the leaves off the stems, our fingers turning green and smelly. Not the bad kind of smelly but the very good kind. Even after a few good scrubbing, we all still smelled like basil. Once the leaves were plucked, I gave the leaves a good washing in my salad spinner and laid them on the table to dry. My entire table was covered. I should have taken a picture, it was a sea of green.

Pesto Collage

I use Ina Gartens pesto recipe. It's fast and easy and uses a combination of walnuts and pinenuts, which gives this pesto terrific flavor. We doubled the recipe so we'd have enough pesto to last us until next summer.

We used 10 cups of packed basil. 10!!
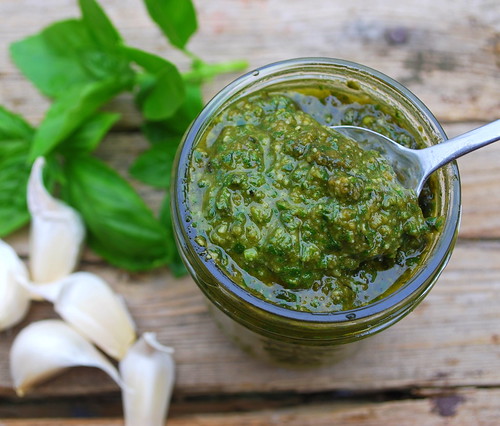
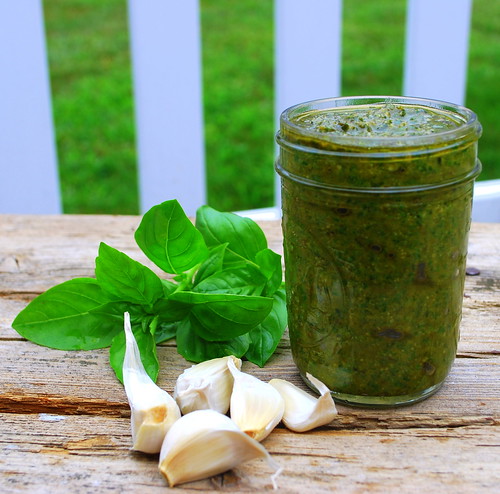
I kept one jar for the fridge and put the rest in the freezer.

Ina’s Pesto
Printable recipe
¼ cup walnuts
¼ pignolis (pine nuts)
3 tablespoons chopped garlic (about 9 cloves)
5 cups fresh basil leaves, packed
1-teaspoon kosher salt
1 teaspoon freshly ground black pepper
1 ½ cups good olive oil
1 cup freshly grated Parmesan

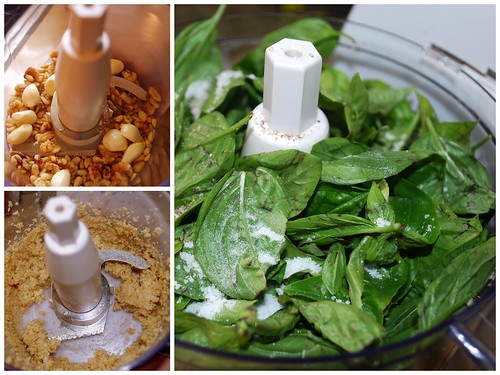
Place the walnuts, pine nuts and garlic in the bowl of a food processor fitted with a steel blade. Process for 15 seconds. Add the basil leave and the salt and pepper. With the processor running, slowly pour the olive il into the bowl through the feed tube and process until the pesto is thoroughly pureed. Add the Parmesan and puree for 1 minute. Use right away or store in the refrigerator or freezer with a thin film of olive oil on top.

Notes: Air is the enemy of pesto. For freezing, pack in a container with a film of oil, or place plastic wrap directly on top with the air pressed out.

To clean basil, remove the leaves, swirl them in a bowl of water, and then spin them very dry in a salad spinner. Store in a closed plastic bag with a slightly damp paper towel. As long as the leaves are dry they will stay green for several days.

Pesto

Thursday, August 27, 2009

Corn Pudding

Corn Pudding with spoon

I am not a big fan of corn in many recipes. I will tolerate it in a taco salad, I can deal with that and I do enjoy the Steam Fresh corn. 5 minutes in the nuker and out comes corn that tastes like it just came off the cob. Yum. I don’t like creamed corn, or corn casseroles. I prefer mine on the cob, lightly buttered and salted thank you very much. My husband on the other hand loves creamed corn. So every once in a blue moon I will buy him a can of pig slop (that’s my little pet name for it) and he happily munches away on his bowl of goo.

This recipe caught my attention. Corn Pudding. Yeah I know you might be thinking, why is the girl who isn't crazy about corn casseroles making a corn pudding? I'm kooky that way, plus I thought my husband would enjoy it.

This is a recipe from the former Mrs. Joel, Katie Lee. I guess she's quite the little Southern cook. I saw this is the latest issue of Food & Wine and thought I might give it a whirl for the creamed corn lover in my life.

Corn Pudding in pan

Out of the oven it came. A golden fluffy casserole. I let it cool for 5 minutes, then scooped up a big spoonful and happily carried it over to my husband. He took one bite and gave me the "ehhhh" face. "Not so good?" I asked. "I'm not crazy about it" he said. Crimeny. I went back into the kitchen and took a bite, expecting to be as underwhelmed as he was and I wasn't. Huh. This was light and creamy and sweet and had a little layer at the bottom that tasted like moist corn bread. It was good. It was very good. I can't believe the creamed corn lover wasn't impressed.

Now I said I'm not a fan of the corn casserole.
Do I have to retract that statement since I like this dish so much??

Corn Pudding in bowl


Corn Pudding
Recipe from Katie Lee
Food & Wine – Sept 2009

“Some corn puddings are really dense,” says Katie. “The egg whites here make this one lighter”. The cornmeal in the recipe settles a bit in the bottom of the baking dish, almost creating a layer of cornbread under the moist, sweet pudding.

Corn Pudding
Printable recipe
2 cups milk
½ cup heavy cream
4 medium ears of corn, shucked
1 tablespoon extra virgin olive oil
1 medium sweet onion, finely chopped
1 stick unsalted butter
½ cup cornmeal
6 large eggs, separated
3 ounces sharp cheddar cheese, shredded (about a cup)
1 teaspoon, plus 1 pinch salt
½ teaspoon freshly ground black pepper

Step 1 - Preheat the oven to 350. Butter a 10x15 inch-baking dish. In a large saucepan, bring the milk and cream to a simmer over moderate heat. Add the ears of corn cover and cook over moderately low heat, turning a few times, until tender (about 10 minutes).

Steps 2 - Meanwhile, in a medium skillet, heat the olive oil. Add the onion and cook over moderate heat until softened (about 8 minutes).

Step – 3 Transfer the corn to a plate to cool. Remove the saucepan from the heat and swirl in the butter until melted. Let it cool to room temperature. Using a serrated knife cut the kernels off the cobs and add to the saucepan with the milk and cream. Add the onions to the saucepan as well. Whisk in the cornmeal, egg yolks, cheddar and 1 teaspoon of salt and the pepper.

Corn Pudding in bowl 1

In a large stainless steel bowl, beat the egg whites with a pinch of salt at high speed until firm peaks form. Fold the whites into the corn mixture and pour into the prepared baking dish. Bake for about 30 minutes, until puffed and golden brown. Let the pudding rest for 5 minutes before serving.

This pudding can be made ahead up until Step 3 and refrigerated overnight.

Bring to room temperature before proceeding.

Tuesday, August 25, 2009

Strawberry Banana Split Cake & a bit of rambling

Strawberry Banana Split Cake - slice

There are lots of foods that I make that don't blog about. I mean I really don't think you would all love to see a post about my grilled burgers, or the pasta I made, or that you would get particularly excited about the tuna fish sandwiches we had for dinner the other night. These are meals that just aren't blog worthy in my opinion. I kind of like to share recipes that don't make ya yawn out loud. Sure I like to post simple dishes that anyone can make, and I'm happy when I get emails from people I don't even know saying "thanks I made such and such from your blog and my kids, my hubby, my Mom, etc., loved it. That just makes me smile. People feeding each other, it' a beautiful thing, but there are lots of other foods that I make that never get their photos taken, or the recipe written down.

I usually post 2 or 3 times a week, sometimes more, sometimes less. It depends on what's going on in my life and truthfully, if I've made anything that anyone else would be interested in.

I think most of us with blogs have felt from time to time like we have to keep up with Joneses so to speak. Like I'm not keeping up with my quota here. I mean there are bloggers out there that post every single day? Every day! Come on! Give the rest of us some slack. Get out of your kitchen, go outside and get some fresh air, see a movie, phone a friend, we're worried about you!

I vow not to get caught up in the "I need to post something new everyday" crowd. You will never see a monthly blog count near the 30 mark, sorry it's just not going to happen. There is so much more to do that sit in front of a screen chronicling every meal I make. Don't get me wrong, I love sharing my recipes with you all, I love the feedback I get, I enjoy photographing the food I make and writing about it, but I don't want it to ever become something I have to do, you know?

So I hope you enjoy visiting my blog and aren't tsking me when you see that I haven't posted in 4 or 5 days. I promise to keep sharing the recipes that I make that are worthy (why do I see Wayne and Garth in my head every time I use that word??) and I hope you'll keep stopping back from time to time. There's a whole heck of a lot of wonderful bloggers out their, so I'm grateful to everyone one of you takes time out of their busy days to see what's happening in my little world. Now on to the recipe!

Strawberry Banana Split Cake


This is one of my absolute biggest hits. No matter where I bring it, it is the first dessert to be devoured. A layer of graham cracker crumbs, a layer of sweetness, then loads of fruit topped with whipped topping. If you'd like to top this with homemade whipped cream, knock yourself out.

I know there are lots of people out that that turn their nose up at store bought whipped topping, but I honestly have to say, I haven't run into any of them personally.

Top this with toasted coconut, mini chocolate chips, chocolate syrup, or whatever floats your boat. No matter the topping, it will be the hit of the party. I guarantee it.

Strawberry Banana Split Collage

Strawberry Banana Split Cake
Printable recipe
Crust2 cups graham cracker crumbs
1/2 cup (1 stick) butter, melted
1/4 cup granulated sugar

Filling
1 ½ sticks butter, softened
3 cups confectionery sugar
1 ½ tablespoons milk
1 ½ teaspoons vanilla

2 large bananas cut into 1/4 inch slices
1 – 20oz can (large) crushed pineapple, drained well
1-pound fresh strawberries
(if using frozen sliced strawberries defrost and drain)
Coconut, if desired
16oz whipped topping (larger tub)

For the crust: combine the crumbs, butter and sugar in bowl and, press into an ungreased 13x9x2 dish. Chill for 1/2 hour.

In a mixing bowl cream butter, confectioners sugar, milk & vanilla. Spread over crust, chill for 1/2 hour. Layer strawberries, bananas, pineapple, and coconut (if desired). Any fruit can be substituted and chocolate syrup can be added also) Spread Cool Whip over the fruit. Top with nuts or toasted coconut. Keep refrigerated.

Strawberry Banana Split Cake TS

Saturday, August 22, 2009

Asian Pork Meatballs with Soy Garlic Dipping Sauce

Asian Meatballs CU

I'm always finding these great blogs filled with fantastic recipes and I'm bookmarking away like crazy and you want to know the only bad thing about it??? I just don't have the time to make all the great food that I want to make.

I'll see a recipe and in my head I'm already putting together my grocery list and thinking about side dishes I can make to go with it, or what main course I'd want to serve before I make this fantabulous dessert. It's a sickness I tell ya.

I have a huge basketful of recipes to try. I have stack and stacks of foodie magazine with post it's sticking out of almost every last one of them and little codes to go along with them. The ones I really, really should try soon get 3 stars, the ones I want to try but maybe not just right now get 2 stars and the ones that interest me, but I know I'm really not going to get around to, get 1 star. Those poor 1 stars will never make it into the kitchen.

I did come across a 3 star recipe on a blog called Life's Ambrosia. Des has a pretty awesome blog with lots and lots of terrific recipes. She's got more 3 star recipes than all my magazine combined.

When I saw her recipe for the Asian Pork Meatballs I immediately added the ingredients to my shopping list and lo and behold....weeks later I finally got around to making them.

These meatballs were so good that I've already added them to my Christmas Eve menu. Yup you read that right. When I have a recipe that's a hit, I add it to my Excel spreadsheet for Christmas 2009. Yes, I am that OCD. I plan on making these a bit smaller so they are appetizers size. The great part is I can make these ahead of time. Cook them before my guests arrive and pop 'em in a crock pot to keep warm.

The dipping sauce came together in about 2 minutes. How easy is that? (Ok I just sounded like Ina Garten)

Des' notes: I did choose to fry these meatballs because I wanted a crispy golden brown outside with a tender flavorful inside. If you would prefer to bake them, I would recommend drizzling them with a little olive oil before cooking them in a preheated 350 degree oven for about 30 to 35 minutes or until cooked through.

Asian Meatballs

Asian Pork Meatballs with Soy Garlic Dipping Sauce
recipe from Life's Ambrosia
Printable recipe
1 ½ pounds ground pork
½ cup finely minced onion
3 cloves garlic, minced
1 teaspoon kosher salt
½ teaspoon minced fresh ginger
1 teaspoon dried cilantro or 1 tablespoon chopped fresh cilantro
1 teaspoon roasted sesame seeds
1 egg, beaten
2 serrano peppers, minced
½ cup plain dry breadcrumbs
1 teaspoon fish sauce
¼ cup of oil (if frying)

Preheat the oven to warm setting. In a bowl combine all the ingredients except the oil. Mix well. Roll into 20 meatballs.

If frying: Heat the oil in a large frying pan over medium heat. Fry meatballs in batches until they are golden brown on all sides and cooked through. About 8 to 10 minutes total. Be careful not to overcrowd the pan. Transfer cooked meatballs to the oven to keep them warm while you finish cooking the remaining meatballs.

Soy Garlic Dipping Sauce
3 tablespoons soy sauce
1-tablespoon rice wine vinegar
1 teaspoon granulated garlic

Combine all the ingredients in a bowl and serve.

I did choose to bake these and they came out perfect after about 35 minutes in the oven.

Tuesday, August 18, 2009

Trail Mix Freezer Cookies

Trail Mix Cookies

I’m not going to whine and complain, but I want to let you all know what's been happening here in my little world…..it’s hot and humid here on the East coast!!

It’s the kind of humid where you can’t even walk outside without sweating beading up all over your body. Just watering the garden had John’s shirt soaked with sweat. Oppressive I tell ya. I love the Fall, so I can’t even begin to explain how much I hate this kind of weather or what a frizzy mess my hair becomes when the humidity starts to rise. It’s not pretty.

So what do I do when the 3 H’s hit? (3 H’s – Hazy, Hot, & Humid, the weathermen here likes to say it). I make a batch of cookies. Yup, that’s right. I turn on the oven and bake. Not to worry, I have A/C in the kitchen so it actually was quite comfortable. I decided to make some Trail Mix Freezer Cookies.

Let me tell ya, this recipe make some BIG cookies. Two handed cookies. It was all Evan could do to hold on to this monster cookie, but he managed. These were almost like a cross between an oatmeal and a chocolate chip cookie (with M&M’s). Ummm does it get better than that?

I adapted these to fit Evan’s taste. Instead of the 2 cups of trail mix that the recipe calls for, we filled up 2 cups with M&M’s, mini chocolate chips and some extra oats. Next time I make these I’m using some trail mix, but these were for Evan and he wouldn’t have touched them if there were nuts of any kind in them.

I baked up a dozen of these and froze the rest of the dough for later use. It’ll be nice one chilly night in the Fall to pop a dozen in the oven. Wait let me say those beautiful words again….CHILLY…..FALL.

I can’t wait.

Trail Mix Cookies 1


Trail Mix Freezer Cookies
(makes about 27 three inch cookies)

recipe from William Sonoma Family Meals
Printable recipe
¾ cup all purpose flour
½ cup white whole wheat flour
1 teaspoon salt
1 teaspoon baking powder
½ teaspoon ground cinnamon
1 cup (2 sticks) unsalted butter, room temp
1 cup (packed) light brown sugar
¾ cup sugar
2 large eggs
1 teaspoon vanilla extract
2 cups old fashioned rolled oats
½ cup unsweetened coconut flakes
2 cups trail mix, chopped

Preheat the oven to 350.

Line 3 baking sheets with parchment. Mix the first 6 ingredients in a bowl. Using an electric mixer beat the butter and both sugars in a large bowl until fluffy. Add the eggs and vanilla, mix again until fluffy (1 to 2 minutes) Reduce the speed to low and beat in the flour mixture until just combined. Fold in the oats and coconut. Stir in the trail mix.

Using a 2-inch diameter ice cream scoop, drop the dough onto the sheets spacing them about 2 inches apart.

Bake until cookies are golden brown (about 13 minutes). Transfer to racks to cool.

Do ahead: For ready to bake dough, freeze the dough on sheets until firm and then transfer to resealable plastic bags. Keep frozen until ready to make. Arrange frozen cookies on parchment lined baking sheets and bake about 16 minutes. Transfer to rack to cool.

Friday, August 14, 2009

Muddy Buddie Cookies

Muddy Buddie Cookies CU cookie

I get lots of email from food sites. I will quickly scan through them and if nothing sparks my interest in the first, oh say, 20 seconds, the email goes right to the trash folder. That’s just the way it is. You have to grab me from the git go if you want me to take a second look.

The last email I got from Betty Crocker had a cookie spotlighted that actually made me stop and look for longer then 20 seconds. I even clicked on “get the recipe”. I read the recipe. Oh yeah. I was that intrigued. I decided I was going to make the recipe.

What it sounded like was a peanut butter cookie (from the pouch, yeah, yeah, you purists, don’t judge) that was covered in the same mixture that you make Muddy Buddies with. A peanut butter cookie covered in a peanutbuttery chocolate mixture and then rolled in powdered sugar!

I could envision my kids gobbling them up already.

Like Muddy Buddies these were a little messy to make. I must have rinsed my hands off a dozen times. The kids and my husband loved them. Peanut butter is not my thing so I only taste tested a bite of one and it was good.

They went quickly. Always a sign of a good cookie.

Muddy Buddie Cookies
Printable recipe
1 pouch (1lb, 1.5oz) Betty Crocker peanut butter cookie mix
3 tablespoons vegetable oil
1 tablespoon water
1 egg

Coating
1 cup semisweet chocolate chips
¼ cup butter
¼ cup peanut butter
1 teaspoon vanilla
1 ½ to 2 cups powdered sugar

Heat the oven to 375. In a large bowl, stir in the cookie mix, oil, water and eggs until soft dough forms.

Shape the dough into 1-inch balls. On an ungreased cookie sheet, place the balls 2 inches apart. Bake 8 to 10 minutes or until the edges are light golden brown. Cool 2 minutes; remove from cookie sheets to a cooling rack. Cool completely (about 15 minutes).

In a small microwaveable bowl, microwave the chocolate chips, butter and peanut butter uncovered on high 1 minutes and then in 30 second intervals if it’s not completely melted. Stir in the vanilla.

Place 1 ½ cups of powdered sugar in a 1 gallon resalable food storage plastic bag, set aside. Place 12 cooled cookies in a large bowl and pour 1/3 of the chocolate mixture over the cookies in the bowl. Using a rubber spatula, toss the cookies to gently coat. Place the cookies in the bag with the powdered sugar and seal the bag. (I only worked with 4 cookies at a time. I think 12 would have been too many to coat properly). Gently turn the bag to coat the cookies. Remove from the bag to a cooking rack to set. Repeat with 12 more cookies, adding powdered sugar to the bag as necessary.

Muddy Buddie Cookie with cupTS

Tuesday, August 11, 2009

Crunchy Apple & Grape Salad

I was craving something crunchy.

I was craving fruit.

Grapes and apples in particular.

I knew I had a crinkly recipe for an apple and grape salad hiding somewhere in one of my old recipe binders.

I dug it out, tweaked it a wee bit and made this:

Crunchy Apple and Grape Salad.

Crunchy Apple & Grape Salad1

This is one salad that will give your jaw a workout. I ate it for breakfast, then had some more for lunch, then I had it again for breakfast and lunch again the next day. Then I took a break, lol.

I love the crisp crunch you get in every bite and the bits of sweetness from the nuts, with a little hint of cinnamon thrown in there.

Feel free to take this and make it your own with the fruits you are craving.

Crunchy Apple & Grape Salad
Printable Recipe
Dressing
1 cup low fat vanilla yogurt
1/3 cup granulated sugar
1/3 cup brown sugar
1/2 cup mayonnaise
juice from 1/2 a lemon
½ teaspoon ground cinnamon

2 granny smith apples, cored and diced
2 red delicious apples, cored and diced (I used Gala, you can use any kind you like)
1 pear, cored and diced
1 stalk celery, diced
½ cup slivered almonds
½ cup walnuts, chopped
2 cups seedless grapes, halved

Mix all the dressing ingredients together in a medium size bowl. Stick this in the fridge while you make the salad.

Once you have everything chopped up, pour the dressing over and stir gently to coat.

Refrigerate any leftovers.

Crunchy Apple & Grape Salad in bowl

Saturday, August 8, 2009

Chocolate (Chip) Zucchini Bread

I have been making this zucchini bread for well over 20 years now. It grew out of necessity. I had a need to use up the zucchini avalanche that overtakes us every August. You think that I would finally learn that one zucchini plant is enough? No, not me. They sell them in those cute little 4 packs and it breaks my heart to throw away a perfectly good plant, so the extra plants I can’t give away, end up in the ground, cause I would feel bad if I had to banish them to the compost pile. The result of my plant sympathy is lots of zucchini.

There is some truth to the saying “I can’t give the stuff away”.

This is one of my favorite ways to use up some of the abundance. Chocolate Zucchini Bread, or in this version, Chocolate Chip Zucchini cause we all know everything is better with chocolate (or as my husband would say bacon, but I’m not quite sure bacon would work well in this recipe!).

Chocolate Zucchini Bread slice1

This is another recipe pulled from the archives. I don’t even peel the zucchini; I just give it a good scrub and shred it. I kinda like the little green flecks nestled into the moist chocolate cake. For years and years my kids would gobble this up, never thinking there was a vegetable in it! Oh the horror! Once they got older I confessed that the little green flecks were indeed zucchini and guess what, they still gobble it up. Every once in a while I will throw in a handful of chocolate chips or mini chips to make it extra chocolaty and gooey.

I often substitute applesauce for the oil in this cake and it still comes out great. This recipe makes two loaves.

I guarantee that even your most picky vegetable haters, will love this cake.

zucchini


Chocolate (Chip) Zucchini Bread
Printable recipe
3 eggs
1 cup vegetable oil
(you can substitute 1 cup of applesauce)
2 cups sugar
1 tablespoon vanilla
2 cups shredded zucchini
(you can peel them, I never do)
2 1/2 cups all purpose flour
½ cup baking cocoa
1 teaspoon salt
1 teaspoon baking soda
1 teaspoon cinnamon
¼ teaspoon baking powder
handful of chocolate chips or mini chips

In a mixing bowl, beat eggs, oil, sugar & vanilla. Stir in zucchini. Combine all the dry ingredients and add it to the zucchini mixture. Mix well. Pour into 2 greased loaf pans, or make muffins by filling the pans 2/3 full with batter.

Bake loaf pans at 350 for 1 hour or until bread tests done. Bake muffins at 350 for 15 minutes or until they test done.

Chocolate Zucchini Bread

Wednesday, August 5, 2009

Herbed Seafood Pasta

Herbed Seafood Pasta

Sometimes recipes are born out of necessity. Sometimes there are born out of the ingredients you have in your cupboards and freezer. This recipe was born out of the latter. As usual, I’m trying to clean out the freezers and make a little room in them. After a quick rummage through the garage freezer I found a bag of scallops that I had long forgot about. A peek into the kitchen freezer turned up some shrimp. What to make??

Pasta and seafood is a common combo round these parts. Seafood is reasonable here so we eat it quite often (when we don’t forget the hidden scallops). I added in some ricotta, some fresh herbs from the garden, a little cheese, some good olive oil and viola….Herbed Seafood Pasta.

This is the perfect summer dinner.
It’s not heavy and the fresh herbs and lemon really give it wonderful flavor.

Herbed Seafood Pasta
Printable recipe
1-pound twisty pasta
(you want something the cheeses can hold on to.
I used campanelle)
1 cup – part skim ricotta cheese
½ teaspoon grated lemon peel
½ cup loosely packed fresh parsley leaves, chopped*
½ cup loosely packed fresh basil leaves, chopped*
2 cups medium sized scallops
1 pound medium shrimp
2 tablespoons olive oil
½ cup grated Parmesan cheese

Heat a large covered pot with salted water and bring to a boil.
Cook the pasta until al dente.

While the pasta is cooking in a bowl combine the ricotta, feta and lemon peel. Add salt and pepper to taste.

Cook the shrimp and scallops in 2 tablespoons of olive oil on medium-high heat. They should only take 4 – 6 minutes to cook.
Watch them carefully so they don’t overcook.

Herbed Seafood Pasta CU

Reserve 1/3 cup of the pasta water.
Drain the pasta and return it to the pot. Stir the reserved cooking water into the ricotta mixture, toss with the pasta. Add in the chopped herbs, shrimp and scallops and Parmesan cheese. Top with additional Parmesan cheese if desired.

*To avoid confusion on the herbs – You don’t want ½ cup of chopped herbs for the final dish. You want to loosely pack your measuring cup with the parsley and basil and then chop the ½ cup of herbs. You won’t end up with a ½ cup of the herbs after they are chopped. Just wanted to clear that up, cause 1 full cup of chopped herbs in this dish would be a bit overkill.

Sunday, August 2, 2009

Super Quick Mini Tarts

Sweet Mini Tarts

It can’t get much easier than these.
Need an appetizer that won’t take you hours to make?
Want something even the kids could help you with?
Need it to come out of the oven in like, oh say, 10 minutes?
When I say super quick, I mean it.
Look no more.

Savory Tarts plate 1

These easy mini tarts can be made two ways…sweet or savory.
Make them with cream cheese and then top them with your favorite jam or preserves.
Not feeling super sweet, how about some savory tarts…goat cheese and caramelized onions? Ricotta and spinach?
Blue cheese and pear?
The possibilities are endless and with these little pre-made shells, they area breeze to make.

Sweet Tart

Super Quick Mini Tarts
Printable recipe
3 oz cream cheese or mild goat cheese
5 tablespoons of your favorite jam (for savory tarts think caramelized onions, or a savory jam)
30 Mini Fillo Shells
(Look for them in the freezer section.
I bought the Athens brand, they come 15 to a box @ $1.74 each here)

Preheat the oven to 350.
Fill each shell with ½ teaspoon of cream cheese or goat cheese.
Top with a ½ teaspoon of jam or other topping of your choice. Bake for 8 to 10 minutes, or until hot. Serve warm or room temperature.

I made 15 strawberry and blueberry sweet tarts and 15 carmalized onion and goat cheese savory tarts. I loved them all. I am a complete onion freak so I think I ate more of the onion ones, but they all were wonderful.

Savory tarts carm. onion