Monday, November 28, 2011

Special Sauce

Special Sauce

When I was a teenager, my friend Kathy and I would make this dip that we used to dunk our potato chips in. It was equal parts of ketchup and mayo mixed together. We thought we were culinary geniuses, really we did.

It was our special dip.

We also had another specialty....white rice and butter. Yea we were rebels in the kitchen I tell ya, but we were young and hungry so we did what we had to do. Most of the time we'd sleep over her Meme's house. While Meme was out line dancing with her friends, we'd call boys on the phone, write elaborate stories, listen to music and make white rice and dip.

Just a few months ago that dip popped into my head and I was telling my youngest son about it. He wanted to make it, so we did.   It was a hit. He happily dipped chips into it and it really brought back a flood of memories for me. I told Kathy about it via Facebook and I think it brought back from memories for her too.

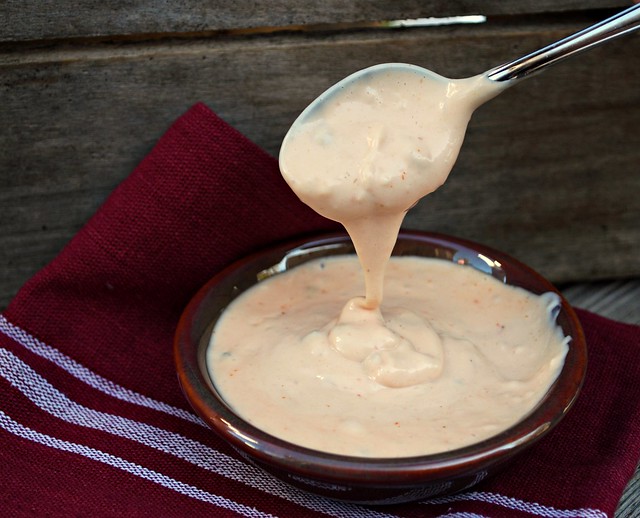
When I saw this recipe for Special Sauce, I just knew I had to make. My oldest son is a mayo and ketchup freak, so I knew this sauce would be something he would love.

I omitted the adobo sauce, cause as we all know, I am a wimp when it comes to heat. If you're not a wimp like me, please leave it in!

Special Sauce1

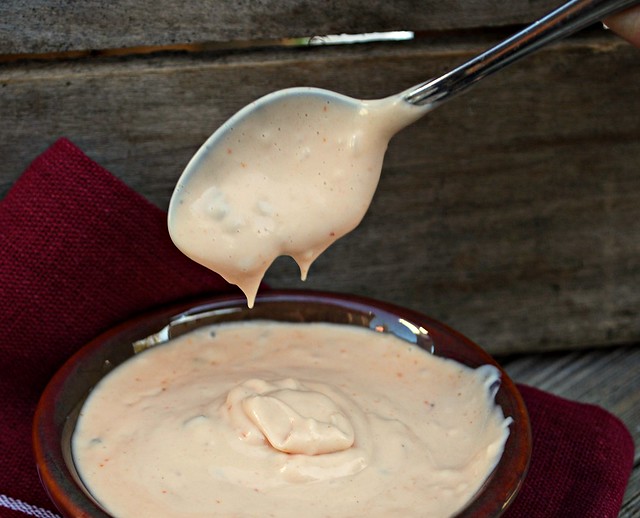
This is really like a thousand island dressing, but just a little better. We're already dunking everything in it.

Special Sauce
½ cup mayonnaise
2 tablespoons ketchup
1 tablespoon finely grated onion
1 tablespoon sweet or dill pickle relish
2 teaspoons adobo sauce from canned chipotle chilies in adobo
1/8 teaspoon celery salt
1/8 teaspoon kosher salt.

Combine all ingredients and serve on burgers or whatever you like!

Thursday, November 24, 2011

For each new morning with its light,
For rest and shelter of the night,
For health and food, love and friends,
For Everything thy goodness sends.


~ Ralph Waldo Emerson


thanks1

Tuesday, November 22, 2011

Winners!


Thanks to everyone who entered!
Here are the winners!

Angelica and Karie@The Hob!

Congrats ladies! Please use the contact me button off to the left to send me your address!

Wednesday, November 16, 2011

Swedish Almond Cake & a Giveaway or two!

Swedish Almond Cake 2jpg


This recipe is from my friend Ken's Mom, Marion.

I first time I had this cake was probably more than 15 years ago.

You do need a special pan to bake it, which is why I had never blogged it before until now, but this cake is too good not to share. Marion is Swedish, so this is the real thing people. I just love it. It's one of my most favorite cakes. It's not fluffy or frosted, it doesn't have a page full of ingredients, it's just simple good cake with a fantastic almond flavor.

The pan I bake this in is called a Half Roll Bake pan. My friend Eva (Ken's wife) bought me ones ages ago. Mine is marked on the bottom "Made in West Germany". Huh? Doesn't sound too Swedish to me!

Swedish Almond Cake 1jpg

I had never seen another pan like it until last week so I picked up 2 to give away, cause I think a few more people should be able to experience this delicious cake.

Here's the recipe. Scroll down for the giveaway(s)

Swedish Almond Cake
recipe from Marion Bird
Spray a half roll pan with Bakers Joy or use cooking spray. I like Bakers Joy cause the cake never sticks.

In a large bowl beat:
1 1/4 cups sugar
1 egg
1 1/2 teaspoons PURE almond extract (Imitation just won't do in this recipe)
2/3 cup milk

Beat until combined. Then add in:
1 1/4 cups all purpose flour
1/2 teaspoon baking powder

Again, beat until combined, scrapping up any flour that sticks to the side of the bowl.

Finally add in:
1 stick melted butter.

Mix again.

If you'd like the top to be almond covered (I think it looks pretty) then sprinkle some slivered almonds into the bottom of the pan. Pour in the batter and carefully smooth the top. Bake at 350 for 40 - 50 minutes of until the edges are nicely browned and the cake tests done. It will puff up over the top of the pan, don't worry.

Cool completely in the pan. If you don't, the cake will break while you are trying to get it out.

Invert onto a plate, sprinkle with powered sugar and serve!
_______________________________________________________________________________
The Giveaways!

So since the baking season is upon us, I put together 2 baking gifts for you to win. Both contain the same items, but one also includes a 9 cup brownie pan. You get 9 perfect little individual brownies from one pan. Pretty cool huh?
So what up for grabs?

  • The half roll bake pan
  • Wilton green & white sparkling sugar
  • Trader Joe's (Baker Joe's in this case) Cocoa Pearls
  • Cupcake Plunger - you can easily make filled cupcakes or muffins.


    giveaway Here's all the loot! Remember one person will win what is pictured above. Another will be chosen for the additional items. So here's the brownie pan..... giveaway3 And here is the half roll pan..... giveaway 4 The A cupcake plunger. I picked one up for myself. I need to get plunging! giveaway2 
     And lastly, the Wilton sprinkles and Cocoa pearls. giveaway 1 
     TO ENTER: Leave me a comment answering this question....... 
    What is your favorite holiday cookie?
    Please, please, please, I can't stress this enough.....LEAVE AN EMAIL ADDRESS if you don't have a blog. If you don't leave an address, then I 'll just pick another winner, so please don't forget! 2 winner will be drawn on Monday, November 21st! If you're a follower, let me know and I'll throw in another chance for you! Good Luck!

Monday, November 14, 2011

How to roast garlic. Simple and easy.

Garlic 1

I grow my own garlic every year.

After is harvested in the fall, it hangs from one of the rafters in the garage.

I love that I can grab a pair of scissors and just snip away at whatever I need.

We are a garlic lovin' family. Some people might think I love it a little too much. I can go overboard with it at times.

I remember saying to John one day that I was so happy that he loved it to cause I honestly don't think I could have married anyone who didn't like it. I would have to compromise my cooking too much. I really can't live without it. No joke.

So we have a lot of garlic, and we use it all the time.

One of my favorite ways is to roast it. Roasting garlic makes it so creamy and nutty that you will be tempted to hold a whole head over your mouth and just squeeze out every clove directly into your pie hole (or garlic hole in this case). Wait, maybe that's just me?

Anyway roasting garlic is super easy and so delicious. If you've never done it....YOU NEED TO!

Here's how I do it.

Get one or two heads of garlic. Try and pick heads that are on the larger size. I always roast at least two at a time.

Pull away the outer papery layers. Don't peel them completely. You want the cloves inside to say together. Then chop off a quarter of a section with a sharp knife. You want to cut off just the tips of the cloves.

Garlic 2

Then get a double layer of foil and place the garlic in the middle. You want enough foil to wrap it up tightly. Now drizzle each clove with olive oil.

Garlic 3

Wrap the heads up and seal the foil tightly.

Garlic 4

I use my toaster oven to roast my garlic. You certainly can use your oven. Heat to 400 and roast for 35 - 45 minutes. Times vary depending on how big your garlic is. Mine are very large.

Open the foil up carefully in case there is some steam trapped inside. Now poke it with a knife to see if the cloves are all mushy and creamy. If they are...CONGRATS...you just successfully roasted garlic, if they aren't stick them back in for a few more minutes.

Garlic 5

Once you can handle the garlic, just squeeze out the cloves. You just spread it on bread, you can add it to soups, heck there really are endless uses for it.

One of our favorite ways to eat it is as a dipping sauce. We heat up some good olive oil on low in a sauce pan loaded with cloves. As soon as the oil is warm, we pour it into dipping bowls. Grab a hunk of bread and start dipping.

It's one of my favorite ways to eat it.

Now go make some roasted garlic!

Friday, November 11, 2011

Almond Joy Brownie Bites

Almond Joy Brownie Bites

I know Halloween just past.

I know Thanksgiving is just around the corner. Yeah!

I realize that some of you may even have candy leftover! How'd you manage that? Oh the willpower you must have!

Well we are plumb outta candy at our house. With teenage boys, and teenage boys friends visiting our candy bowl is pretty near empty. Whoppers and black licorice seem to be the last to go.

In homage to my favorite candy bar the Almond Joy, I give you Almond Joy Brownie Bite.

Brownie base, crunchy coconut topping, melted chocolate and almonds.

These little suckers are filling and this recipe makes 24 of them. A recipe with lots to share. I like that.

Almond Joy Brownie Bites
Makes 24
Adapted from a recipe at Flour Me with Love
1 box (family size) chocolate fudge brownie mix, plus ingredients for making
1 (14oz) can sweetened condensed milk
1 (14oz) bag coconut
¼ cup milk
1 teaspoon vanilla extract
1 cup chocolate chips
¼ cup crushed almonds

Oven to 350.

Line a cupcake pan with paper liners. Don’t skip this step!

Prepare the brownies according to the package directions. Pour the batter ½ way up the cupcake liners. Bake for 12 minutes.

While the brownies are baking, mix the coconut, sweetened condensed milk, milk & vanilla extract together.

Remove the brownies from the oven and spoon on about a teaspoon full of the sweetened coconut. Return to the oven for an additional 14 – 16 minutes.

Remove and allow to cool completely. Melt the chocolate chips on low power in the microwave for 1 - 2 minutes. Stirring every 30 seconds. Drizzle on the chocolate and top with chopped almonds.

Almond Joy Brownie Bites 2

Friday, November 4, 2011

Pumpkin Crunch Cake

Pumpkin Crunch Cake 1


Did you hear that there is supposed to be a pumpkin storage this year?
There was talk about it, but when I went to the store, I saw plenty of pumpkin on the shelves. I do a lot of my shopping at BJ’s Wholesale Club, and they sell pumpkin by the 3 pack. I bought two three packs. Then I went to the grocery store and I saw the 15oz size cans of pumpkin for under a dollar, so I bought 3 more. I’m so ready for all things pumpkin.

I found this cake on my beloved Pinterest. It’s also called a “dump cake” because basically you are throwing everything in the dish and baking it. I think crunch cake sounds nicer than dump cake don’t you?

If you like pumpkin pie with a crunchy topping, this is a dessert for you. The bottom layer is like creamy pumpkin pie, and the top layer is nutty and crunchy. I used spice cake for this recipe, but yellow, butter or even white would work too.

It literally took minutes to throw together.

Pumpkin Crunch Cake 3

Pumpkin Crunch Cake
15 oz can pumpkin; or 2 cups fresh pumpkin puree
1-12 oz can evaporated milk
1 1/2 cups sugar
3 eggs
1 teaspoon cinnamon
1 box cake mix (I used spice cake, but yellow, butter or white would work too)
1 cup melted butter (yup that’s 2 sticks)
1 cup chopped walnuts or pecans (optional)

Mix the pumpkin, evaporated milk, sugar, eggs, and cinnamon.

Spread mixture evenly in a lightly greased 9 x 13 baking pan.

Sprinkle dry cake mix evenly over pumpkin mixture. Sprinkle the nuts over the top of the cake mix. Pour the melted butter evenly over the top of everything. Do not stir.

Bake at 350 degrees for 50 to 60 minutes or until top is browned. Let cool before serving. Refrigerate leftovers.