Tuesday, December 23, 2014

Merry Christmas!

December 2014 12

Well it's Christmas time again.

Thank you for checking in with me and for all your heartfelt comments, emails and messages to me over the past year. I might not have as many followers as some blogs, but I think I have the best followers! So I thank you for that.

I'll be busy in the kitchen for the next few days but I wanted to take a moment to wish you all the happiest of holidays. I hope it's filled with good food, laughter and the people you cherish.

Merry Christmas!
Lisa

Monday, December 15, 2014

Soft Molasses Cookies

Soft Molasses Cookies 1

How;s everyone doing with their Christmas preparation? I'm just about finished.

I'm an early shopper so I was done way back in October. I spend December wrapping and baking and working on my Christmas menu. Yesterday I cooked and baked all morning and then I wrapped up the last of my presents. I look forward to a lazy few weeks before Christmas. I stressed myself out for too many years and ended up sick every holiday until I vowed that I wouldn't let it get to me anymore, so I shop early, I plan ahead, we keep the buying to a minumum, and really try and enjoy the season. I hope you all do the same!

Now on to cookies!

We all have that one cookie or dessert that just screams Christmas for us. The one you have to make or it's just not Christmas without it.

Well here is that cookie for me. Soft Molasses Cookies.

I blogged about these ages ago. I've been making them for years and years. They are always on my Christmas cookie list.

The whole house smells like Christmas when you make these. Cinnamon, cloves, ginger.....it just makes the whole room come alive.

I have a few friend who have added these to their "must make" list and it just warms my heart to know that they have become a part of their Christmas tradition too.

Soft Molasses Cookies 3

Soft Molasses Cookies
recipe from Lisa@The Cutting Edge of Ordinary
Printable recipe
1/2 cup butter, softened
1/2 cup vegetable shortening
1 1/2 cups sugar
1/2 cup molasses
2 eggs, lightly beaten
4 cups flour
1/2 tea. salt
2 1/4 teaspoons baking soda
2 1/4 teaspoons ground ginger
1 1/2 teaspoons ground cloves
1 1/2 teaspoons ground cinnamon
sugar for rolling ball into

In a large bowl, cream together the butter, shortening, and sugar until light and fluffy. Beat in the molasses and eggs.

In another bowl combine flour, salt, baking powder and spices. Blend thoroughly with a wire whisk. Gradually mix flour mixture with the creamed mixture until dough is blended and smooth. Roll dough into balls about the size of a walnut, roll into sugar, and place on greased cookie sheet or use parchment. I used parchment and they came out perfectly. Bake at 350 for 10 minutes. DO NOT OVERBAKE! You really want to take these out when they look underdone. Trust me they will set up perfectly.

Cool on wire rack and store in tightly covered container.

Tuesday, November 25, 2014

Old Fashioned Molasses Cake

Molasses Cake

So Turkey Day is fast approaching and I know many of you have your menus done and you're desserts planned already but I can't help but share this delicious little cake with you now.

I love molasses. I love the smell of it and the taste of it. It instantly makes me think of Thanksgiving and Christmas.

This is the perfect little cake to whip up on a whim. It's like the baby bear of cakes. Not too big, not too little, just right. All it requires is a few bowls and few minutes and you have a little cake to enjoy with a warm cuppa tea on a chilly afternoon. If you love gingerbread, you'll love this!

I've been watching my sugar, so I used Stevia in place of the sugar and sugar free whipped topping. It tasted plenty sweet to me!

Molasses Cake2

Old Fashioned Molasses Cake
Recipe from Taste of Home
Printable recipe.
2 tablespoons reduced-fat butter, softened
1/4 cup sugar
1 egg
1/2 cup molasses
1 cup all-purpose flour
1 teaspoon baking soda
1/4 teaspoon ground ginger
1/4 teaspoon ground cinnamon
1/8 teaspoon salt
1/2 cup hot water
9 tablespoons fat-free or sugar free whipped topping

In a small bowl, beat butter and sugar until crumbly, about 2 minutes. Beat in egg. Beat in molasses. Combine the flour, baking soda, ginger, cinnamon and salt; add to butter mixture alternately
with water, mixing well after each addition.

Transfer to a 9-in. square baking pan coated with cooking spray. Bake at 350° for 25-30 minutes or until a toothpick inserted near the center comes out clean. Cool on a wire rack. Cut into squares;
garnish with whipped topping. Yield: 9 servings.

Nutritional Information: (based on using sugar, not a sugar substitute) 1 piece with 1 tablespoon whipped topping equals 148 calories, 2 g fat (1 g saturated fat), 28 mg cholesterol, 205 mg sodium, 30 g carbohydrate, trace fiber, 2 g protein. Diabetic Exchanges: 2 starch, 1/2 fat.

Friday, November 14, 2014

Creamy Veggie Casserole

Creamy Veggie Casserole 4

I got some powerful Thanksgiving mojo going on lately. The internet is all abuzz with talk of turkeys and Thanksgiving sides. It's everywhere I tell ya.

I get excited about Thanksgiving. I love that it's a holiday where gifts are not involved. In my house it's all about food, football and naps.

I host Thanksgiving dinner every year. I love the weeks building up to Thanksgiving. I love planning my menu and making my shopping lists. I just love everything about it.

While I do stick to a few tried and true recipes....like my Roasted Parmesan Creamed Onions....just take a look at these beauties....

Parmean & Cream Baked Onions

They are out of this world! You can get the recipe here.....I do venture out and try some new recipes. I found this recipe back in September and let me tell you, it's a winner.

I made this for a party we hosted when my in-laws were here from Ohio and everyone raved about it. I doubled the recipe and I'm glad I did cause it was a huge hit. It will now grace my Thanksgiving table.

I used a broccoli and cauliflower combination, but feel free to chose whatever veggies you like.

Creamy Veggie Casserole 2
Creamy Veggie Casserole
adapted from a recipe at The Gunny Sack
Printable recipe
2 – 14oz bags of mixed veggies (broccoli/cauliflower/carrots or any combination of these work well)
¼ cup butter
2 tablespoons flour
Small diced onion
1 cup milk
4oz flavored cream cheese (garden veggie or chive work well)
4oz shredded cheddar cheese
Salt & pepper
½ cup French Fried Onions

Cook the veggies (the microwave works fine for this) and place them in a large bowl to cool a bit.  I squeeze any excess water out of them at this point too. Place butter and onion in pan and cook over medium high heat until slightly tender (about 3 minutes). Add in the flour and milk and whisk until thickened. Add in the cream cheese and stir until smooth. Pour the cream sauce over the veggies. Add in the shredded cheese and stir to combine. Pour into a greased deep dish pie pan and bake at 350 for 20 –25 minutes or until hot and bubbly. Sprinkle with French Fried onions and place back in the oven for 5 minutes.


* If doubling the recipe, place in a 9x13 inch pan and add about 5 - 10 extra minutes to the cooking time.

Wednesday, November 12, 2014

Apple Fritter Bread & the cookbook winners!

Apple Fritter Bread 3

What is is with me and the whole apple fritter thing? Really. I'm just apple fritter crazy lately.

Just ask my family how many times I've said "fritter batter, fritter batter, fritter batter". Once I start I can't stop, lol. You know you just tried it!

I've been busy getting my Thanksgiving menu ready and my Apple Fritter Cake is on that menu. It was such a hugely popular cake that I decided to look for other "apple fritter" recipe. I turned to Pinterest as I do so many times and this beauty popped up.

It only uses 2 apples so you don't have to sit and peel and chop a while buncha apples. It came together really quickly. I even had my sous chef Mitchell to help me stir and mix this one. Thanks Mitchell!

Apple Fritter Bread 2

We loved it. It produces a moist and tender cake. Perfect with a cup of coffee or tea if you're like me!

I'll be posting a few of my favorite Thanksgiving sides in the next week. I've got a fantastic Creamy Veggie Casserole coming your way. It makes frozen veggies taste amazing!

Apple Fritter Bread

Apple Fritter Bread
recipe from The Baking Chocola Tess
Printable recipe
1/3 cup light brown sugar
1 teaspoon ground cinnamon
2/3 cup white sugar
1/2 cup butter, softened
2 eggs
1 1/2 teaspoons vanilla extract
1 1/2 cups all-purpose flour
1 3/4 teaspoons baking powder
1/2 cup milk
2 apples, peeled and chopped (any kind), mixed with 2 tablespoons granulated sugar and 1 teaspoon cinnamon

For the glaze:
1/2 cup confectioners sugar
2 - 3 tablespoons of milk or maple sugar

Preheat oven to 350 degrees. Use a 9x5-inch loaf pan and spray with non-stick spray or line with parchment and spray with non-stick spray for easy release.

Mix brown sugar and cinnamon together in a bowl. Set aside. In another medium-sized bowl, beat white sugar and butter together using an electric mixer until smooth and creamy. Beat in eggs, 1 at a time, add in vanilla. Combine & whisk flour and baking powder together in another bowl and add into creamed butter mixture and stir until blended. Mix milk into batter until smooth. Pour half the batter into the prepared loaf pan; add half the apples and half the brown sugar/cinnamon mixture. Lightly pat apple mixture into batter. Pour the remaining batter over apple layer and top with remaining apples and brown sugar/cinnamon mixture. Lightly pat apples into batter; swirl the top a little using knife or spoon. Bake in the preheated oven until a toothpick inserted in the center of the loaf comes out clean, approximately 50-60 minutes. Let cool for 15 minutes before adding the glaze.

For the glaze
Add a half cup of confectioners sugar in a bowl. I like to add pure maple syrup to my sugar for a mapley flavor. You can also use milk. Just add enough to get it to the right consistency for drizzling.

Cookbook winners!

I have to tell you all, based on the comments, stuffing and mashed taters seem to be high on your lists of favorite sides!

And the winners of the autographed copies of Callie's Biscuits and Southern Traditions!

Lynda Herman who said

I love it all, but the green bean casserole might be my favorite!

Tracy McGinty who said

Oyster Dressing! 

Congratulations ladies. Please contact me with your mailing addresses!

Wednesday, November 5, 2014

Callie's Biscuits and Southern Traditions Cook Book(s) giveaway!

Have you ever fallen in love with a cook book as soon as you opened it? Like you're standing in the store and you start to thumb through it and you just start swooning page after page?

That's what happened to me with this book.

First of all it's a beautiful book and so well written. I don't like stuffy cookbooks. I like cookbooks that read like....well...a book. I like a little story, I like beautiful pictures, I like to see the photo and have it make me say "yes, I want to make that...NOW!".

This book did that for me. I want to make so many recipe from this book! Just the biscuit section alone had me and there is so, so much more than biscuits!

I had never heard of Callie's Biscuits before but I'm a biscuit lover from way back and this woman is a Southern biscuit baker so come on....how could you go wrong?? It's not just a book of biscuits, oh no. It's filled with amazing recipes.....here's a little about Carrie:

Carrie Morey started her company, Callie’s Charleston Biscuits, with a simple goal: She wanted to make her mother Callie’s delicious biscuits—unbelievably tender, buttery creations—accessible across the country. Carrie’s handmade biscuits combine unique, brilliant flavors—sharp cheddar with fresh chives, cracked black pepper with cream cheese and green onions, and cinnamon biscuits so buttery they melt in your mouth. The biscuits are an iconic Southern staple, but they are just the beginning.

Now Carrie Morey shares her modern approach to traditional Southern cooking in more than one hundred recipes that pair classic Lowcountry fare with surprising twists, for incredible results. Carrie guides you through the foundational techniques of Southern cooking to reveal how she developed her new takes on favorite heritage dishes and how to take the fuss and huge time investment out of traditional preparations. She shares skillet recipes passed down through generations, including Lemon Zest Cast-Iron Fried Shrimp, Macaroni Pie, and Cast-Iron Herb Lamb Chops. She gives roasting and slow-cooking techniques for Beef Stew with Herbed Sour Cream, Spicy Black-Eyed Pea Salad, and Roasted Pimento Cheese Chicken. Her DILLicious Cucumber Sandwiches, BBQ Chicken Salad Biscuits, Fiery Pimento Cheese Deviled Eggs, and Summer Crab Salad will make any picnic or casual get-together a true Southern affair. And her desserts are to die for: Mama’s Sour Cream Banana Pudding, Alex’s Chocolate Chess Pie (so good that Carrie credits the pie for sparking her and her husband’s whirlwind romance), and Blueberry and Peach Cobbler finish your meal on the perfect sweet note.

Carrie also shares her family stories behind each recipe—growing up in Charleston, learning to cook from great Southern matriarchs, and founding and growing her business. Fill your kitchen with the comforting aroma of home-cooked goodness with Callie’s Biscuits and Southern Traditions.

This giveaway is a little thank you to all of you. I'm ever so grateful that you stop by and visit my little corner of the internet. I'm touched by every comment, every share, every kind word that passes my way. This is my way of showing how much you all mean to me. Without you guys writing and photographing and maintaining this blog really wouldn't be much fun, so thank you, thank you, thank you from the bottom of my heart.

callie

I'm sure many of you are planning your Thanksgiving menu. This book will arrive in time for you to plan some delicious recipes!
I loved this book so much that I'm going to give away 2 copies to 2 lucky winners, and get this...they are autographed copies!!

We all need to get our biscuit on don't we?


callie 2

How to enter:

I'm going to make this simple. You don't need to go visit me on Facebook (although if you're not already a fan I'd sure appreciate it!) You don't need to enter, or follow a bunch of different blogs, or click on some widgety thing, just leave me a comment, here or on Facebook answering the question:

What is your favorite Thanksgiving side?

Contest ends Wednesday, November 12th, 2014!
Good Luck Ya'll - see I was speaking Southern right there!


Friday, October 31, 2014

Chicken and Rice Casserole

Chicken and Rice Casserole

Happy Halloween!

I can't wait to see the little one's lining up at the door tonight. I have a sneaking suspicion that I'm going to see a lot of Elsa's and Olaf's tonight!

I loved trampsing around the neighborhood when the kids were little, but I missed answering the door. Now that the kids are big and don't trick or treat anymore I miss walking around the neighborhood!

It's cooled down quite a bit here in New England so I'm breaking out the casseroles.

I just threw this together , much like I do with my soups. I did take note of what I used to make this so I could share it with you all tough. More than once I've made one of my "throw this and that in" casseroles and forget to write down exactly what I did. This time I remembered.

I used 3 very large chicken breasts when I make this but you could most certainly use the meat from a rotisserie chicken in a pinch.

Chicken and Rice Casserole 2

Chicken and Rice Casserole
recipe from Lisa@The Cutting Edge of Ordinary
Printable recipe
2 - 8oz boxes Uncle Ben's Wild Rice cooked according to package directions * see note
1/4 cup butter
1/4 cup flour
2 cups milk
3 to 4 cups completely cooked, cubed chicken (you can use a rotisserie chicken if you'd like!)
2 Tablespoons olive oil
1 small onion, chopped fine
2 large carrots, chopped
1 large stalk celery, chopped fine
3 cloves garlic, minced
2 cups grated sharp cheddar cheese

Melt butter in a Dutch oven or large, heavy bottomed saucepan. Blend in flour with a wire whisk, stirring constantly, cook for 1 or 2 minutes or until the flour turns golden. Gradually stir in the milk. Cook over medium heat, stirring constantly, until thickened. Remove from heat.

Sauté the onion, carrots, celery in the olive oil until tender. Add in the garlic during the last few minutes.

Add the sauce, rice and chicken to the veggie mixture and stir to combine. Spread in an a greased 9 x 13 baking dish. Sprinkle the shredded cheese evenly over rice mixture. . Bake uncovered for 30 to 45 minutes or until cheese is melted and bubbly. Let sit for 10 minutes before serving.


Note* See the note on the bottom of the Uncle Ben's box when you are making 2 boxes at once. There are instructions for making 2 boxes.

Tuesday, October 28, 2014

Easy Apple Pastry Puff

Easy Apple  Puff Pastry

I could eat stuff made with apples every day. I really could.

Every year we go to the same apple orchard to pick. I'm very loyal to my local farmers. I've been picking blueberries at Macombers Farm in Rhode Island for over 20 years and I can proudly say the same thing about Sunset Orchards in Scituate, RI too. It's the only place I go to get my apples.

It's a yearly tradition that we have. My friends and I go pick, they have a coffee, I get some cider, we pick a whole buncha apples and then I make apple treats. The kids would all go with us up until a few years ago when it became uncool to be seen with your parents. The kids are now 17, 18 and 19 so they want no part of apple picking anymore. They'll come back one day. I keep telling them this. I'll be patient.

There is nothing like a fresh picked apple. Unless you've had one you wouldn't even know what you were missing. They are so crisp and so fresh. I love baking with them because I don't have to add much sugar. The sweetness of the apples really shine through.

So I made some apple treats over the last month and I'm now down to the last few apples. I just threw this recipe together to make something sweet for the Sunday football games. It was super easy to make. I always have a package of puff pastry in my freezer to whip up goodies. I also make a Ham & Cheese in Puff Pastry savory appetizers that also takes just minutes to make. Puff Pastry to the rescue!


Easy Apple  Puff Pastry 1

Apple Puff Pastry
recipe from Lisa@ The Cutting Edge of Ordinary
Printable recipe
1 sheet puff pastry, thawed
4 medium apples, peeled and cored and sliced thin
4 tablespoons of butter
1/3 cup lightly packed brown sugar (less if your apples are really sweet)
1/2 teaspoon cinnamon
1 egg, beaten (for egg wash)
Coarse sugar for sprinkling

In a skillet melt the butter and toss in the apples. Cook for about 5 minutes, just until they become a little soft. Add in the brown sugar and cinnamon and cook for another 5 minutes until the apples get all gooey and caramelized. You don't want them to be mush so don't over cook! Take off the heat to cool a bit.

Preheat the oven to 400. Line a baking sheet with parchment. Place 1 sheet of the puff pastry on the baking sheet and roll it out just a little. You can do it right in the pan or on the parchment on your counter. You're not going to double it in size of anything, just make it a wee bit bigger. Make sure to do this on a piece of parchment or you will have a heck of a time moving it!

Place the apples to the left hand side of the puff pastry leaving a half inch of space from the edge. Fold over the pastry and use a fork to "pinch" the edges together all the way around the pastry. Brush the top with the egg wash and cut some slits in the top to vent it. Sprinkle with sugar and bake for 15 - 18 minutes or until golden brown.

Friday, October 24, 2014

Pumpkin Cream Cheese Chocolate Chip Bread - makes 2 loaves!


Arcadia - pond

Arcadia - picnic table

Arcadia - lone leaf

I have a favorite month.

It's October. That shouldn't come as a shock to most of you who know me. I love October for all sorts of reason. I celebrate my anniversary, one of my son's birthdays, my Dad's birthday and several relatives birthday in October. I wait every year to take vacation in October. It's stunningly beautiful here in Rhode Island.

It rains color here. It drips magic from the trees. Every ordinary road is brought to life, every sidewalk is a kaleidoscope of yellows and reds and orange. It just makes everything better and more beautiful.

It brings to life the baker in me.

Give me something to stir or mix or to add chocolate chips in and I'm a happy camper. Let me warm my kitchen with the oven. Let me hear the boys come tumbling down the stairs asking "what's that smell?" and then "when can we eat it?".

Pumpkin Cream Cheese Chocolate Chip Bread 1


For me it's what I hope memories are made of. I hope they always remember me in the kitchen and lots of good stuff coming from the oven.

This Pumpkin Cream Cheese Chocolate Chip Bread is some good stuff. This recipe makes 2 loaves, so you can keep one and spread the Autumn love by sharing the other.


Pumpkin Cream Cheese Chocolate Chip Bread


Pumpkin Cream Cheese Chocolate Chip Bread - makes two loaves!
slightly adapted from a recipe at Your Cup of Cakes
Printable recipe
1 can (15 oz) pumpkin (not pumpkin pie filling)
4 eggs
1 cup applesauce
2/3 cup milk
2 tsp. vanilla extract
2 cups sugar
3 1/2 cups flour
2 teaspoons baking soda
1 1/2 teaspoons salt
2 teaspoons cinnamon
1 teaspoon nutmeg
1/2 teaspoon ginger
1 1/2 cups mini chocolate chips.

Cream Cheese Filling:
12 oz. cream cheese (1 block and one ½ block), room temperature
6 tablespoons sugar
1 egg, room temperature
1 Tablespoon milk


Preheat oven to 350 degrees and grease 2 loaf pans. I always line mine with parchment too, but you don’t have it. In a large bowl, combine pumpkin, eggs, vegetable oil, applesauce, milk, vanilla extract and sugar.

In a separate bowl sift flour, baking soda, salt, cinnamon, nutmeg and ginger together. Add the flour mixture to the pumpkin mix and fold in until just combined. Stir in the chocolate chips.

For the filling: Beat cream cheese, sugar, egg and milk together until smooth.

Pour about 2 inches of batter into the bottom of both loaf pans, spread to cover the bottom. Spoon the cream cheese filling over the batter and gently spread it on top. Take a butter knife and swirl the cream cheese mixture into the bottom batter. Top each pan with the remaining batter. Sprinkle with additional chocolate chips if you’d like. Bake for 60-80 minutes or until a knife inserted into the center comes out clean.

Monday, October 20, 2014

Honey BBQ Sticky Wings

Honey BBQ Wings

It's was blustery and chilly over the weekend. The leaves were flying like snow in the yard. It was just the kind of weekend I love. Every time the back door opened I'd have a pile of leaves in the breezeway. I love that I need to wear my socks in the house now and that it gets just chilly enough for me to have to put on a sweater and dig out my slippers. I was made for this weather.

This is my favorite time of year to cook and bake too. Who wants to turn the oven on in the summer? Not me. This time of year it warms the kitchen up nicely. Makes me happy.

I make wings yesterday. Football food. There will be a lot of football food heading your way. There is something deeply satisfying about a big ole pan of wings. My guys love them. I'm not as big of a wings fan as they are. I don't do spicy so the whole buffalo wings thing is lost on me. I do like the sticky, gooey wings though.

I loved these wings. I made up the recipe on a whim. Looking at a few recipes on the internet and then giving them my own spin. I didn't want anything complicated. I just wanted some "gooey I need 3 or 4 napkins to eat these" kinda wings and that's what I got!

This is a very simple recipe. The hardest part was waiting for the wings to cool enough to eat them!!

Honey BBQ Wings 2

Honey BBQ Sticky Wings
recipe from Lisa @The Cutting Edge of Ordinary
Printable recipe
4 pounds of wings
1 cup of your favorite BBQ sauce (we like Sweet Baby Ray's)
1/2 cup honey
2 tablespoons ketchup

Oven to 375. On a parchment or foil lined baking sheet bake the wings for 25 - 35 minutes, or until wings are cooked through and juices run clear. Turn the oven up to 400.

Combine all the ingredients in a large bowl (you want a large bowl to toss them around in). Toss a few wings at a time in the bowl and coat them with the sauce. Return them to the oven for 5 - 10 more minutes or until they are bubbly and crispy. I turned on the broiler for the last 5 minutes of cooking. Devour!

Friday, October 17, 2014

Apple Fritter Cake

Apple Fritter Cake 2

Look at me. I go from being a bad blogger to a blogger who is posting during her vacation. Pretty good huh? We are on vacation this. We just took the week off to work around the house, get the yard prepped for winter, plant the garlic, get everything in storage before the snow comes. It's a yearly event and it's not that much fun but being home and doing it during the middle of the week makes it a little easier.

We haven't been all work and no play, no sirree. We had a birthday party for my youngest son who turned 18. *sniff*. Where have the years gone? We did some Christmas shopping and we even took it easy and lazied about a bit. I've been doing a lot of cooking at baking. My word, if I was home everyday I think everyone in the house would pack on the pounds. I just can't stop! I am over the moon to share this recipe with you all.

This cake, this cake, this cake! I haven't been this excited about a cake in a long time.

I was browsing Pinterest looking for a different apple recipe and I came across this beauty. It just sounded good. The best part...it tasted even better. My mother-in-law made it and my father-in-law upon first bite declared it "the best cake he's ever had". My friend had a piece and after the first bite she was oooing and ahhh-ing. It is that good!

This cake is amazing! Like, I want to make it every week amazing! The moist soft cake, the sweet apples, that glaze! I really can't say enough about it. I already know it's going to be my go-to cake. AMAZING!

I only adapted it very slightly from the original. I added in some pure maple syrup to the glaze and it just sent it over the top. Apple and maple are just a perfect combination, but if you'd prefer it without the maple, just add in another 2 tablespoons of milk.

I'm adding this to my "must make" list for Thanksgiving!

Apple Fritter Cake
slightly adapted from The Domestic Doozie
Printable recipe
For the batter:
3 cups of flour
1/4 teaspoon salt
1 cup of sugar
4 teaspoons baking powder
1 1/2 cup milk
2 eggs
2 teaspoons vanilla
1/2 cup butter, melted

6 small or 4 large apples cored, peeled and diced into small pieces

For the topping:
1 cup of butter, softened
1 cup of brown sugar
2 tbsp. flour
1 tablespoon cinnamon

For the glaze:
2 cups of powdered sugar
3 tablespoons milk
2 tablespoons real maple syrup
1 teaspoon. vanilla

Start by mixing all the ingredients for the batter (except the butter) together in a bowl. Once combined, carefully pour in the melted butter. If you do this part with your mixer at a high speed it will splash everywhere. So slow is best. Pour the batter into a greased 9x13 pan, any smaller and it will overflow while baking. Evenly distribute the apples over the top of the batter.

In a separate bowl mix together the topping, it will be thick so do your best to drop scoops of it evenly over the apples. I just plopped them all over the top of the apples. It will spread while it bakes.

Bake at 350 for 40 - 45 minutes. You want the apples to become tender and the cake to get golden brown. If the top is getting too brown you can always tent it with foil. Once baked let sit for 20 minutes and then pour the glaze all over the cake.

Thursday, October 2, 2014

Easy Enchilada Casserole


I had a hankering for Mexican. That doesn’t happen very often with me. I’m not really into Mexican food. Maybe it’s because I’m such a wuss when it comes to heat. I can barely handle the mild sauces so imagine me ordering at a Mexican restaurant….”no sauce please cause even your mild is too hot for me”. Yes I’m baby when it comes to heat. I can handle mild enchilada sauce though and I even had a can in my cupboard so I decided to whip this up for dinner.

Let me tell you, there are loads of Enchilada casseroles all over the Internet. Loads I tell ya. I looked a few over and decided that I could just whip up my own. So that’s what I did.

I made this very basic because I have a picky eater at home. You can certainly add in whatever you like….black olives, green chilies, beans, etc. The next time I make this I might have to make sure Evan isn’t home to eat it so I can be a bit more adventurous.

I didn’t measure out most of the ingredients. I just eyed the sour cream. Just dollop it over the top so you get some bites with a bit of sour cream in them.


I think frying the tortillas makes them a little less “gummy” in the oven. You can certainly just use them without frying them first if you’d like.

The four of us ate ¾ of the pan. It was that good.

This would make great football food. We ate ours while watching football. That’s why I said that, lol. Throw it all together the night before and pop it in the oven before the game.


Easy Enchilada Casserole
recipe from Lisa@ The Cutting Edge of Ordinary
Printable recipe
6 medium tortillas
2 pounds ground beef.
1 medium onion, diced
Enchilada sauce (I bought the large can)
Sour cream
2 cups grated cheddar cheese
Vegetable or Canola oil for frying tortillas

Oven to 350º F.

Heat up a little oil in the bottom of a skillet. Place the tortillas in the pan one at a time and fry until brown and bubbly on each side. You may have to add a little more oil to the pan with each tortilla to prevent them from sticking. Move to a plate lined with paper towels to cool.

Place the diced onion in the same pan and cool until just translucent. Add in the ground beef and cook until done. Drain the grease. Set aside.

Pour an even layer of enchilada sauce in the bottom of a greased 9x13 pan, making sure the enchilada sauce coats the entire bottom of the pan. Place 2 tortillas in the bottom of the pan. Cut the 3rd tortilla in half and use the pieces to cover the bottom as best as you can. It doesn’t have to look pretty.

Add a layer of ground beef and top with dollops of sour cream. Sprinkle with one cup of cheese.

Add a second layer, cover the tortillas with the rest of the enchilada sauce and continue to layer with the ground beef and sour cream. The top layer should be shredded cheese. Bake for 30 minutes – 40 minutes or until brown and bubbly.

Friday, September 26, 2014

Trisha Yearwood's Skillet Apple Pie


I'm totally into my fall geekery mode.

I love this season. LOVE it. I'm all about the pumpkin and the apples. I'm headed out this weekend to pick apples, so I thought I'd post this recipe that doesn't use said apples that I will be picking! Ha! What is wrong with me? I'll tell ya what....I'm crazy for apple pie.

Most of you who have read this blog for any amount of time know I have a pie sickness. I love PIE. This pie does not use fresh apples. It uses canned apple pie filling. Yes, I said it. Canned. Pie. Filling. and it's glorious!

So say you used up all the apples you picked and you really want pie. You have a hankering, a craving for pie. You don't have the time to CUT UP APPLES! You just don't. You want some pie and you want it fast. Your troubles are solved. Let me introduce you to this baby.....

SKILLET APPLE PIE.

It's a thing of beauty isn't it? Yes, you need a cast iron skillet to make this. If you don't already own a cast iron skillet and urge you to purchase one. It's the work horse of my kitchen. A 9 inch cast iron, pre-seasoned skillet like this one will run you under $20.

This pie was so good that I almost didn't get a picture of it with the filling showing. My boys were trying to dig into it again. I had to snatch it up and quickly grab a photo.

I cut the amount of butter and brown sugar that was in the original recipe and I didn't add the cinnamon whipped topping that was in the original recipe either. It didn't need it, but I wouldn't stop you from putting a big ole scoop of vanilla ice cream on this.


Trisha Yearwood’s Skillet Apple Pie
adapted from a Trisha Yearwood recipe
Printable recipe
4 tablespoons unsalted butter (1/2 stick)
1/2 cup light brown sugar
2 refrigerated rolled pie crusts, such as Pillsbury
One 21-ounce can apple pie filling
2 teaspoons cinnamon sugar
1 tablespoon for melted butter for top.

Preheat the oven to 400.

Melt the 1/2 stick of butter in a 9-inch cast iron skillet. To the melted butter, add the brown sugar and melt them together on medium heat, about 2 minutes. Remove from the heat then line the skillet with one of the pie crusts. Pour the apple pie filling over the crust and sprinkle with 1 tablespoon of the cinnamon sugar. Use the second pie crust to cover the filling. Brush the top with the 1 tablespoon of the melted butter, then evenly sprinkle the remaining 1 tablespoon cinnamon sugar on top. Cut vents in the middle of the pie. Bake for 30 - 35  minutes or until golden brown.

Monday, September 22, 2014

Chicken Terrific

Chicken Fantastic

Wow, I've done it again! I've been a slacker with the blog. Sorry! This time I was on vacation. My in-laws visited and we just had the most wonderful time. There stay was too short, but we enjoyed every day of it.

They brought me the most precious gift too. One I want to share with you. More on that in a bit!

I'm so excited that Fall is finally here. It's my most favorite time of year to cook and bake. I'm giddy with all the great recipes I have in store for you all.

First, this casserole. Let me tell you, when I was making this I was thinking to myself..."this doesn't look very good".  I know it was called Chicken Terrific, but it wasn't looking so terrific. It was kinda a goopy and beige looking. I was hoping I just hadn't wasted all these ingredients on something that no one was going to eat. I really had my doubts, but this was really good. I was waiting with anticipation while my crew took their first bites and they all really loved it.

It's throw it all in a bowl and mix it together kind of recipe. If you are against "cream of" soup recipes, then stop right here. There are two can's of "cream of" in this and boxed stuffing mix! Blasphemy! I use them. I know some others poo-poo their noses up at them, but not me. I'm a busy working mom and I'll take shortcuts when I can.

I varied this from the original recipe just a bit. I added more chicken and omitted the water chestnuts, pimento and onions. You can leave them in or take them out or substitute them. This is a very forgiving recipe.

Chicken Fantastic 1

Now back to the great gift I got from my in-laws. My mother-in-law had asked me and my mom for a hand written recipe quite awhile back. She had mentioned something about Flickr books and I honestly thought that I was going to get some kind of a personalized recipe book from her, but what I got was so much more special. I got this:

Cutting board

A beautiful cutting board with my mother's recipe on one side and mine on the other, in our own handwriting! How crazy wonderful is that?

Cutting board 1

It's an instant heirloom I tell ya. Wouldn't this make a terrific gift for Christmas? If you've got old recipes from your mom, or your grand mom wouldn't this be a terrific present to pass down? I just LOVE it! Thank you again Mom! You always pick the best gifts! Here is a link to the store - Sister Specialty Shop.


Chicken Terrific
Original recipe from Cooking with K
Printable recipe
3 cups cooked chicken, diced (I used 4 cups which was the meat from one rotisserie chicken)
1 (6 1/2 oz.) pkg. wild rice
1 (2 oz.) jar pimento, diced (I omitted)
1 cup mayonnaise
1 cup sour cream
1/2 cup minced onion(I omitted)
1 (8 oz.) can sliced water chestnuts, drained and chopped (optional, I omitted)
1 can cream of celery soup
1 can cream of chicken soup
1 16oz can French green beans, drained
1/2 cup Cheddar cheese, grated

Stuffing Topping
1 box of herb seasoned Stove Top Stuffing
1 stick butter, melted

Preheat oven to 350. Combine all the ingredients and place in a 9 x 13 dish. Top with cheese.

Combine Stuffing and butter, mix thoroughly. Sprinkle on top of the chicken mixture.

Bake for 35-40 minutes until golden brown.

Thursday, August 28, 2014

German Chocolate Zucchini Bread


Are you sick of zucchini?

Do you have too many? Is your garden mass producing? Are you pawning them off on your friends and neighbors? Are you bringing them to work just to get rid of them?

You need to use them up right? You can't let them go to waste. You need an idea? You need to find a delicious way to use up all that green goodness. Well I have the solution.

German Chocolate Zucchini a Bread. Yes, you read that right.

It's like German Chocolate Cake and Zucchini bread had a most moist and perfect loaf of scrumptiousness.

I really need to let you know how incredibly moist this bread was. I have a hard time calling it a bread, it's really more cake like, and it makes 2 loaves! 2 loaves! One to eat and one to share, or you can just hoard them both for yourself. Trust me, you will want too!

If you don't want to make tie in a loaf pan, you can make this in a 9x13 or a bundt pan. Very versatile!

It's my new favorite way to use zucchini! Make it!

You can also try my Chocolate Zucchini Cake. Equally delicious!


German Chocolate Zucchini Bread
adapted from a recipe at The Better Baker
Printable recipe
Makes 2 loaves
4 eggs
2-1/2 cups sugar
1 cup oil or applesauce
2 teaspoons vanilla
2 cup all-purpose flour
1 teaspoon cinnamon
1 teaspoon salt
2 teaspoons baking soda
2 teaspoons baking powder
1/2 cup baking 4-serving size cocoa
1 small box instant chocolate pudding
3 cups grated zucchini, peeled or unpeeled
1 cup shredded coconut
1 cup chopped nuts (optional)

Preheat oven to 350. Lightly grease and flour 2 loaf pans (I use Baker’s Joy). This recipe can also be make using use a 9" X 13" or a large Bundt pan.

In a large bowl beat eggs, sugar and oil with an electric mixer. Add in the vanilla and mix to combine. Add all the ingredients into another bowl and combine (a whisk works well). Add dry ingredients to wet ingredients, a little at a time, until well blended.

Stir in zucchini, nuts and coconut. If you’d like you can save a little of the nuts/coconut and sprinkle them over the top before baking.

Pour into prepared pans. Bake 30 - 50 minutes, depending on which pan you're using. Just check with a toothpick stuck in the middle - if it comes out clean, remove bread from oven, but be careful not to over bake. I used 2 loaf pans and it took 55 minutes to test done. Let stand in pans for 5 - 10 minutes; remove from pans to wire racks until room temperature.

Thursday, August 21, 2014

Muffuletta Dip (Giveaway winner too!)


Yes, I've been a bad, bad blogger once again. I suck, I admit it.

I'm just so terribly busy in my real life, not that this isn't real life, but you know what I mean right?

It hasn't been because I haven't been cooking and baking. I have been. Honestly. I bring you this recipe as proof.

This is our new favorite dip! It's so good!

I posted a picture of it on Facebook and got some great feedback, so I knew I had to share this with you all.

If you're not familiar with Muffuletta let me explain. The Muffuletta is a sandwich that is very popular in New Orleans. Here is a little info:

The muffuletta is both a type of round Sicilian sesame bread and a popular sandwich originating among Italian immigrants in New Orleans, Louisiana using the same bread. It's a large, round, and somewhat flattened loaf with a sturdy texture, around 10 inches across. It is described as being somewhat similar to focaccia. A traditional style muffuletta sandwich consists of a muffuletta loaf split horizontally and covered with layers of marinated olive salad, mortadella, salami, mozzarella, ham, and provolone.

So it's a delicious sandwich and now it's a delicious dip! I tweaked this a bit from the original recipe. (Don't I always?). I added pickles cause it just seemed like the right thing to do. The original also called for 1/2 green and 1/2 black olives, but my boys don't like green olives so I used only black. Feel free to substitute whatever you'd like. It's a very forgiving dip!

Feel free to scoop up any leftovers and use them as a filling on a sandwich. I can tell you that's what one of my boys did and he loved it!

I promise you this will become one of your favorites. Football season is just around the corner and you know that means it's dip time!

Oh before I forget...the winner of my last giveway!!

Robin Weiss!!

Robin I sent you an email! Congrats!

Let's all go make some dip!


Muffuletta Dip
Printable Recipe
Adapted from a recipe at the Lettered Cottage
½ lb. deli-style ham - chopped
¼ lb. salami, any variety – chopped
¼ lb slicing pepperoni - chopped
2 cups Italian blend cheese - shredded
1/2 cup green onion - chopped
4 pepperoncini , chopped (optional)
½ cup chopped pickles
1 cup black olives, chopped
1 cup mayo
1/4 cup Zesty Italian dressing
1/2 - 1 cup Roma tomatoes - seeded and chopped

Whisk mayo and dressing together in a large bowl. Add all the remaining ingredients together except the tomatoes. Refrigerate for at least an hour to overnight. Adjust the mayo/dressing amounts to make as creamy (or not) as you prefer.

Add tomatoes right before serving. Serve with crackers.

Thursday, July 24, 2014

Honey Bun Cake and a little giveaway


Honey Bun Cake


Yes it's been over a month since I’ve been back to this little space on the Internet. I took a month off. Yes I did. I’m totally allowed.

I truly enjoyed the last 4 weeks when I was at home. Work, well work is another story. Did I mention that I work full time? Yes, yes I do. 31 years at the same company. I have never been busier during these past 31 years as I am right now. I'm working like a crazy woman. So tired at the end of the day that blogging was the last thing on my mind.

I didn’t do a whole lot of baking. I didn’t use my oven very much.

I did hang outside a lot. I worked in my garden. I caught 3 woodchucks that ate all of my cucumbers and zucchini. I was so mad. Still am. They have been relocated far, far away from my garden the litter buggers.

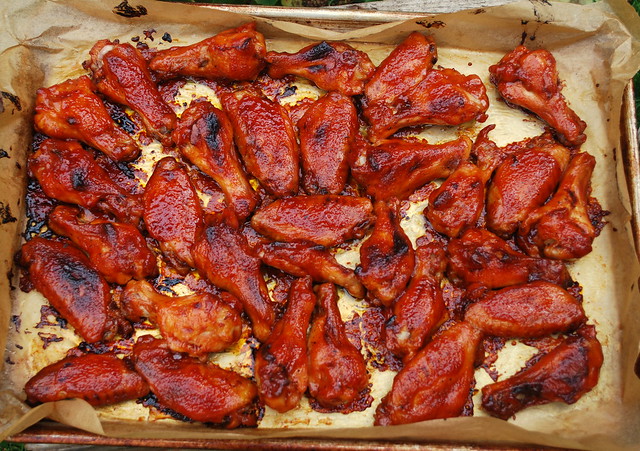
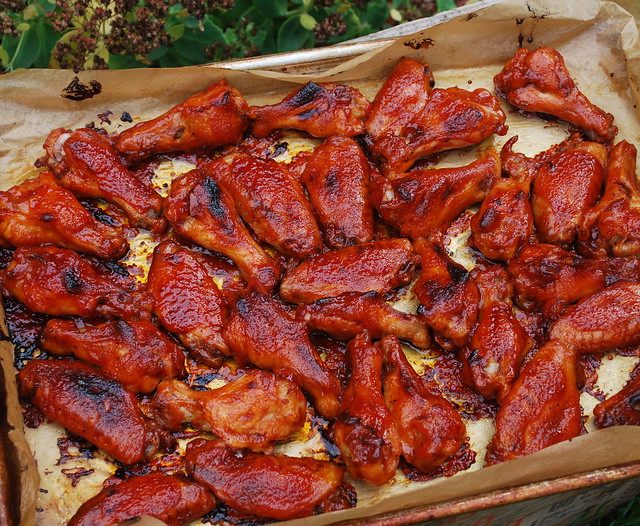
I spent quite a few nights by the fire. I took some photos. I grilled a lot, I lazed about, I read, I met a friend from Georgia, I had a 4th of July party, I got a pedicure, I wore flip flops all the time.

I enjoyed it all. Really I did.

I’m back now. I have some pretty pictures to share with you all as well as some delicious food.

Sorry I was away for so long, but I needed this time.

Did you miss me?? I missed you all.

So in addition to this Honey Bun Cake recipe I’m having a little giveaway. It’s just a small one. It involves pampering. Who doesn’t need more of that in their lives right? Scroll to the end to read more on the giveaway.

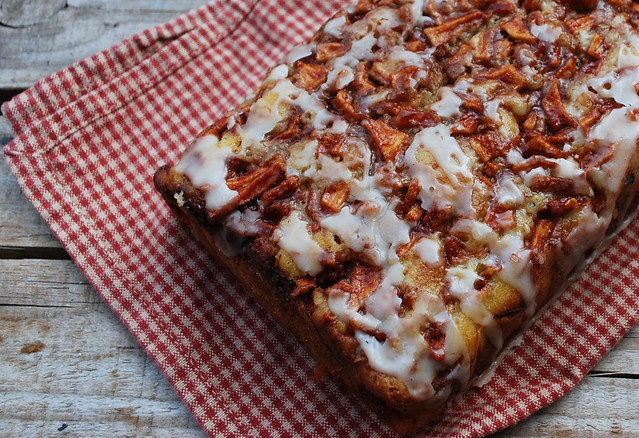
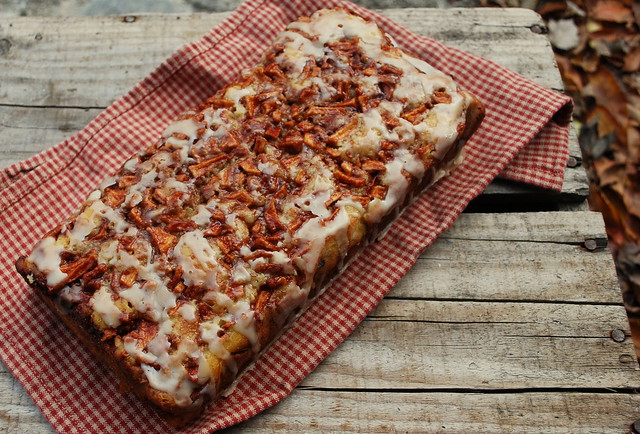
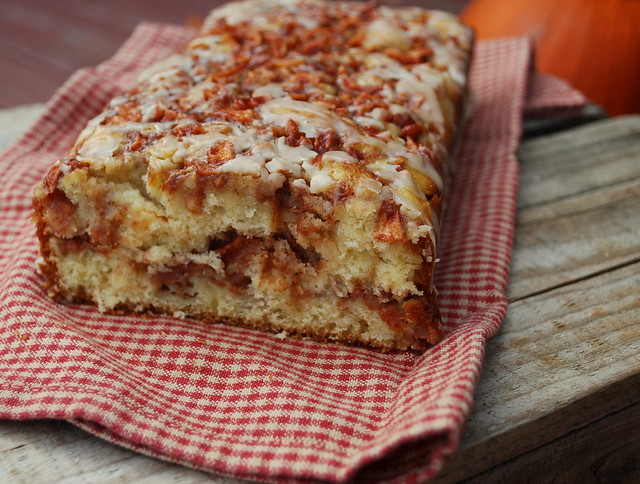
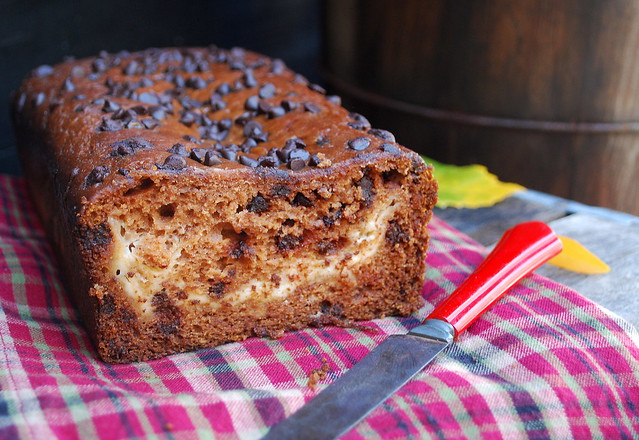
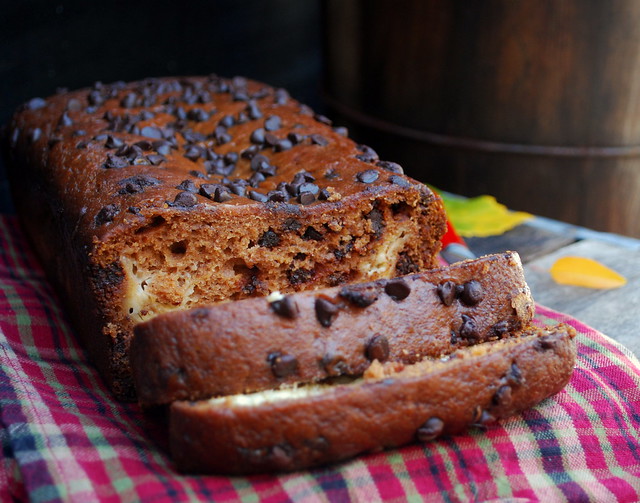
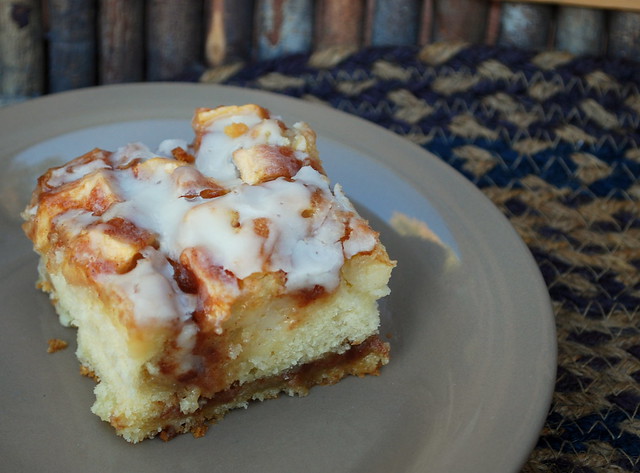
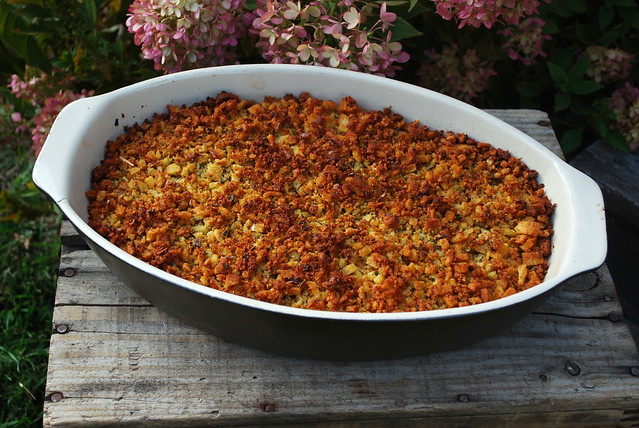
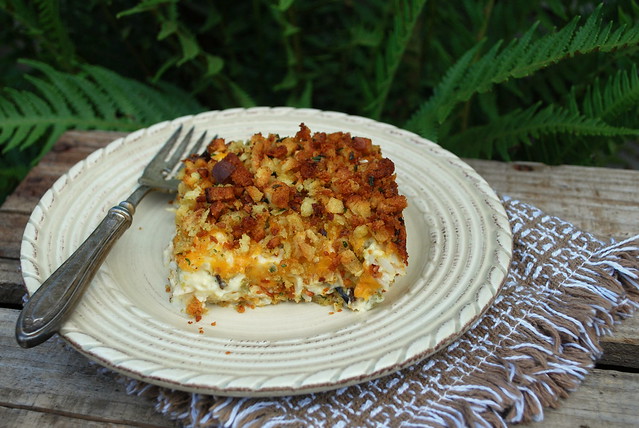
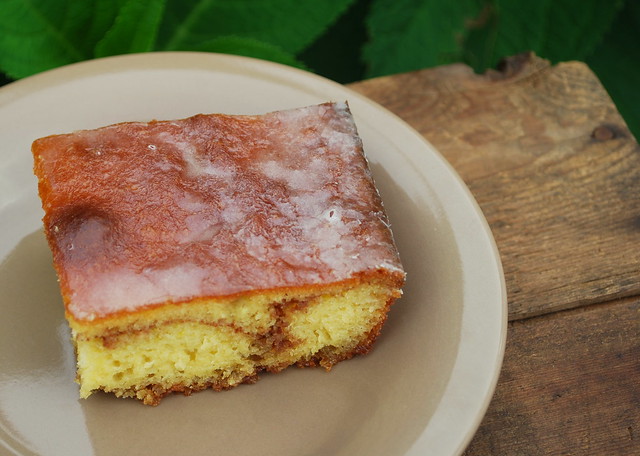
Now on to this cake. This cake is your perfect morning cake to go with a cup of coffee or a bug cuppa tea. It's moist and soft and covered in a sticky glaze that really is like eating a big sticky bun! My kids loved it!


Honey Bun Cake 1

Honey Bun Cake
recipe adapted from The Country Cook
Printable recipe
1 box yellow cake mix
3/4 cup vegetable oil
4 large eggs
8oz container sour cream

For filling:
1 cup brown sugar
1 Tablespoon cinnamon

Glaze:
2 cups powdered sugar
4 Tablespoons milk
1 Tablespoon vanilla

Preheat oven to 350. Spray a 9×13 pan with nonstick spray and set aside.

In a small bowl, combine brown sugar and cinnamon. Set aside.

In the bowl of a mixer, combine cake mix, oil, eggs , and sour cream. Beat on low speed for a few seconds, then on medium just until batter is fully combined and all large lumps are gone. (about a minute)

Pour half of batter into prepared pan. Spread evenly (batter will be thick). Sprinkle all of the brown sugar/cinnamon mixture evenly across the surface. Cover with remaining cake batter, spreading evenly (spreading can be a bit difficult because the batter is thick — if some of the topping shows through or ends up mixed in with the top layer, it’s totally fine). Bake cake for about 30-40 minutes, until center is set.

Make the glaze by whisking together the powdered sugar, milk , and vanilla in a medium bowl. Pour over  the warm cake and spread evenly. Glaze will set as it cools.


The Giveaway.

With warm weather comes sundresses, short shorts and tank tops, but after this winter your skin may need some extra TLC. Body Benefits by Body Images introduces two unique takes on a bath-time favorite to get you fresh and clean in the shower while smoothing and toning skin.

· Skin Smoothing Beauty Massager – a skin-tingling, dual-function sponge creates a rich lather while the massager polishes for softer, younger-looking skin


· Skin Toning Beauty Massager – a nodule-covered side that improves the appearance of dimple-prone skin while the sponge scrubs for a deep clean.


Both of these skin-improving beauty massagers are now available at retailers nationwide for $3.99. For more information please visitbodybenefitsbath.com.

To win a set of these:
1 lucky winner will be chosen. Contest only open to folks in the USA.

Answer this question:

What's your favorite thing about summer?

If you don't have a blog, please leave me an email address to contact you (no email and I'll move on to the next name).

There are three ways to enter: (1) leave a comment on the blog (2) If you haven't already, go “like” The Cutting Edge of Ordinary on Facebook or (3) Already a fan? Just leave a comment here or on Facebook to let me know! Facebook comments will count as entries.

Giveaway ends on Wednesday, July 30th midnight eastern standard time.

Friday, June 20, 2014

Baked Blueberry Lemon French Toast


Hello foodie friends. I'm trying to drag myself away from the yard and garden long enough to make something delicious to share with you all.

Guess what? It's breakfast time again.

I know I've posted quite a few breakfast recipes over the past few months. I can't help it. I just love them! I especially love the make-ahead recipes cause I can leisurely throw them together on a Saturday night and sleep in a bit later on Sunday morning. Pop it in the oven and in less than an hour we have a delicious poppin' hot breakfast.

I used up the second to last bag of my summer blueberries of 2013 for this recipe. I can't wait for blueberry picking 2014! I'm loading up baby!

Please try this scrumptious recipe. Using the King Hawaiian Rolls gives it just a touch of extra sweetness. It's perfect for a lazy Sunday morning breakfast.


Baked Blueberry Lemon French Toast 
recipe from Damn Delicious
Printed recipe
1 (12-count) package King's Hawiian Sweet Dinner Rolls, cubed
1 cup blueberries
2 cups milk
4 large eggs
1/4 cup maple syrup
Zest of 1 lemon
1 1/2 teaspoons vanilla extract
1 teaspoon cinnamon
1/4 teaspoon nutmeg

For the Crumb Topping
1/4 cup all-purpose flour
1/4 cup brown sugar, packed
1/2 teaspoon cinnamon
1/4 cup unsalted butter, cut into cubes
2 tablespoons confectioners' sugar

Lightly coat a 9x13 baking dish with nonstick spray. Place a layer of bread cubes evenly into the baking dish. Top with blueberries in an even layer, repeating 2 more times and ending with a layer of bread. (I didn't do this. I just put the bread down and threw all the blueberries on top)

In a large glass measuring cup or another bowl, whisk together milk, eggs, maple syrup, lemon zest, vanilla, cinnamon and nutmeg. Pour mixture evenly over the bread cubes. Cover and place in the refrigerator for at least 2 hours or overnight.

Preheat oven to 350 degrees F.

To make the crumb topping, combine flour, sugar and cinnamon in a small bowl. Add cold butter and toss to coat, using your fingers to work the butter into the dry ingredients until it resembles coarse crumbs. Sprinkle the crumb topping evenly over the bread cubes. Place into oven and bake for 35-45 minutes, or until golden brown. Serve immediately, sprinkled with confectioners' sugar, if desired.

Friday, June 13, 2014

4 Ingredient Moist and Delicious Chocolate Cake


My oldest son turned nineteen last week. Nineteen! I can hardly believe it. We stopped the big birthday parties at age 18, so we were planning on taking him out to dinner and then having cake at home later. I drove 30 minutes to visit a dairy farm to buy him a fruit tart (which was amazing by the way) and then realized that my youngest son wouldn’t go ten feet near a fruit tart. I know it wasn’t his birthday, but I wanted him to have something sweet to eat too so I went looking for an easy chocolate cake recipe on Pinterest.

There were lots and lots of recipes to choose from. I chose this one from Eat, Live, Run.

4 ingredient cake that is moist and delicious. 4 ingredients. No eggs, no oil. It’s crazy right?

I was skeptical about this recipe. I read the reviews. Those that made it really liked it, so I decided to give it a try.

Let me just preface this to say I made this cake 2 times in 24 hours! It was that good. It was that easy. You literally can throw this cake together in like 2 minutes.

My son had 4 friends unexpectedly show up at the house when we were about to have cake. Now that little fruit tart wasn’t going to cut it so I was glad I had this cake. All the guys loved it. Most of them had 2 pieces. You know you’ve got a good recipe on your hands when big teenage guys devour it.

Yes it uses a boxed cake mix and instant pudding. I’m ok with that. I make cakes from scratch all the time, so using a boxed mix is allowed. Heck , when you are in a hurry it’s welcome! Speaking of hurried…..so I said I made this cake 2 times in 24 hours. My youngest informed me that he needed to bring in something for a class party the next day! Yikes. Good thing I had everything on hand to make it again. He took it to school and came back with an empty cake carrier and told me “you should have made 2 cakes, everyone loved it”.

There is no oil, there is no eggs! Just 4 ingredients!

This recipe is a keeper!


4 Ingredient Most & Delicious Chocolate Cake
Printable recipe
recipe from Eat, Run, Live.
1 box – chocolate cake mix (18.25 ounces)
1 small package (3.4 ounces) instant chocolate pudding
1 1/2 cups milk
1 1/2 cups chocolate chips (I don’t measure, just sprinkle until the top is full!)

Preheat oven to 350 degrees. Grease a 9x13 pan.

In a large bowl combine the pudding mix and the milk Whisk for 1 minute, just until it thickens up a bit. Add the cake mix (just the dry mix–don’t add anything else) and stir well to combine. This batter will be very thick! I used use an off-set spatula to spread it out evenly. Scatter chocolate chips on top.

Bake for 30 minutes, or until edges pull away from sides. Cool, cut, eat!

Tuesday, June 10, 2014

Vegetable Quiche


I know Mother's Day was ages ago but I'm just now getting around to posting about it. When I'm home I'm usually outside weeding or watering or taking care of something in the yard. I love the extra daylight hours. I always feel like I'm getting gypped out of time when I come home from work during the fall and winter. Spring and summer make me feel like I'm gaining that time back. Makes me happy.

I made a lovely brunch for my Mom for Mother’s Day. I hadn’t done a brunch before. Usually I'd make dinner or just recently over the past few years we went out, but I was feeling the breakfast vibe and wanted to test out a few recipes so brunch it was!

Let me just tell you I am in love with this quiche recipe. I followed basic foolproof quiche instructions from The Kitchn and then tweaked it to my likings.

It was everything a quiche should be. The ratio of veggies to custard egg mixture was perfect. I doubles the recipe and made two. We loved it so much I'm thinking that I might make Sunday's quiche day. Cook one up and use it for breakfasts through the week.

The beauty of this recipe is that you can use whatever veggies (or meat) that you like. I used leeks, mushroom and julienned zucchini. I have a nifty julienne tool so my zucchini was like thin string of  spaghetti. It cooked really quickly too! I topped it off with some grape tomato slices and a few sprigs of fresh thyme just so it looked pretty too. It was Mother's Day after all.

Just make sure to cook your veggies before they go into the quiche. You don't want watery mushroom or spinach to ruin it.

I used a combination of mozzarella and cheddar in my quiche too cause it's what I had on hand but a nice Gruyere or Swiss would do nicely too.


Vegetable Quiche
Printable recipe
1- 9 inch pie crust
2 cups filling ingredients (whatever you like, i.e,  bacon, mushrooms, onions, spinach, etc)
1-2 cups (3 oz - 6 oz) grated cheese, like Gruyere, Swiss, or Cheddar
3 large eggs
¾ cup milk
½ cup half and half or heavy cream
1 teaspoon salt
dash pepper
teaspoon Italian seasonings
½ teaspoon fresh thyme

9-inch cake or pie pan - straight-sided is traditional, but a pan with sloped sides works fine.

Blind-Bake the Crust: Line a 9-inch pie plate with parchment and spray the sides with non-stick spray. Roll out the pie crust and fit it into the tin. Heat the oven to 375°F. Line the pie crust with parchment and fill with pie weights or beans. Make sure the weights are snug against the sides of the pan. Bake for 15-20 minutes or just until lightly brown. Remove the weights and parchment. Let cool.

While the crust is baking, prepare your quiche filling. Make sure all ingredients are cooked through and are fairly dry. (i.e., make sure spinach has wilted and that cooked mushrooms have released all their moisture.)

Sprinkle half the cheese over the bottom of the pie crust and top with the fillings. Sprinkle the remaining cheese over top.

Whisk together the eggs, milk, cream, salt, pepper Italian seasonings and thyme until frothy. Pour the custard into the pie crust.

Bake the quiche at 350°F for 30 to 40 minutes, until the edges are set but the quiche still jiggles just a little in the center. Cool for at least 20 minutes. Quiche can be served cold, room temperature, or warmed. If serving warm, heat in a 300°F oven until just warm to the touch.

Thursday, May 29, 2014

Grandma Virginia’s Light Lemon Cake


Who doesn't love a recipe that has the word Grandma in the title? You know it's going to be good.

This recipe was made by a real Grandma. Mindi at Home Grown Beets got this recipe from her hubby's Grandma one 4th of July and Mindi has been making it ever since and I can see why.

There was a time when you could not get me to eat anything with lemon in it. I was a lemon hater. I don't know what happened. I guess my tastes have changes cause now I'm a freakin lemon lover.

I saw this on Pinterest. I see everything on Pinterest, I just don't get around to making 98% of what I pin! This lemon cake was calling my name.

Yes, it uses a boxed lemon cake. Get over it. Boxed cake mixes happen (and instant pudding too!). This cake is super light and delicious. It's not overly lemony or artificial tasting. The texture is almost like a sponge cake and that topping is so light and fluffy, I could have eaten it with a spoon!

This is the perfect refreshing summer dessert! I'm already planning on serving it for my 4th of July party.


Grandma Virginia's Light Lemon Cake
recipe from Home Grown Beets
Printable Recipe
For the Cake
1 box (18.25oz) Lemon Cake Mix
1 box (3.4oz) Instant Lemon Pudding Mix
1 ¾ Cups Water
3 Egg Whites

For the Topping:
3/4 Cup Milk
1/2 tsp. Lemon Extract (optional, I omitted)
1 box (3.4oz) Instant Vanilla Pudding Mix
1 Carton (8 oz.) Frozen Whipped Topping

Combine the lemon cake mix, the pudding mix, water and egg whites. Beat on low speed for 1 minute. Pour into a greased 9 x 13 x 2 in. baking pan. Bake at 350 for 23-28 minutes or until cake test done. Cool.

Combine all the topping ingredients in a mixing bowl. Beat on low for 2 minutes. Fold in whipped topping. Spread over cake. Keep refrigerated.

Friday, May 23, 2014

Mandarin Chicken Salad


I know I've been a bit laxed with posting lately, but it's spring and my yard is alive and I have lots of stuff to do! There is a garden to be planted and flowers to tend to and a yard that is finally sprung to life after a long hard winter. I have to admit, I haven't been in the kitchen a whole lot. I usually drag myself in and have to spend 20 minutes cleaning the dirt out from under my nails before I can even begin to think about dinner.

We've had more than a few salads lately. Quick and easy dinners are what's happening at the moment. This salad is my new favorite.

I could eat it by the boatload, I swear. I'm a little obsessed with it right now.

Sometimes I add the chicken in, sometimes I don't. I think this would work well with cooked shrimp too. Yeah. Now I'm going to have to try that.

I love the tang of the mandarin orange and the crunch of the noodles.

I substituted broccoli slaw from the original coleslaw mix that was in the original recipe. We just like it a lot more, but if coleslaw is your thing, go right ahead and use it.


Mandarin Chicken Salad
Adapted from Betty Crocker Cookbook
Printable recipe

2 tablespoons butter
1 package (3 oz) chicken-flavored ramen
2 tablespoons of sesame seeds
1/4 cup sugar
1/4 cup white vinegar
1 Tablespoon of sesame oil (or vegetable oil if you don’t have sesame)
2 cups cooked chicken, diced
1/4 cup dry-roasted peanuts
1/4 cup sliced green onions
1 bag (14-16 oz) broccoli slaw
1 can (14 oz) mandarin orange segments, drained

Melt butter in 10-inch skillet over medium heat. Stir in ramen noodle seasoning packet. Break up the noodles into bite-sized pieces and add them into the butter mixture. Cook for 2 minutes stirring a few times. Add in the sesame seeds. Cook until noodles are golden brown. Remove from heat and set aside.

For the dressing
Combine the sugar, vinegar and oil. Whisk until combined.

In a large bowl, combine the broccoli mix, mandarin oranges, green onions, peanuts and chicken.
When you are ready to serve the salad, add the dressing and the noodles to the salad mixture and toss.

Friday, May 9, 2014

ScentSational Spring Giveaway!


Sorry I've been away so long. Spring has sprung and we've been out working in the yard and getting some projects done. No time to blog until now!

I'm kicking off spring with this wonderful giveaway from ScentSationals!

I’m a candle lovin’ fool. If you walked into my house you’d swear I owned stock in Yankee Candle. I love the jarred candles. I even have a primitive cupboard in my living room that is filled with nothing but candles and candle accessories. That’s how obsessed I am.

Now I found something new and I want to share it with you all.

ScentSationals Wickless Candles. You can read more about them here. I love this product!

I love that there are dozens and dozens of warmers to choose from. I mean there is a style for every person you’d want to buy for. I scrolled through and wanted like....oh 15 of them!

I love that some of them use an Edison bulb to melt the wax. That Edison bulb is so cool looking!

Another thing I love about them is, you’re not just getting a wax melter, you’re getting a light for your room. My nautical warmer casts a soft, warm light across half of my living room!

I can’t gush enough over the fantastic way it makes my house smell. Once that wax melts, the whole room is bathed in a beautiful scent. I’ve had lots of tart warmers over the course of my life and none have smelled so good for so long. Plus, you don’t have to worry about leaving a candle burning.

Here’s mine. I choose the nautical warmer because I liked how you could see the bulb really well.


I love them so much that I asked the nice folks at ScentSationals if I could get one to host a giveaway and they said “yes”. So I’m giving away this beauty and some tarts to go with it!


I might have to pick this one up for myself! It's got that shabby chic look that I love.

Wouldn't you love to have that in your home? Well here's how to enter:

1 lucky winner will be chosen. Contest only open to folks in the USA.

Answer this question:

What's your favorite scent?

If you don't have a blog, please leave me an email address to contact you (no email and I'll move on to the next name).

There are three ways to enter: (1) leave a comment on the blog (2) If you haven't already, go “like” The Cutting Edge of Ordinary on Facebook or (3) Already a fan? Just leave a comment here or on Facebook to let me know! Facebook comments will count as entries.

Giveaway ends on midnight Wednesday, May 14th eastern standard time.

One lucky winner will receive this warmer plus a variety of tarts!

Wednesday, April 23, 2014

Lemon Almond Ricotta Cake


I can tell you the amount of times I have had dessert since January. Twice.

Once was at my 50th birthday party and the second time was a Ted's Montana Grill on the day of my actual 50th birthday when we went out to dinner.

I had a piece of luscious Strawberry Short cake from a local dairy farm (Wright's Dairy Farm) at my party, and I split a decadent brownie covered in hot fudge and whipped cream with one of my son's and my husband, so I really only had a 1/3 of that.

I kind of save desserts for special occasions and holidays now. That's not to say that I haven't had a bite or two of something I've made. I have. I still need to taste what I'm making and see if it's good, but I'm not sitting down with a piece of whatever it is and eating a whole piece. It's sad and depressing sometimes but I just keep thinking ahead and looking forward to the days I know I can splurge.

Easter was a splurge day and I picked this dessert to splurge on.


It was the Sicilian in me that saw the words LEMON - ALMOND - RICOTTA.

I love all those flavors. Now put them in a cake.....I'm in heaven.

This cake was so good. The flavors were incredible. I'm so glad I chose this as the dessert to splurge on! It was so worth it. It looked so elegant too. Perfect dessert to bring to a party.

Since you use almond meal in this recipe, I believe it gluten free.


Lemon Almond Ricotta Cake
Printable recipe
By Honey & Figs
120 grams (1/2 cup or 1 stick) unsalted butter, softened
240 grams (2 cups) powdered sugar
2 vanilla beans (I used vanilla bean paste)
zest from 1 lemon
4 eggs (separated and at room temperature)
240 grams (2 1/2 cups) almond meal
300 grams (10 1/2 oz) ricotta
Freeze your beaters and a mixing bowl.

Heat oven to 400F (200ºC). Line a 20 cm round pan (9 inch) with parchment paper and set aside.

Beat softened butter, half of the sugar, vanilla seeds and lemon zest with an electrical mixer until pale and creamy, which should take about 5-6 minutes. Add egg yolks, one at time, and mix after each addition. Add almond meal and beat to combine. Fold in ricotta.

Take your mixing bowl and beaters out of the freezer. Beat egg whites and the remaining sugar until stiff. Gently, fold them into the cake batter.

Pour mixture into prepared pan and decorate with almond flakes if desired. Bake for 40-45 minutes (cover it with tinfoil after 25 minutes or so) until cooked. Let it cool for a couple of hours, or better yet, overnight!

Friday, April 11, 2014

Pina Colada Cookies


I’m getting spring fever.

Although I love winter and the snow I’m ready for a change of season and that comes late for Rhode Island. We’ve had a few nice days but for the most part it’s been chilly out. I’m waiting for a nice warm day so we can clean up the yard, and start prepping the garden for this year. I’ve got a few design changes for the yard this year too. We moved a big raised bed which contained my garlic and basil. I planted the garlic last fall so that’s all set but we have to make another raised bed for the basil. I plant a lot of basil.

I’m also re-designing an area in the front of the house. I have the plans all drawn up in my head and they include a picket fence. My only worry is that I think I have to move my Japanese maple and I’m a bit worried about that.

So my head is full of spring plans and more cooking on the grill and the garden and getting out in the fresh air! Oh, longer days also mean that I can actually take photos after I come home from work, so that means more recipes for the blog.

With all this talk of spring and Easter right around the corner, I thought I’d bring you a springy type cookie.

I adapted this recipe a bit from the original that I found on Eat at Home Cooks. I added in some toasted coconut to the mix. I think it was a good decision.

These cookies are so moist and so light. They are almost cake-like melt-in-your-mouth. How's that for a description?


Pina Colada Cookies
Yields 30 cookies
adapted from a recipe at Eat at Home Cooks
Printable recipe
1 stick butter, softened
2 eggs
1 box white cake mix
2 tablespoons flour
8 oz crushed pineapple, drained well and reserve the juice
¾ cup coconut (toasted)

For the glaze
1 1/2 - 2 cups powdered sugar
Reserved pineapple juice
1/2 tsp. coconut extract

Heat the oven to 350.

In a large bowl cream together the butter and the eggs. Add in the cake mix and drained, crushed pineapple. Mix until just combined. Stir the coconut in by hand. Chill batter for a half hour, then drop by rounded tablespoon on a parchment lined baking sheet 2 inches apart. I returned the batter to the fridge in between each batch. Bake for 11 – 13 minutes of just until the tops turn slightly golden. Let cookies sit for 3 minutes on the baking sheet, remove to cooling rack to cool completely.

For the glaze:
Place the powdered sugar in a bowl. Add just enough of the reserved pineapple to get it to a dunkable consistency. Dunk the tops of each cookie into the glaze and place on cookie rack until glaze sets.

Monday, April 7, 2014

Cadbury Easter Egg Bark


The absolute hardest part of staying away from sugar for me has been these:


I knew they were coming. I saw them in the market around mid February. Then March rolled around and they were everywhere. I mean everywhere.

They are my most favorite candy on the plant. I just love them so much. I bought 2 bags of them. One to make this recipe and one for John and the boys to much on. I successfully managed to not eat a single one until March 15th. I knew I was going to allow myself to cheat a bit that day. Our wonderful friends Ken and Eva threw me 50th birthday party at their home. All my family and friends were there. I always bring something to a party, and it's usually a dessert, so that night I brought this bark.  It was such a great evening and since I was allowing myself to cheat, I got to eat a piece of it. It was so good. I'm kinda glad I held out and waited cause I think that made it taste even better.

The hardest part of making this recipe was chopping the mini eggs. I tried the mini food processor, it chopped them up too much, tried putting them in a bag and whacking them with a rolling pin, same result. I ended up very carefully putting them on a cutting board and cutting them in two with a  big knife, then cutting each half in pieces. If any of you figure out a better way, please let me know!

Just make sure to have your chopped mini eggs ready before you start melting the chocolate.


Cadbury Easter Egg Bark
Printable recipe
adapted from a recipe at Tutti Dolci
1- 8oz bag Cadbury Mini Eggs, chopped
1- 16oz package of vanilla Candi-Quick (or 1 pound white chocolate, chopped)
1/2 pound bittersweet chocolate, chopped
1/2 pound semisweet chocolate, chopped

Before you begin melting the chocolate, chop the mini eggs up! You need to have this ready when your chocolate is ready.

Line an 11 x 17-inch jelly roll pan with parchment paper. Melt the Candi-Quick in the microwave according to the manufacturers directions. Pour melted chocolate into prepared pan and spread with an offset spatula into an even layer. Chill in the refrigerator until set, about 20 minutes. Remove pan from refrigerator and leave at room temperature while melting remaining chocolate.

Place bittersweet and semisweet chocolate in the microwave and microwave on low power in 1 minute intervals and then 30 second intervals until melted. Let stand 5 mins. Pour melted chocolate over white chocolate layer; carefully spread with an offset spatula into an even layer. Sprinkle with chopped Cadbury eggs. Chill in the refrigerator until completely set, about 1 hour.

Carefully lift parchment paper and place bark on a cutting board; then use a sharp knife to cut the bark into pieces. Just chop away, no need to have look-alike pieces.  Pack in an airtight container with wax paper between layers; store at room temperature up to 1 week.