Tuesday, April 28, 2015

Baked Scrambled Eggs


Most of you know that I am a breakfast person. I'll give up lunch any day of the week if it means I can stuff myself silly for breakfast. Even though I don't particularly care for waffles or pancakes, I'm in love with just about every other breakfast food there is, so finding this recipe for Baked Scrambled Eggs made me so happy.

I was searching out brunch recipes for Mother's Day. I looked into taking my Mom out for brunch, but when I saw the prices...forgetaboutit! $32 a person! No thank you. I can do brunch much more economically and I'm pretty sure, much more delicious.

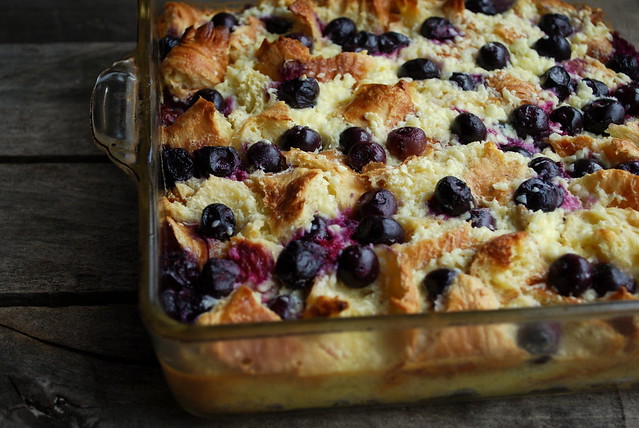
So on the Mother's Day Brunch Menu will be my most favorite breakfast casserole of all time....my Blueberry Croissant Breakfast Bake. You can find the recipe here.

Blueberry Croissant Puff

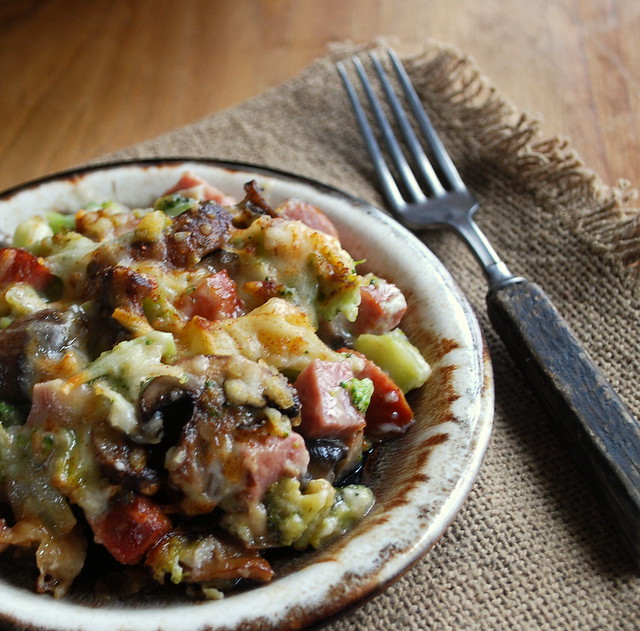
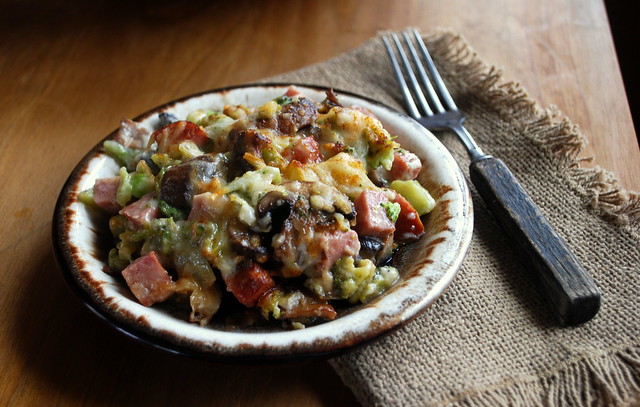
Also on the menu is my Three Cheese Breakfast Bake. Recipe here. It's hearty and cheesy and full of everything we love about breakfast!

A co-worker had told me that she made Baked Scrambled Eggs for her Easter brunch and that everyone went crazy for them, so I thought I'd give the recipe a whirl.

3 Cheese Breakfast Bake 1

WOW! I tried it and I loved it! The eggs came out so soft and fluffy. Could you make scrambled eggs in a fraction of the time on the stove top? Sure, but I love the convenience of having the stove free to cook other things while the eggs are baking in the oven. If you have a large crowd to feed, or a bunch of hungry teenagers, this is a terrific recipe.


All the recipes I found were double this amount! I halved it for us. You can certainty double it if you like. If you like to throw in some cheese, or cooked veggies at the half way point, feel free to do so!

Baked Scrambled Eggs
PRINTABLE RECIPE
12 eggs
1 ¼ cups milk
4 tablespoons butter
Pinch salt and pepper.

Heat oven to 350. Place the butter in the bottom of a 9x13 pan. Let the butter melt while you prepare the eggs. Whisk together the remaining ingredients. Remove pan from oven and add egg mixture. Bake for 10 minutes then remove and stir well. You want to break the eggs up. Place back in the oven for another 10 minutes, remove and stir again. My eggs were done at this point, but yours might take a few more minutes. I would check on them every 3 minutes or so at that point. You don’t want to over bake them. If you pull them out at the right time they will be nice and fluffy.

Monday, April 20, 2015

Cheesy Smoked Sausage and Veggie Bake

cheesy smoked sausage bake 3 2

First off let me say that my absence from the blog was due to some minor hand surgery that I had done. I couldn't cook or clean for over a week! It was torture! I also couldn't do dishes.....that was NOT torture! But I'm back and I've got a delicious recipe made with Hillshire Farms Smoked Sausage.

There are not many brands that I love enough to promote, but this brand is one the whole family loves. Hillshire Farms Smoked Sausage is a favorite in this household. I love it because it's quick and easy to prepare for dinner. I mean how many times can you have pasta or chicken for dinner?

My husband would eat it 5 times a week! I love all the different ways it can be used. It's not just for supper. Smoked Sausage for breakfast is also a great idea. If you need more inspiration, head on over to Hillshire Farms for more delicious recipes.

Hillshire Farm smoked sausage is crafted to be better. The experts have perfected the pre-seasoning of the smoked sausage over the last 75 years and let me tell you, it's a winner! Plus it's so much cleaner and easier to work with than chicken. I love me some chicken but there are nights when I'd much rather just slice or dice up some smoked sausage and be done with it!

Hillshire Farms asked me to create an original recipe from them so I came up with this Cheesy Smoked Sausage and Veggie Bake.

It's loaded with veggies (and some cheesy goodness too). So easy to throw together and pop in the oven. You can even make it the night before and just heat it up when you get home!


cheesy smoked sausage bake 2

Cheesy Smoked Sausage & Veggie Bake
recipe from Lisa@The Cutting Edge of Ordinary
PRINTABLE RECIPE
2 tablespoons olive oil
1 small onion (or 1 large leek, light green and white parts only) finely chopped
8oz baby bella mushrooms, sliced
2 cloves of garlic, minced
1 pound Hillshire Farms Smoked Sausage, diced
1 - 16oz package frozen cauliflower, thawed
1- 16oz package frozen chopped broccoli, thawed

Cheese Sauce
3 tablespoons butter
3 tablespoons flour
1 ½ cups milk
1 ½ cups shredded sharp cheddar cheese
½ cup mozzarella cheese, shredded.
Salt and pepper to taste
Paprika for sprinkling on top

Preheat oven to 350. Lightly grease a 9x13-inch baking pan. Set aside.

In a large skillet heat oil and add the chopped onion or leeks and sliced mushrooms. Cook for approximately 5 minutes or until the onions and mushrooms becomes softened. Add in the garlic and cook for 1 minute. Add in the diced smoked sausage. Toss to combine. Transfer to a large bowl so it can cool for a bit while you make the cheese sauce.

To make the sauce
In a medium saucepan melt the butter. Once the butter has melted, whisk in the flour. Once the flour hits the melted butter it is going to clump so it is important to keep whisking so that you make a nice smooth paste or roux. Cook the paste for about a minute to eliminate the raw flour taste but don't let it start to brown. Add the milk in a little at a time and stir until slightly thickened. Remove from heat, add salt and pepper and stir until well blended. Pour over the smoked sausage and veggie mixture, folding in gently making sure the sauce covers all the mixture. Add in the cheddar cheese and place into baking dish. Sprinkle the top with the mozzarella cheese and top with paprika if you’d like. Bake for 40 minutes or until golden brown.

I'm required to disclose a relationship between our site and Hillshire. This could include Hillshire providing us w/content, product, access or other forms of payment.

Friday, April 3, 2015

Bust Your Buttons Butter Pound Cake


Berry season is almost here. I can't wait until I can pick fresh strawberries and blueberries again, until then I rely on the supermarket berries grown on the west coast. They will just have to do for now. I don't even bother buying them in the winter. Winter berries in Rhode Island taste like nothing. I rely on what I have in the freezer during the winter.

Since deep red juicy berries started showing up in the markets again, I bought my first few pounds. I knew I needed a great pound cake recipe to go with them. I relied on my Pinterest pages and found this one called Bust Your Buttons Butter Cake. I read through it and it sounded like the perfect cake to pair with berries. There is a lot of butter in this recipe, almost 3/4 of a pound. Butter makes cake better, so you know this is a good one.

It has really great almond flavor too and that name.....you will want to bust your buttons when you start eating this!

I served it with fresh whipped cream and strawberries. Perfect!


Bust Your Buttons Butter Cake
original recipe from Just a Pinch
PRINTABLE RECIPE
3 cups cake flour
2 cups granulated sugar
1 teaspoon salt
1 teaspoon baking powder
1/2 teaspoon baking soda
1 cup buttermilk
1 cup (2 sticks) butter, softened
2 teaspoons vanilla extract
1 teaspoon real almond extract
4 eggs, room temperature

BUTTERY GLAZE
1/3 cup butter (about 5 ¼ tablespoons)
3/4 cups granulated sugar (white sugar, not powdered)
3 tablespoons water
1 ½ Tablespoons vanilla extract

In a stand mixer bowl combine the cake flour, sugar, salt, baking powder and baking soda and mix to combine. Add the buttermilk, butter, vanilla and almond extract and eggs. Mix just until ingredients are combined. Do not overmix.

Pour into a greased and floured Bundt pan. DO NOT SKIP THIS STEP. SPRAYING IS NOT ENOUGH! TAKE THE TIME TO FLOUR IT OR IT WILL STICK!

Bake at 325 degrees for 1 hour to 1 1/4 hours or until cake tester comes out clean. Do not over bake! Ovens vary so start testing yours around the 50 minute mark.

GLAZE INSTRUCTIONS:
Combine all the ingredients, except vanilla, in a sauce pan. Bring to a slow boil over medium heat. Stir in vanilla, set aside to slightly cool. Pierce the cake with the tines of a fork or a bamboo skewer while it’s still in the pan. Pour half the glaze slowly over the cake.

Cool in the pan for 15 min. then flip out onto a cake plate. Pour the remaining sauce over the cake. I found that the glaze gets gooey at the bottom so after it set completely; I moved the whole cake to another plate. Refrigerate any leftovers.

Thursday, April 2, 2015

Swiss Roll Cake with Oreo Cream Cheese Filling


What is wrong with me? Why would I make this cake when I'm watching my sugar?

It was a cruel, cruel thing I did to myself. I mean come on! Look at this cake. Really. It's two boxes of Swiss rolls cut into 144 slices, yes I did the math, pressed into a spring form pan and filled with a cream cheese/whipped cream/Oreo filling. Oh. My. Lord.

My youngest with the very active sweet tooth saw this and it was all over. "Mom you have to make this" is what I heard over and over again until I made it.

I'm not, or never really was into the whole Little Debbie thing, but I did love the Swiss Rolls. I liked to peel off the chocolate and then eat the cakey center. That was just my thing.

This was super easy to throw together and look at it, it looks pretty damn impressive.

Oh how I wanted to have a slice but I resisted. I have some willpower huh?

You will lose some of the chocolate as you cut the Swiss Roll into pieces. Just gather them up and throw them back into the pan. It fills in all the little spaces.


Swiss Roll Cake with Oreo Cream Cheese Filling
Adapted from a recipe at Confessions of a Cookbook Queen
PRINTABLE RECIPE
24 Swiss Roll cakes (2 small boxes), unwrapped and cut into 6 slices each
8 oz cream cheese, softened to room temperature
1/2 cup powdered sugar
1 ½ cups heavy whipping cream, cold
16 Oreos, crushed

Line a 9 inch spring form pan with plastic wrap. Set aside.

Place a metal mixing bowl and your mixer whisk attachment in the freezer or fridge.

In a medium bowl, beat cream cheese and powdered sugar with your hand mixer, on medium speed until smooth and creamy. Set aside.

Remove chilled bowl and whisk attachment from freezer or fridge. Pour heavy cream in bowl and beat with the chilled whisk attachment with the mixer on high speed , until a stiff whipped cream forms. Working with 1/3 of the whipped cream at a time, gently fold into the cream cheese mixture until smooth and blended. Once all the whipped cream has been added and the filling is smooth, fold in cookie pieces until combined.

I cut each Swiss roll into 6 pieces. Line bottom and sides of spring form pan with Swiss Roll slices. Gather up any loose chocolate and put it back into the pan. Spoon filling into the pan and spread evenly. Top with remaining Swiss Roll slices to cover. Remember, your bottom will become your top so if there are some spaces left on the top it’s ok. Cover pan with plastic wrap or foil and refrigerate for at least 3 hours. To serve, turn pan out onto a cake plate and remove pan and wrap.