Thursday, December 15, 2016

Sausage and Pepperoni Hot Italian Dip

Hot Italian Dip. 1JPG

Anyone who knows me know I am the crazy list lady. I have an Excel Spreadsheet for every holiday, party and get together that I've hosted since the early 90's. It's what I do. I have a weekly list that I update as I go through the week. I add items as I add recipes and I also have files for all the major holidays, Easter, Thanksgiving, Christmas, etc. I can tell you what we ate for Christmas Eve in 2001 and produce the shopping list to go along with it. It's just how my brain works. I need to write it or type it down to get it out of my head.

The process for creating a recipe is a bit different but starts the same way. I get an idea for a recipe, I jot down what ingredients I need and then I have the laptop on the kitchen table and I adjust the recipe as I go, back and forth from the stove to the laptop. Once it's out of the oven and approved, I hit the save button, write up a post and share it with all of you. Lots and lots of hours go into each recipe, not to mention the time it takes to photograph each dish, something that gets more difficult when the short, dark days of winter approach.

Hot Italian Dip

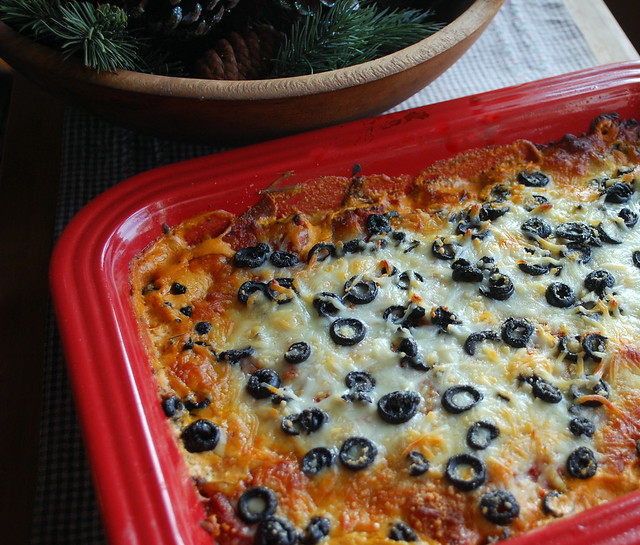
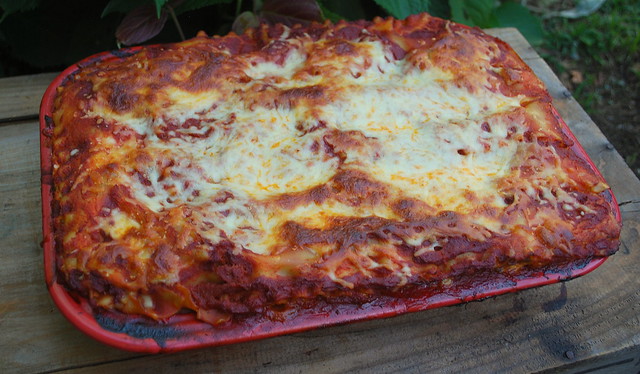
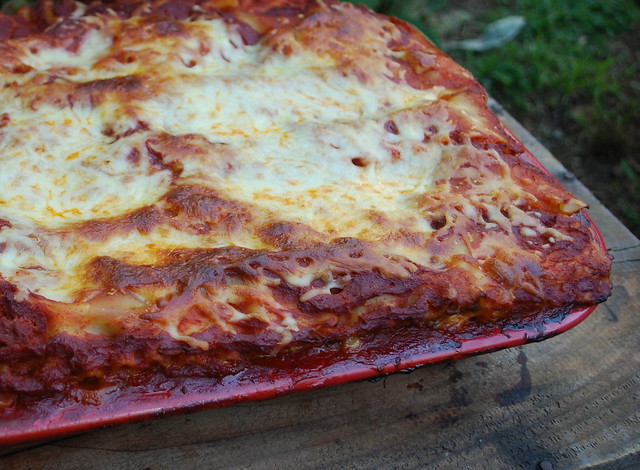
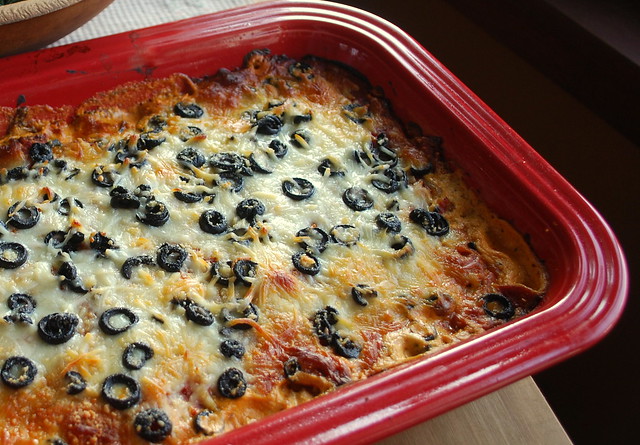
I was looking for something different to add to my Christmas Eve table. I didn't want the same old, same old so I decided to make a new dip straight from my noggin. This dip was created over the course of a few hours on a Saturday afternoon and happily devoured by my guys in about 10 minutes. That's how I know a recipe is a hit! This was definitely a hit my friends. It's got a sausage and pepperoni pizza like taste, but you still get all that creaminess and cheesiness too. Success!

Sausage & Pepperoni Hot Italian Dip
recipe from Lisa@The Cutting Edge of Ordinary
PRINTABLE RECIPE
16 ounces cream cheese, softened
1 tablespoon and 1 teaspoon of Italian seasoning
1 tablespoon olive oil
1 medium onion, chopped
4 cloves garlic, minced
1-14.5oz can petite diced tomatoes with garlic and olive oil, drained
1 1/2 cups pasta sauce
1½ cup mozzarella cheese, shredded
1 pound of Italian sausage (sweet or hot)
20 pepperoni slices cut in half
1 small can sliced olives, drained
Parmesan cheese

Preheat oven to 350.  Cook  the sausage in a skillet on medium heat breaking the sausage up as you cook it. If you are using sausage links, remove the meat from their casings.  Drain any grease and set aside. Place the olive oil back in the same skillet and cook the onion until they becomes soft and translucent. Add the chopped garlic in at the last few minutes. Place the onions and garlic in the same bowl as the sausage and stir to combine.

In a medium bowl, beat the cream cheese and Italian seasoning together with an electric mixer and spread on the bottom of a baking dish. I used a baking pan that was a little bit smaller than a 9x13. Top with the diced tomatoes, the sausage mixture, and the pepperoni *(see note on pepperoni preparation). Continue to layer with the sauce, mozzarella, and the olives. Sprinkle with Parmesan just before going in the oven. Bake at 350 for 30 - 35 minutes or until hot and bubbly. Serve with tortilla chips, bagel chips, crusty bread, crackers, etc.

Note* - I placed my pepperoni on a double layer of paper towel and microwaved them 20 seconds to release some of the grease.

Monday, December 12, 2016

Buttery Parmesan Roasted Carrots

Roasted Parmesan Carrots

I know it's the holiday season and there is candy and cookies around every corner. It's so hard to be good this time of year and I'm certainly not going to deprive myself of some sweets in the next few weeks but I'm trying to be good during the week and get my veggies in.

These Buttery Parmesan Roasted Carrots were so sweet and delicious you can almost pretend you're eating something that's not good for you!

With just a few ingredients you can have these sweeties on the table in no time.

Roasted Parmesan Carrots 1

Buttery Parmesan Roasted Carrots
recipe from Lisa@The Cutting Edge of Ordinary
PRINTABLE RECIPE.
5 - 6 carrots, peeled (I used tri-color carrots)
2 Tablespoons of butter, melted
2 cloves garlic, minced
4 Tablespoons Parmesan Cheese

Preheat oven to 400. Melt the butter then add the garlic. Place the carrots on a parchment lined baking sheet. Pout the mixture over the carrots and toss to coat. Place in the oven for 15 - 20 minutes depending on the size of your carrots. Check them half way through cooking to move them a bit so they get evenly roasted. Sprinkle with Parmesan and roast for an additional 8 - 10 minutes or until they are done.

Monday, December 5, 2016

Homemade Instant Oatmeal

Homemade Oatmeal (5) Blog

You know those handy little packets of instant oatmeal that they sell in the store? The ones with the smiling Quaker on the box? Did you know that you can make your own homemade instant oatmeal? You can ditch those little packs that are filled with way more added sugar than you need in the morning. With instant oatmeal, the packages often have loads of added sugar, salt and artificial coloring. Read the labels and see what you’re getting. Another thing with instant is that it tastes differently than rolled or steel-cut oats. The flavor is more bland and not as textured.

Also, the glycemic index of old fashioned oats is 55, while the GI of instant oats is 83, so instant or quick-cooking oats push up your blood sugar, something of particular concern to diabetics and people with other blood sugar issues.

I started making this a few months ago. I can tell you this.....we will never go back to those little packages again. In a short amount of time you can whip up a big batch of oatmeal. I just take the recipe x8 or x10 and store it in a big glass jar on my counter. I throw a 1/2 cup measuring cup in the jar so two scoops, some fruits and/or nuts and a cup of boiling water makes a nice big bowl of oatmeal that will stick with ya.

Homemade Oatmeal (12) Blog

We throw all sorts of stuff in the oatmeal too. I have jars of nuts and dried fruit at the ready so we just mosey over to that cupboard and add whatever we feel like that day to the bowl. I often chop up an apple and add some raisins in mine, but you can use what ever combo you love. I'm very found of dried pineapple and coconut. Yum!

Please note that this recipe calls for OLD FASHIONED ROLLED OATS, not INSTANT oats. It may take a few more minutes to make than the oats in the paper packet, but it's so worth it!

Homemade Instant Oatmeal
recipe from Lisa@The Cutting Edge of Ordinary
Printable Recipe
1/2 cup Old Fashioned Rolled Oats (not quick cooking oats)
2 teaspoons oat bran
2 teaspoons brown sugar or maple sugar if you have it
2 teaspoons dehydrated milk (powdered non-fat milk)
1/8 teaspoon cinnamon
1 pinch kosher salt

Mix all the ingredients together and store in an airtight container or portion out into increments of 1 cup into snack size bags. I use 1 cup of oatmeal to 1 cup of boiling water but you may want your oatmeal thicker or thinner. Let the oatmeal sit for 5 minutes. I cover mine with a small plate until it's ready. Experiment until you get the perfect mixture for you! Don't forget to add in nuts and fruits to make it your own!

Thursday, December 1, 2016

Thin and Chewy Ginger Cookies

Thin Chewy BB

Every time I mix up ginger anything I look at the batter and think "now that would be a beautiful wall color". Strange I know, but I do it every single time.

Do you think the guys at Lowes would think I'm strange if I walked in with a bowl of batter and said "match that".

As soon as the molasses hits the batter and my spatula does a few turns around the bowl it turns into this lush, warm color that I want all over my walls. Luckily for me I'm getting ready to paint my spare room so I'm hoping to see a ginger cookie or two up on those walls.

By now if you've followed this blog at all you know I'm obsessed with all things onions, mocha, pie and ginger, so yes, this is yet another ginger recipe, but come on.....thin, chewy ginger cookies. They are just crying out for a nice cuppa tea or a big mug of hot chocolate!

Thiny Chewy Ginger Cookies Blog

Thin and Chewy Ginger Cookies
Recipe from Lisa@The Cutting Edge of Ordinary
PRINTABLE RECIPE
makes about 26 cookies
1 1/2 sticks (3/4 cup) unsalted butter, at room temperature
1 cup sugar
1 large egg
1/4 cup molasses
2 1/4 cups flour
2 tsp baking soda
1/4 tsp cinnamon
1/2 tsp ginger
1/4 tsp cloves
1/4 tsp nutmeg
1/4 tsp allspice
extra sugar for rolling

Oven to 350 . Combine all the dry ingredients and set aside. Cream the butter and sugar together with an electric mixer until light and fluffy.

Add the egg and molasses. Add the dry ingredients and mix until combined. Scoop into walnut size balls. Roll each ball in granulated sugar.

Place on an ungreased or parchment paper lined baking sheet 2" apart. Bake for 10 - 12 minutes. Let cool slightly on baking sheet before transferring to cooing rack.

Monday, November 28, 2016

Chili Mac and Cheese Soup

Chili Mac and Cheese Soup 1

There is that chill in the air that I love so. I know so many of you hate the cold weather but I truly love it. My chunky sweaters come out of the cedar chest, the thick socks are all moved to the front of the drawer and the warm boots come down from the attic bins. Now that I don't have to wear dress clothes to work anymore I happily put on jeans and a sweatshirt for work. I'm so warm and comfy all day.

I love making hearty belly warming foods too. I make my fair share of chili and soups during the fall and winter so I decided to try my hand at combining the two and making my own version of Chili Mac and Cheese soup. It's super easy to make too, so you can easily throw this together on a week night.

My guys all love chili. I make a big ole pot of it and they devour it over the course of a few days. This soup didn't make it past a day.

Chili Mac and Cheese Soup

  • Chili Mac & Cheese Soup
  • recipe from Lisa@ The Cutting Edge of Ordinary
  • PRINTABLE RECIPE
  • 2 tablespoon olive oil
  • 3 cloves garlic, minced
  • 1 medium onion, diced
  • 1 1/2 pounds ground beef, cooked and drained
  • 1 quarts chicken broth
  • 1 (14.5-ounce) can diced tomatoes
  • 2 cans kidney beans, drained and rinsed
  • 2 tablespoons chili powder
  • 3 teaspoons cumin
  • Salt & pepper to taste
  • 1 pound pasta, cooked al dente and drained
  • 1 cup shredded cheddar cheese
Heat the olive oil in a large skillet or Dutch oven over medium high heat. Add  the onion and cook until translucent. Add in the garlic and cook for a minute longer.  Stir in chicken broth, tomatoes, beans, chili powder and cumin and salt & pepper. Bring to a low boil and then simmer. Once the soup is simmering, shut it off, and remove it from the heat. Stir in the pasta. Let it stand about 15 minutes then add in the cheese.

Remove from heat. Top with cheese and cover until melted, about 2 minutes.

Friday, November 18, 2016

Bacon Wrapped Sausage Stuffing Balls

Bacon Wrapped Sausage Stuffing Balls 1

Yes, you read that right.

I thought long and hard to come up with this one my friends. It all started with the Sweet Chicken Bacon Wraps over 6 years ago. My most requested appetizer recipe ever. Click here for that recipe. After that I ventured further into all things wrapped in bacon and made these beauties....

Sweet Bacon Tater Tots

Sweet Bacon Tater Tots. Another hit. That led me to make...you guessed it.....Sweet Bacon Kielbasa. Affectionately know as Sweet Bacon Pork Shots.

Pork Shots 3

There is no denying it. Everyone loves almost anything that you can wrap in bacon, then dredge in a chili powder and brown sugar.

So I started to think about what else would taste great nestled in a little bacon blanket. I started asking my husband, and my kids and my friends. What is comfort food to you. What makes your think of all things homey and good in life. What food makes your taste buds scream "YES". More than once I heard stuffing (or dressing depending on where you are from). My mother-in-laws stuffing balls come to mind and I knew I had it. The next great bacon wrapped wonder.

BACON WRAPPED SAUSAGE STUFFING BALLS!

I must say. These were beyond perfection. After they had cooled just enough to bite into one, after I had the first taste, that savory sausage stuffed, the crunchy bacon, the hint of spicy sweetness from the chili powder brown sugar mixture, once I devoured that first one, I knew this was a winner.

I brought some to my husband and my boys and watched as their eyes nearly rolled in the back of their heads. yes, I had done it!

So you can whip these bad boys up, or here's an idea.....leftover Thanksgiving stuffing next week?? I think it just might be crying out for a little bacon love. I used an organic stuffing mix but you can use whatever mix you like.

Bacon Wrapped Sausage Stuffing Balls 3

You can thank me later.

Bacon Wrapped Sausage Stuffing Balls

Bacon Wrapped Sausage Stuffing Balls
recipe from Lisa@The Cutting Edge of Ordinary
PRINTABLE RECIPE
Makes about 30 balls
1 pound ground pork sausage
1 small onion, minced
2 stalks celery, minced
1- 6oz box stuffing mix (unprepared, I use Arrowhead Organic Stuffing mix – 10oz)
3 eggs, beaten
1 cup chicken broth
1 pound bacon

For the Brown Sugar/Chili Mixture
2/3 cup packed brown sugar
2 tablespoons chili powder
Stir together

Add onions and celery to skillet and cook until vegetables are soft and onions are clear. Place the sausage in the skillet and continue to cook until sausage is fully cooked. If there is a lot of grease, drain it. My sausage wasn’t overly greasy. Add the dry stuffing mix to sausage and stir to combine. Transfer to a bowl and then stir in the eggs and chicken broth making sure entire mixture is completely combined.

Using a cookie scooper, scoop the mixture into balls (a little smaller than a golf ball). Place onto a cookie sheet and put into fridge for about 30 minutes so they firm up. Prepare another sheet pan for baking. Line this with aluminum foil and place a cooling rack over the top. This will keep the stuffing balls from sitting in bacon grease. Wrap each ball in a half slice of bacon. I didn't need to use toothpicks to keep them together. Once the bacon cooks it will wrap itself around the stuffing ball. Roll in brown sugar/chili powder mixture and place on top of the cooling rack.

Bake in a preheated 400ยบ oven for 18- 20 minutes, or until the bacon is crispy. Let cool 10 minutes before eating. Serve warm.

Monday, November 14, 2016

Coffee Cake Gingerbread Muffins with Streusel Topping

Gingerbread Muffins with Maple Glaze

If you haven't already noticed I am a bit obsessed with gingerbread. I've always loved it. I dont know if I'm more in love with the smell or the taste of it.

When I have something "gingerbready" in the oven my it makes my whole house smell warm and cozy. It's a festive smell you know? Like when you walk into a carnival and you can smell the candy apples or the cotton candy.

So I have to admit I have loads of gingerbread recipes to try and I'm doing my best to pace myself so you don't get gingerbread overload, and I know there are folks out there who don't like gingerbread. *gasp*. Tis true. But for my fellow gingerbread lovers I bring you these Coffee Cake Gingerbread Muffins with Streusel Topping. It's a sweet and lovely moist gingerbread muffin topped with a deliciously crunchy streusel topping.

Gingerbread + coffee cake = scrumptious.

I varied this recipe just a tad from the original. I used just a wee bit of maple syrup for the glaze. You know me and my maple, almost as bad as me and my gingerbread!

Gingerbread Muffins with Maple Glaze 1

Coffee Cake Gingerbread Muffins with Struesel Topping
Recipe from Deliciously Yum
PRINTABLE RECIPE
Makes 12 muffins
For The Muffins
2 cups all-purpose flour
1/4 teaspoon salt
1 teaspoon baking soda
1/2 teaspoon baking powder
1/2 teaspoon ground cinnamon
1 teaspoon ground ginger
1/2 cup dark brown sugar
1 large egg
1/2 cup milk
1/2 cup molasses
1/4 cup butter, melted

For The Streusel Topping
1/4 cup granulated sugar
1/4 cup brown sugar
3/4 teaspoon cinnamon
1/4 teaspoon ginger
pinch of salt
1/4 cup unsalted butter, melted
3/4 all-purpose flour

For The Glaze

1/2 cup powdered sugar
2 tablespoons maple syrup

Preheat oven to 375 degrees.  Line a muffin pan with liners or grease very well. Start with the streusel topping, combine sugars, cinnamon, ginger and salt in a medium bowl. Add melted butter and whisk to incorporate. Add flour and stir until just combined. Set aside. In a large bowl, combine flour, salt, baking soda, baking powder, cinnamon and ginger.

In a separate bowl, whisk together brown sugar, egg and milk. Slowly add wet ingredients into the dry and stir until barely incorporated. Finally stir in molasses and butter and mix to combine. Don't over mix. It's okay if some lumps remain.

Evenly divide batter between the 6 muffin liners. You will be using the entire batter and fill each muffin tin pretty full. Sprinkle with all of the streusel topping. Put into oven and bake for 18-20 minutes or until a toothpick inserted in the middle comes out clean. Remove from the oven and let muffins rest for 2-3 minutes in the pan or until you're able to invert the muffins and transfer them to a cooling rack to cool completely. Meanwhile, whisk together the confectioners' sugar and heavy cream until smooth. Drizzle desired amount over each muffin and enjoy!

Wednesday, November 9, 2016

Parmesan Roasted Green Beans with Mayo/Garlic Dipping Sauce.

Roasted Green beans with dipping sauce 1

I'm all about roasting veggies. I roast just about any vegetable that you could think of. I've actually changed people's mind on certain vegetables that they thought they didn't like. You didn't like them until you had them roasted!

For most veggies all you have to do it spend a little time chopping and peeling and then it's as simple as throwing them all on a parchment lined baking pan and turning them a few times.

Tossing green beans in a little oil and Parmesan brings out a totally amazing flavor in them. Try these on your picky little eaters, I bet you can get them to eat their veggies this way.


Roasted Green beans with dipping sauce

Parmesan Roasted Green Beans with Mayo/Garlic Dipping Sauce
recipe from Lisa@The Cutting Edge or Ordinary
PRINTABLE RECIPE
1 pound fresh green beans, rinsed and trimmed
Parmesan cheese
Olive oil

For the dipping sauce:
4 tablespoons mayonnaise
1 teaspoon Dijon mustard
1 clove garlic, minced

Preheat the oven to 400 degrees.

Line a baking sheet with parchment paper. Sprinkle olive oil and Parmesan cheese over the green beans. No need to measure, just make sure they are coated in oil (not swimming in it) and then top them off with a healthy sprinkle of cheese. Toss to coat and get the cheesy goodness all over those beans. Bake for 10 minutes, then stir them up a bit and return them to the oven for another 10 - 15 minutes, depending on how well done you like them. I like mine to have some good color on them.

While they are cooking, stir together the ingredients in a small bowl. Dip and enjoy!

Friday, November 4, 2016

Apple Fritter Breakfast Casserole with maple glaze

Apple Fritter Breakfast Casserole 1

There is just something about the word fritter that makes me thing of all things homey and comfortable. I'd lump that word in there with back porches, tree swings, hot cocoa, warm biscuits and chicken pot pie. The word fritter just gives me that down home feeling.

So I saw this recipe on Pinterest and I immediately knew I had to make it.

Warm apples cooked in a caramel-like sauce paired with buttery croissants and topped with a maple glaze. Breakfast doesn't get much better than that my friend.

This is Christmas morning worthy friends!

My Blueberry Croissant Puff was my most favorite breakfast casserole but this is giving it a run for it's money.

Apple Fritter Breakfast Casserole

Apple Fritter Breakfast Casserole
adapted from a recipe at Wonky Wonderful
PRINTABLE RECIPE
Apple Mixture
4 cups apples - peeled and chopped
6 tablespoons butter
1 packed cup brown sugar
1 teaspoon vanilla
1 teaspoon corn starch
2 tablespoons warm water
Casserole
10 oz croissants (I used a pack of mini croissants), ripped into small pieces
1/2 cup heavy cream
1/2 cup apple butter
3 lightly beaten eggs
1/8 teaspoon ground cinnamon
Glaze:
1/2 cup powdered sugar
3 tablespoons real maple syrup

For the apple mixture:
Melt butter in a large sautรฉ pan, over medium heat. Add brown sugar and stir until completely incorporated. Transfer chopped apples to pan and stir until coated with sugar mixture. Cook for 5 minutes while stirring frequently. In a small bowl, stir together the corn starch and warm water. Add the corn starch mixture to apples and continue to cook/stir for 5 more minutes. Remove from heat and set aside while prepping the other ingredients. The apples should be soft and the liquid will be a syrup consistency.
For the casserole: Preheat oven to 375°F. Whisk together the heavy cream, apple butter, eggs and cinnamon. Spray 9x11 casserole dish with non-stick. Place most of the croissants in an even layer in the pan. Reserve about a 1/4 of the croissants. Pour the apple butter/cream mixture over the croissants. Top with the caramelized apple mixture.  Top of with the remaining croissants. Gently press down on the top with a wooden spoon or spatula so the croissants are covered. Bake at 375° for 25 minutes. Once lightly browned on top; remove from oven, glaze and serve.
For the Glaze
Mix powdered sugar and maple syrup together. Drizzle over the casserole.

Monday, October 31, 2016

Creamy (and Cheesy) Veggie Soup

Creamy Veggie Chowder 2

It's soup time!

I love that chill in the air! Every morning I wake up and pick out a pair of chunky socks and wrap a sweater around my shoulders and remember how thankful I am to live in New England.

I think I have a soup cooking on the stove almost every weekend from now until February. I simmer the stock for hour and add in bit of this and that throughout the day.

I'm always trying to come up with new soups and when I can take a little shortcut and utilize frozen veggies, it's a bonus. Frozen veggies are great when you are pressed for time. No peeling or chopping involved! I've been feeding my kids frozen turnips for decades. They still think they are potatoes.

Creamy Veggie Chowder 1

Creamy (and Cheesy)Veggie Soup
recipe from Lisa@The Cutting Edge of Ordinary
PRINTABLE RECIPE
The veggie part:
2 tablespoons olive oil
1 tablespoon butter
3 carrots,chopped
2 stalks celery, chopped
5 shallots, chopped or 1 small onion, chopped
2 cloves garlic, minced
2 quarts (32oz each) chicken broth
2 cups frozen turnip
2 cups frozen butternut squash
3 cups chopped broccoli florets (from 2 crowns of broccoli) *see note
1 tablespoon Italian seasoning
1/4 tsp dried thyme
Salt and freshly ground black pepper
The creamy part:
4 tablespoons butter
6 Tbsp all-purpose flour
3 cups milk
1/2 cup heavy cream
2 cups shredded sharp cheddar cheese
1/3 cup shredded Parmesan cheese

For the veggie part
: In a large soup pot over medium heat add in the olive oil and 1 tablespoon of butter. Add the carrots, celery and shallot or onion and saute until tender (about 4 mins). Add garlic and saute 30 seconds longer. Stir in chicken broth, frozen butternut squash, frozen turnip and fresh broccoli. Add the Italian seasoning, thyme and season with salt and pepper to taste. Cover and bring to a boil over medium-high heat, then reduce heat, cover with a lid and cook 20 more minutes. Test the broccoli after 20 minutes to make sure it's tender. If it's not let it cook a bit more.

For the creamy part: Meanwhile, melt 4 tablespoons of butter in a medium saucepan over medium heat. Stir in flour and cook, whisking constantly 1 minute. While whisking vigorously, slowly pour in milk (whisk well until no lumps remain). Cook stirring constantly until mixture begins to gently boil and thicken, stir in heavy cream. Remove from heat and once all veggies are tender pour into the soup and stir. Remove from heat and stir in cheddar and Parmesan cheese until melted. Serve warm.

Note* You don't want big pieces of broccoli in this soup. This is what I did. I bought 2 small broccoli crowns and I cut the stems as close at I could to the top of the floret. You really don't want any pieces of stem, just the floret top. I chopped the tops if they were too big. You want them bite sized.

Tuesday, October 25, 2016

Soft Batch Chocolate Chip Cookie Bars

Soft batch chocolate chip bars 1


I've been slowly easing out of life in corporate America. After working at the same place for 33 years you get comfortable. You get used to your job and the people and the routing of it all. As I said before, it was one of the hardest decisions that I have ever had to make and it was scary, damn scary, but I felt it was the right time and right move for me.

I am so happy with my new life. I have time, precious time. I used to wake up at 5:45am. I left the house at 7:15am and I got home at 5:30pm, 5 days a week. I ran in the door, put dinner together, cleaned up, did the laundry, got my clothes ready for the next day, thought about what I'd make for dinner the next day, tried to keep it simple so I could have something on the table at a decent hour. It wasn't easy. Now I wake up at 6:30am, leave at 7:30am and I'm home by 2:30pm. Those precious few hours make all the difference in my life. I have time to make a nice dinner. I have time to do laundry, organize, clean, craft if I want, plan meals, read a book! My life has really slowed down and I love it.

I work for my friends company and they treat us all like family. I have the best boss on the planet and I'm stress free. You can't put a price on that my friends.

I'm so grateful for this new life. I appreciate every single day and I get to bake for people other than my family and neighbors! We have 3 young techs that I get to bake goodies for. As our first staff meeting approached I was giddy with anticipation thinking about what I could make. I know that young men can eat lots of sweets, my boys are living proof of that, so I choose to make these Soft Batch Chocolate Chip Cookie bars.

These are made on a half sheet tray so you get a lot of bars. This is a thin bar cookie and it makes a lot!

Soft batch chocolate chip bars


Soft Batch Chocolate Chip Cookie Bars
Recipe from Real Life Dinner
PRINTABLE RECIPE
¾ cup softened butter (12 tablespoons)
3 ounces cream cheese, softened
1½ cups packed brown sugar
½ cup granulated sugar
2 eggs
3 tsp vanilla
3½ cups all-­purpose flour
3 tsp cornstarch
1½ tsp baking soda
½ tsp course sea salt or ¾ tsp regular salt
2 cups semi­-sweet chocolate chips

Preheat oven to 350 degrees

Spray a large cookie sheet 15''x11'' (half sheet tray) with cooking spray and set aside. With your stand mixer or a hand mixer, cream together the butter, softened cream cheese, brown sugar and granulated sugar until well combined. Add the eggs and vanilla and continue mixing for 3 minutes or until mixture is very light and fluffy. Scrape sides down halfway through mixing.

Add the flour, corn starch, baking soda, and salt and mix until well combined. Add chocolate chips and mix or stir until combined. Scoop mixture out evenly over baking sheet. The batter is thick so it helps to drop the dough in increments over the pan and then spread it.

Bake at 350 degrees for 15 - 20 minutes. Place cookie sheet on cooling rack and allow cookie bars to cool completely. You can put them in the fridge to speed up this process if desired. You can eat them warm but they are much easier and less crumby and messy if allowed to cool completely.

Monday, October 17, 2016

A&P Spanish Bar Cake

Spanish Bar Cake

Do you remember A&P Grocery Stores? I remember going to one of the last A&P's in Rhode Island quite a long time again. For those of you who are not familiar with A&P....

The Atlantic and Pacific Tea Company (A&P) began back in 1859 in New York City, and quickly made a name for itself as an innovator and leader in the grocery industry. Before long, the company even began making its own brand of products, including the beloved Spanish Bar Cake. By the 1930s, there were over 16,000 A&P stores across the country. Sadly, in the 1950’s, A&P lost ground to newer, more modern stores. I'm not sure if there are any A&amp stores still left operating in the United States, but I'll always have memories of shopping at them when I was little.

I saw this cake on Pinterest and some kind of light bulb went off. I remember this cake. I don't remember eating it or what it tasted like, heck I don't even know if I tasted it, but this cake was familiar to me, so I called my Mom and as soon as I said "do you remember a cake from A&P called Spanish Bar Cake?" she immediately remembered and told me that my great grandparents bought it often from the local A&P. Ah ha!

She said it had raisins and was cut lengthwise and had a buttercream frosting on it decorated with lines running over the top. BINGO! This was the cake! Mom said "oh wow you just took me on a trip down memory lane". Well, isn't that what the best desserts will do?

So I give you A&P's famous Spanish Bar Cake. Think Spice Cake with raisins layered in between buttercream frosting. Bake yourself up a memory!

Spanish Bar Cake 1

Spanish Bar Cake
Adapted from a recipe at Baking Blond
PRINTABLE RECIPE
In a bowl whisk together:
2 cups all purpose flour
3/4 cup granulated sugar
3/4 cup light brown sugar, lightly packed
1 1/2 teaspoons baking soda
2 tablespoons cocoa
2 teaspoons cinnamon
1 teaspoon salt
1 teaspoon nutmeg
1 teaspoon allspice
1/2 teaspoon ground cloves
Stir in:
1/2 cup canola or vegetable oil
2 cups unsweetened applesauce
2 eggs (room temp)
1 1/2 cups raisins (plump in hot water for 15 minutes and drain before adding)

For the Buttercream Frosting:
1 stick butter, room temperature
5 cups confectioners sugar
2 teaspoons of vanilla
1/4 cup milk

Preheat oven to 350°. Spray a 9 x 13 baking pan with baking spray.

Whisk first 10 ingredients together in a large bowl. Stir in oil, applesauce and eggs, mix well. Add raisins, stir just until combined. Bake at for 30-35 minutes or until a toothpick inserted in the center tests clean. Cool completely before spreading with a butter cream frosting.

For the buttercream frosting:
Beat the butter until light and fluffy. Add in the confectioner sugar one cup at a time. Add in the vanilla and milk.

Note: If you would like to make the cake like the original Spanish Bar Cake, cut the cake length ways into two halves. Spread the frosting between the layers and on top. Use a fork to make the lines on the top.

Wednesday, October 12, 2016

Skillet Green Beans and Mushrooms

Green beans & mushrooms 1

There are a lot of recipes that I don't share with you all. My every day recipes. The ones that I never really think you would like to see posted, but as friends of mine started to ask me about some every day recipes I started to think about the simpler things I make during the week that become part of our everyday meals. Everything doesn't have to be a show stopper dessert, or a brand spanking new recipes. So I'll be posting some staples here in our household, which vary season to season.

I love to cook with veggies from my garden, but we don't grow everything we eat. I don't have a yard big enough for that. I'm luck enough to live near a wonderful farm stand. I visit it weekly in the summer and fall and pick up the things I don't grow there. I choose whatever is in season and whatever looks good that day. A few weeks ago was green beans.

This is a recipe I make quite often. It's quick and easy to make during a weekday night.

Green beans & mushrooms

Skillet Green Beans and Mushroom
recipe from Lisa@The Cutting Edge of Ordinary
PRINTABLE RECIPE
1 pound fresh green beans, rinsed, root end cut off.
16oz portabella mushrooms, sliced
6 slices bacon. chopped into small pieces
1 small red onion, chopped
2 cloves garlic, chopped
olive oil
salt & pepper

Place the chopped bacon in a large skillet with a lid. Cook until crispy. Remove from pan to a paper towel to drain. Take out all but 2 tablespoons of the bacon grease. Cook the onion in the bacon grease. You might have to add a little olive if they start to brown too fast. Cook the onion under just translucent. Add in the chopped garlic, the green beans and the sliced mushroom. Season with salt and pepper. Cover and cook 10 minutes, stirring occasionally. The liquid that the mushroom releases will help to steam the green beans in the pan. If you like soggy green beans (yuck) you can cook them a bit longer.

Thursday, October 6, 2016

Homemade Boursin Cheese Spread

Boursin Cheese Spread 2

When I see Boursin cheese I always think of the holidays. Why? Because that's the only time I would splurge and pick some up. My oldest son loves the stuff but it's pretty pricey, so unless there was a good sale or it was a holiday, I just pass that delicious cheese spread by.

Not familiar with Boursin? You've probably passed it by in the store.


It's a delicious, creamy herb spread that you can use as a dip or a spread. Try it instead of butter, mayo or mustard. Oh man, your taste buds will thank you!

My kids wiped this out in a day. It tastes even better than the Boursin brand in my opinion. Creamy, garlicky and loaded with herbs. It's so simple to make too. Grab a container of whipped cream cheese, throw in some herbs and let it sit for 24 hours. That's it! Simple and so good! I never have to buy it again!

Boursin every week!!!!

Boursin Cheese Spread 1


Homemade Boursin Cheese Spread
adapted from a recipe at A View from Great Island
PRINTABLE RECIPE
12 ounces whipped cream cheese
2 cloves of garlic, minced
2 teaspoons dried parsley
2 teaspoons dried oregano
2 teaspoons dried thyme
2 teaspoons dried chives or onions
2 teaspoons dried sage
2 teaspoons dried basil
2 teaspoons Trader Joe's 2 Seasoning Salute or you can substitute any other spice blend you like, (i.e, Mrs. Dash)

Here are the incredibly complicated directions. Place the whipped cream cheese in a bowl. Add in all the herbs. Mix well with a sturdy spoon. Cover and refrigerate for 24 hours to allow the flavors to blend and the herbs to soften. Serve with your favorite crackers or use as a sandwich spread.

Monday, October 3, 2016

Giant Oatmeal Chocolate Chip Cookies

Giant Oatmeal Choc Chip Cookies

Since I'm home every day by 2:30pm now (yeah!)  I've actually had some time to re-organize all my cupboards and cabinets. I started by putting everything in glass. I used lots of mason jars because they are the most economical, but I also bought some beautiful large Italian glass jars for things like oatmeal, wheat bran, and some of the mixes I make.

I break out my trusty label maker, slap a label on everything and I have one neat and organized looking pantry. I also did this with my spices. I found the cutest jars at Home Goods. I had to go to 2 different stores but I got enough of them to store every last spice in them. It makes me much happier than it should!

When I started to jar up the oats l I realized that I had a lot of oats, so many oats in fact that I needed to make something with them. I already made a few batches of my granola but I wanted to make something sweet for the guys. I found these colossal cookies and decided to make them cause hey, sometimes you just need to make a colossal cookie. Some days normal sizes cookie just don't cut it.

Needless to say, I think you can see by looking at the pictures that they were indeed very happy with these cookies.

Giant Oatmeal Choc Chip Cookies 1

Giant Oatmeal Chocolate Chip Cookies
Recipe from Lisa@The Cutting Edge of Ordinary
PRINTABLE RECIPE
This recipe makes 8 GIANT cookies.
1 stick butter at room temperature
1/2 cup brown sugar, do not pack
1/4 cup white sugar
1 egg
1 tablespoon molasses
3/4 cup flour
1 1/2 cups rolled oats (not quick oats)
1 teaspoon cinnamon
1/2 teaspoon baking soda
1/2 teaspoon salt
2 teaspoon cornstarch
1 1/2 cup dark chocolate chips (I used Ghiradelli)

Preheat the oven to 350° and line 2 sheet trays with parchment paper. In a small bowl, combine the flour, oats, cinnamon, baking soda, salt and cornstarch. Set aside.

In a large bowl with a hand mixer, cream together the butter, brown sugar, white sugar, egg and molasses until completely smooth. Add in the dry mixture and stir with a wooden spoon until evenly mixed. This mixture is thick so make sure you use something sturdy! Stir in the chocolate chips.

Portion cookie dough into 1/3 cup balls and roll in between palms to make round ball. This batter will make 8 big cookies. Place 4 cookie balls on each baking sheet. Bake 1 tray at a time. Bake for 15 minutes. Wait 5 minutes before removing from baking sheet. Transfer to wire rack to cool completely. Store in an airtight container.

Tuesday, September 27, 2016

Homemade Bisquick

Hoem Made bisquick 1

I've been making a lot of mixes over the past 6 months or so. It's all in an effort to eat less processed foods and keep nasty chemicals and ingredients that aren't good for us out of our diet.

I try. I mean that whole heartily. I try to make things from scratch. I try and buy organic. It's not always easy but I'm doing what I can. There are so many products that I no longer buy anymore. It's very evident by my coupon holder. It used to be chuck full of coupons, now, not so much. My shopping list consists of staples that I make into the products I used to buy. It's time consuming I have to admit, but not horribly so, and because I made a commitment to myself to live this way, I don't mind very much at all. I'll spend a Sunday morning making up a few mixes then I'm good for the next few months or more.

One of the products that is no longer in my cupboards is Bisquick. I didn't use it a lot, but I did reach for that box from time to time and now that it's casserole season I ran across quite a few recipes that I wanted to try but didn't want to use the boxed stuff for. Homemade Bisquick to the Rescue!

A little time in the kitchen once a month or so can not only saves you money, it makes you feel better about what you are feeding your family. 4 ingredients, that's all you need to make it yourself!

Homemade Bisquick
recipe from Lisa@The Cutting Edge of Ordinary
PRINTABLE RECIPE
5 Cups All Purpose Flour
3 Tablespoons Baking Powder
2 Teaspoons Salt
1 Cup Shortening

In a large mixing bowl, combine the flour, baking powder, and salt. Whisk to combine. Cut in the shortening. You can use a pastry blender but I just used my fingers to get mixed in really well. Sift all of the flour and store in an airtight container. Use the same as you would use Bisquick in any recipe. You can skip the sifting part, which can be time consuming, but I think it really blends it all together well. Store in an airtight container for up to 6 months.

Friday, September 23, 2016

Apple Crisp Apple Pie

Apple Crisp Apple Pie 2

This pie....THIS PIE! It's so damn good. It's not your typical apple pie. It's a cross between an apple crisp and traditional apple pie. Warm cinnamony apples nestled in buttery oats and fall spices topped with a crunchy brown sugar and more oats. Oh so good.

I patiently wait for apple season to arrive so I can start baking. I love autumn! Like many people it's my most favorite season. I love it all, the weather, the food, the comfy clothes, socks, blankets. It's truly my season.

Apple and pumpkins are always a big part of these next few months. I can't wait to fill these pages with all the fall food I know you'll love as much as I do.

Apple Crisp Apple Pie 1

I don't like to bite into big thick pieces of apples in my pie. I like my apples cooked through. If you like a pie with more of a bite that I would reduce the time that you cook the apples in the skillet.

Anyway you like it, you must make this pie. It won't hurt if you top it with a big scoop of vanilla ice cream either!

Apple Crisp Apple Pie 3


Apple Crisp Apple Pie
adapted from a recipe at Dinner then Dessert
PRINTABLE RECIPE


1 pie crust

Step 1 - In a skillet combine:
8 cups apples, peeled and thinly sliced (I used a combination of Granny Smith and MacIntosh)
2 tablespoons lemon juice
⅔ cup sugar
¼ teaspoon ground cinnamon
4 tablespoons unsalted butter

Step 2 - In a bowl add:
¾ cup granulated sugar
¼ cup light brown sugar, loosely measured
2 teaspoons vanilla extract
2 tablespoons honey
1 teaspoon cinnamon
¼ teaspoon allspice
¼ teaspoon ground cloves
¾ cup all-­purpose flour
¾ cup rolled oats
1 large egg

Step 3 - For the crumble topping:
3/4 cup flour
1/4 cup + 2 tablespoons granulated sugar
1/4 cup + 2 tablespoons light brown sugar, packed
½ teaspoon kosher salt
1/2 cup rolled oats
1 stick cold unsalted butter, diced

Preheat oven to 375 degrees. Place the pie crust in a pie pan and set aside.

For the filling:

Place all the ingredients in Step 1 in a large skillet and cook on medium heat for 8-10 minutes or until the apples are wilted and tender. Place the apples in a large bowl and let them cool for a bit. Once cooled a bit add in all the ingredients in Step 2. Mix well and place in the pie crust.

To Make the Crumble:
Combine the crumble topping ingredients until the butter is pea size, you can use your hands or a pastry cutter.Top the pie with the crumble filling. Bake for 50 minutes. Let cool for 15 then dig in!

Tuesday, September 20, 2016

Honey Ginger Balsamic Dressing

Honey Ginger Balsamic Dressing 1

I think people get tired of eating salad at home because for the most part they stick with the same old thing...lettuce, onions, tomatoes, croutons, etc. Boring salad can turn you off pretty easily. I always try and spice my salad up with things like, great cheese (Gorgonzola or really good sharp cheddar being 2 favorites), I'll add crunchy tortilla strips, french fried onions, bits of leftovers (thinly sliced steak and leftover chicken are two we use a lot). I add apple, pears, walnuts, almonds, hard boiled eggs, anything to make a salad more exciting and get you to actually look forward to eating salad. A great dressing is a huge part to a wonderful salad so I usually make my own. In the past I've made an amazing Teppanyaki Style Ginger Dressing, and a Herbed Ranch Dressing that really send your greens over the top.

This time I decided to make a dressing that had all of the things I wanted in it. I like my dressing with a bit of sweetness so I set out to make my own.

After a few hours of playing mad scientist in the kitchen, I got what I think is the perfect balance in a salad dressing. A little tart, a hint of sweetness with the tang of 2 different kind of vinegars.

I really prefer to make my own. I know what goes in it and I know I'm not adding any ingredients I don't want it in. The only store bought dressing I really like are actually from BJ's Wholesale. They carry a Balsamic Dressing and a Cesar dressing that are both organic. Good stuff when I'm in a pinch, but for the most part, I make my own.

Feel free to experiment with the ingredients making this "your" dressing!

Honey Ginger Balsamic Dressing

Honey Ginger Balsamic Dressing
recipe from Lisa@The Cutting Edge of Ordinary
PRINTABLE RECIPE
2 medium cloves garlic, minced
1 tablespoon finely chopped or grated ginger
1 shallot, minced
1/4 cup rice vinegar
1/4 cup balsamic vinegar
1/2 teaspoon Dijon mustard
2 tablespoon honey
1 tablespoon light brown sugar
1 tablespoon soy sauce
1/3 cup extra virgin olive oil
1/4 cup canola oil
salt & pepper to taste

I use mason jars for all my dressing. Just throw everything into the jar, shake it up and serve. Keep refrigerated.

Monday, September 12, 2016

Spinach, Feta and Olive Pinwheels

Spinach, Feta and Olive Pinwheels 1

This is truly a recipe that I just threw together. There was no thought out plan to make these. I didn't purchase any special ingredients. I just pulled all the ingredients together and baked them.

Cooking and Baking is therapeutic for me. I suppose some people with much more talent than me paint, or draw or create something beautiful, but I cook and bake. It's what I do.

Saturday morning my friend Eva called me and told me that her sister had died. Kathy was 52, the same age as me. She had a husband and 2 kids, just like me. She got cancer, just like me. She died. I lived. I don't mean to sound crude or harsh, those are the facts. I got to live and she died and it makes me so angry inside and reaches a place of such deep sadness in me that I can feel it in my bones. You know when people say to count your blessing every day? I do. I really do that. I am grateful for every moment I get to be here. I don't think anyone who hasn't lived through a life threatening ordeal can truly feel that in their soul. I could have died but I didn't. I am here and she isn't and it breaks my heart for her family and everyone whose life she touched.

We were out yard sale-ling when I got the call and just like that I was a puddle of tears and John knew that it was time to go home. So I kind of wandered around the house and tried to occupy my mind and it just naturally went to the kitchen.

It's therapeutic for me. The chopping, the measuring, the rolling of the dough, all of it. It let me escape the sadness my heart felt if only for a bit.

This one is hitting me so close to home. I'm struggling with this. I felt like this when Joey Feek passed away. I feel like this again and I'm so angry that cancer has taken someone that was so loved and cherished from their family. So it might seem strange to post a recipe in the middle of this deep sadness I'm feeling, but it's just what I do. It's how I cope.

I had a box of puff pastry in the fridge and I literally just looked around to see what I could throw together and this happened.A little pesto, spinach, fresh feta and a sprinkling of olives. I doubled this batch. There was plenty left of all the ingredients to make two.

Spinach, Feta and Olive Pinwheels 2


Baking always makes me feel better. I'm happy to know that Kathy tasted quite a few of the things I baked over the years. I want to always remember her smiling face biting into a piece of whatever I made.

She was so loved.

14291891_10155216211910299_7827282510448827827_n(2)


Spinach, Feta and Olive Pinwheels
recipe from Lisa@The Cutting Edge of Ordinary
PRINTABLE RECIPE
Yield 20 appetizers
I doubled the batch and got 28, this recipe is for 1 batch
1 sheet frozen puff pastry, thawed
1 tablespoon pesto
1- 10oz package frozen spinach, thawed and squeezed dry
Fresh Feta
Chopped Black olives

Pre-heat the oven to 400. Unfold the puff pastry and roll it out just a bit on a floured surface. Spread the pesto thinly over the pasty leaving a ½ inch border. Pesto is powerful, so keep it very thin. Sprinkle with spinach, feta and olives, covering the surface within a 1/2 inch of the border. Roll up one side to the middle of the dough: roll up the other side to the middle so the two rolls meet in the center.  Pinch the seam together a bit, gently flip it over and put it in the fridge for a bit, at least a 1/2 hour to firm up before cutting. Using a serrated knife cut into ½ inch slices.

Place on a parchment lined sheet pan. Bake for 15 – 18 minutes or until puffed and golden brown. Serve warm.

Friday, September 9, 2016

Lasagna - my way.

Lasagna 2

I've been making this lasagna for almost 30 years. When I was a young cook, and a new homeowner, this was my go-to dish because:

1) It feeds a crowd
2) It's really delicious
3) I could make it a day in advance
4) It was one of the few dishes that I could make

That was many, many years ago. I have quite a few dishes under my belt at this time but this lasagna is something I make a few times a year.

Over the years I've forced myself to write down recipes that I just kind of made without writing anything down.. In a way that is how this blog started oh so many years ago. I needed to have a place where I could share my recipes while also documenting them for my own personal history. So, it's finally all written down and it's comfort food at it's finest.....cheesy and meaty and gooey. Everything you want a lasagna to be!

Lasagna

Lisa's Lasagna
recipe from Lisa@The Cutting Edge of Ordinary
PRINTABLE RECIPE
1 pound lasagna noodles
2 pounds ground beef or turkey or a mixture of both.
1 large onion, chopped
Garlic, chopped – to taste. I use 5 – 6 cloves. We are garlic fiends. You can use less.
Large container (32oz) whole milk ricotta cheese
2 eggs
12 slices Provolone cheese cut in half
1/2 cup Pecorino Romano or Parmesan grated cheese
4 cups shredded Mozzarella cheese
1 tablespoon Italian seasoning
Fresh chopped parsley
Fresh chopped basil
Sauce – I usually make my own sauce, but in a pinch jarred will do. You will probably end up using 1 large jar or 2 small jars.

I start my lasagna the way I start many dishes, by cooking up some onions and garlic in some good olive oil. I do a fairly large chop on the onions and then cook them in about 3 tablespoons of olive oil, just until they are translucent. Add the ground beef or turkey, or both and cook until meat is no longer pink inside. Drain any grease from the mixture.Set aside.

I don't boil my lasagna noodles. I find that most times they come out overcooked and then when they go in the oven, they become mush. This is what I do. I boil some water in my kettle. I place the whole package of noodles in a 9x13 baking pan and pour enough boiling water over them so they are covered. After I pour the water over, I take a fork and separate any noodles that are sticking together so that the water gets in between each noodle. Let them sit for 10 minutes.

In a large bowl combine the ricotta, 2 eggs, Pecorino Romano cheese, Italian seasoning and the herbs. Mix gently. I don’t measure any of the herbs. I just chop them up and kind of go with what looks good to me. Set aside.

The assembly:

I kind of make an assembly station for my lasagna making.

I line up, in this order…..the lasagna noodles, your baking dish, then the sauce, the ricotta mixture and finally the meat mixture. I start by putting a little sauce in the bottom of the pan. This prevents the noodles from sticking. Put down one layer of noodles (just grab them from the water with a fork and shake off the access water). Spread on the ricotta mixture, a layer of mozzarella cheese, and 8 half slices of provolone. Just scatter them over the top. Put a thin layer of sauce over the top. Not too, too much. Repeat layers. I usually get 3 layers from one box. The number of layers will depend on the size of your pan. End with a layer of noodles on top. Sprinkle with mozzarella.

Cover with aluminum foil that has been sprayed with a little cooking spray or your cheese will stick to the foil. Heat in a 375 degree oven for 40 - 50 minutes, or until hot and bubbly. IMPORTANT!! Place on a foil lined cookie sheet in case of spills and bubble over! I remove the foil at the last 15 of cooking so the edges get nice and crunchy…the best part! Let sit for 15 minutes before cutting.

I usually serve this with a big salad and some garlic bread. You can make this a day in advance, just take it out an hour before baking and add about 10 minutes to your cooking time.

Thursday, September 1, 2016

Taco Seasoned Oyster Crackers

Taco Seasoned Oyster Crackers 2

My guys love these seasoned oyster crackers. They just scream football to me because that's the season that they are most requested. My husband is a happy man when he has a beer in his hand, football on the screen and a bowl of these crackers in front of him.

Many years ago my mother-in-law gave me the recipe for these Italian Seasoned Oyster Crackers pictured below. These are a favorite too. Click here for the recipe

Seasonsed Oyster Crackers 1

All you need are a few bags of crackers and a few spices and you have an easy snack that everyone just can't stop eating.

They are really addictive.

I kept seeing quite a few recipes for taco seasoned crackers popping up on Pinterest but I decided to make up my own. All my guys love anything taco so I knew these would be a hit...and they were.

Taco Seasoned Oyster Crackers

Taco Seasoned Oyster Crackers
PRINTABLE RECIPE
2 packages (10 - 12 ounces each) oyster crackers
3/4 cup canola oil
1 envelope taco seasoning (or make your own!!)
1/2 teaspoon garlic salt
1/2 teaspoon dried oregano
1 teaspoon chili powder

Preheat the oven to 350. Place the crackers in a very large bowl. Place the oil in a 2 cup measuring cup and add in the remaining ingredients. Stir or whisk to combine. Pour over crackers and gently toss to coat.
Bake on a parchment lined sheet pan 10-15 minutes, stirring once while they bake. Cool and store in a covered container.

Friday, August 26, 2016

Sugared Walnuts

Sugared walnuts 1

I make a mean salad. I'm going to toot my own horn and tell you that because it's what I hear from most people when they have salad at my house. I eat a lot of salad so I try and make my salads as interesting as they can be for a bowl of greens.

I'll add in almonds, pears, apples, mandarin orange slices, bleu cheese, avocado etc. For a bit of a crunch I'll add crispy tortilla strips, home made croutons, chow mein noodles. For some protein I've been known to throw in chopped boiled eggs, salmon, bacon, leftover steak strips, just about anything can go into a salad really. It's a great place for leftovers.

One of the things that I think takes my salads over the top is my dressing. I love to make my own. I'll be sharing some of my favorites with you all soon but first I wanted to share my Sugared Walnuts with you. They sound fancy don't they? They are so easy. 3 or 4 minutes in a pan and you have crunchy, nutty salad topping made with 2 ingredients that is a snap to throw together.

These walnuts combined with bleu cheese crumbles is the perfect combination for me. Salty, sweet and creamy in one bite. So good!

Sugared walnuts

Sugared Walnuts
recipe from Lisa@The Cutting Edge of Ordinary
PRINTABLE RECIPE
2 cups walnut pieces
1/4 cup light brown sugar
parchment paper

Heat a large skillet over medium heat. Place a sheet of parchment on your counter. Place the walnuts in the pan and sprinkle with the brown sugar. Using a spatula, toss the walnuts gently so the sugar coats them. If you need to put a little more sugar in, now's the time. As soon as the sugar is melted remove from the pan on to the parchment and let cool. Break up any walnuts clusters. Store in glass or mason jar.