Wednesday, July 26, 2017

Oven Roasted Garlic Parmesan Shrimp

Shrimp Blog

Every July I have to tell new readers of the blog that I'm not around a lot in July. Summer doesn't last long here in New England and even thought it's my least favorite season, I appreciate the sunshine and all the yummy summer foods. I love working out in the garden and I love all the fresh seafood we get here in Rhode Island.

Shrimp is at the top of my list. We grill it a lot, but sometimes you need a fantastic recipe to get you through those long winter months when you can't go out and grill.

This is that recipe.

This is the only roasted shrimp recipe you will ever need.

I tinkered around in the kitchen and came up with this and it's just perfect. A hint of Parmesan, delicious olive oil and a dash of Italian seasoning! So good.

It got rave reviews from my gang.

Make sure to use RAW shrimp in this recipe. Cooked shrimp just won't cut it!

Shrimp Blog 1


Oven Roasted Garlic Parmesan Shrimp
recipe from Lisa@The Cutting Edge of Ordinary
PRINTABLE RECIPE
1 pound RAW large shrimp, peeled and deveined
2 tablespoons olive oil
4 cloves garlic, minced
1/2 teaspoon dried Italian Seasoning
1/4 cup freshly grated Parmesan
Kosher salt and freshly ground black pepper, to taste

Preheat oven to 400. Line a sheet pan with parchment or lightly spray with cooking spray. Place all the ingredients in a bowl large enough to hold all the shrimp. Mix all the ingredients together and place shrimp in a bowl. Toss shrimp to coat. Place into oven and roast just until pink, firm and cooked through, about 6-8 minutes (don't overcook!)

Friday, June 23, 2017

Berry Filled Angel Food Cake

Angel Food Berry Cake (7) blog


Now that the warmer weather has hit I'm sure there will be a few parties and cookouts to attend. Most of my friends and family make it pot luck and we all bring a dish. I usually opt for dessert cause I love making desserts. I don't always love making complicated desserts though. Sometimes I'd like to keep it simple. Simple doesn't mean it can't be delicious.

We decided to have a few friends over for dinner. No big, just throw some corn and steaks on the grill, bake a few potatoes, easy peasy. I wanted dessert to the be same way so I made this little beauty.

Angel Food Berry Cake (5) Blog

I made an Angel Food Cake but you can buy one from your local grocery store as well. I think the local stores produce really small cakes compared to making it yourself, plus, you know what you put in yours when you make it yourself.

Angel Food Berry Cake (4) Blog

Easy Berry Filled Angel Food Cake
recipe from Lisa@The Cutting Edge of Ordinary
PRINTABLE RECIPE
1 Angel Food Cake (I used this recipe without the sauce!)
1 pint fresh blueberries, washed
1 pound fresh strawberries, washed
16 oz  heavy whipping cream
5 tablespoons confectioners sugar (divided)
1 teaspoon vanilla extract

Bake the cake and let cool completely. Once the cake is cool, cut it in half horizontally. Remove the top portion and set aside. Using a sharp knife cut a little tunnel into the bottom layer of the cake. Use your fingers to pull some of the cake out. Don't cut too close to the edge.

Slice the strawberries into bite size pieces, add to a large bowl. Add in the blueberries and 2 tablespoons of confectioners sugar. Let the berries sit for 10 minutes.

Using a stand of hand mixer whip the heavy whipping cream on medium speed until it forms stiff peaks. Add in the vanilla. Whip for just 30 seconds more. Using a spatula, fill in the tunnel with the whipped cream and top with half the berries mixture. Place the top back on the cake and cover it with the remaining mixture. Place the remainder of the berries on top and chill until ready to eat!

Thursday, June 15, 2017

Sesame Ginger Dressing

Seasame Giner Dressing bLOG 3

I've been at it again. Tinkering with vinegars and oils and all things delicious in the kitchen.

I eat a big salad every day for lunch. Yes, every day. I know to some folks that might seem boring, but I mix it up and make a really delicious salad filled with all different kinds of nuts and veggies and fruits and it always contains 1/2 an avocado cause I'm kind of a wee bit addicted to avocado. I admit it.

I don't usually buy store bought dressing because I love making my own. It's so easy to make your own dressing and it' not loaded with preservatives and a buncha of stuff you really don't want in your body in the first place, so why not make your own right? Right.

My trusty transcriber Evan (my son) will often sit at the kitchen table while I shout out what I'm adding and how much until I get the perfect balance of tartness. That's another great thing about making your own, you make it the way you like it.

Grab a mason jar, throw a bunch of ingredients in it and make your own!

Seasame Giner Dressing blog 2


Sesame Ginger Dressing
recipe from Lisa@The Cutting Edge of Ordinary
PRINTABLE RECIPE
1/2 cup soy sauce
2 tablespoons red wine vinegar
2/3 cup rice vinegar
2 tablespoons fresh ginger, minced or grated
3 tablespoons honey
2 tablespoons sesame oil
1 cup canola or vegetable oil
salt & pepper to taste
1 tablespoons Asian seasoning (optional)

Put everything in a mason jar and shake! This makes a good amount so use a quart size jar.

Thursday, June 8, 2017

Simple One Bowl Chocolate Cake

One Bowl Choc Cake (11) blog 1

Contrary to what some people might think, I don't make sweets every week, sometimes not even one in a month.

If I go too long without making something sweet my kids will eventually start asking. "hey Mom are you going to make any cookies sometime soon" or I'll get Evan pointing something out in a magazine and saying "you could make that for me mama". Oh why thank you.

I'm happy to make sweets, but I admit it's hard to stay away from them when you have a sweet tooth like I do. So I don't make too many just for us, but I'm always happy to make them and take them (somewhere).

This chocolate cake was a "just because" cake. Sweet were requested and I didn't want to make a big mess in the kitchen so this One Bowl Chocolate Cake was on the menu.

I have to admit I didn't have any cake but I might have licked the spatula after I made the frosting. It smelled like chocolate fudgsicles.

One Bowl Choc Cake  blog

Simple One Bowl Chocolate Cake
recipe from Lisa@The Cutting Edge of Ordinary
PRINTABLE RECIPE
1 1/2 cups white sugar
1 3/4 cups all purpose flour
3/4 cup unsweetened cocoa powder
1 1/2 teaspoons baking powder
1 1/2 teaspoons baking soda
3/4 teaspoon salt
2 eggs
1 cup milk
1/2 cup vegetable oil
2 teaspoons vanilla
1 cup boiling water

For the frosting: 
3/4 cup unsalted butter (room temp)
4 tablespoons unsweetened cocoa powder
2 1/2 cups powdered sugar
1 tablespoon or more milk

Preheat your oven to 350.

In a large bowl, whisk together the sugar, flour, cocoa powder, baking powder, baking soda and salt until well combined. Add the eggs, the milk, the vegetable oil and the vanilla, and whisk these ingredients into the dry ingredient until the mixture is smooth. Slowly add the boiling water, whisking constantly until the cake batter is runny and smooth.

Pour the cake batter into a greased 9­x13­ inch rectangular pan and bake at 350 degrees 
about 30 minutes or until a toothpick inserted into the middle of the cake comes out clean.

Let the cake cool in the pan on a wire rack while you make the frosting. For the frosting, whip the butter on high speed using a stand mixer or electric hand mixer until the butter is
pale and smooth. Add the cocoa powder and the powdered sugar and continue to whip until smooth. If frosting is too stiff, a teaspoon or 2 of milk to loosen up the frosting until it reaches a consistency that is spreadable. Spread on cooled cake.

Friday, May 19, 2017

Roasted Garlic

Roasted Garlic blog 2

I don't know if everyone knows this about me but I'm a yard saler. You might call them tag sales, or garage sales, or even car boot sales as they call them in England. Once the nice weather hits here in New England my husband and I have our ritual. I go over the local paper Friday evening, writing down which ones we'll hit in order of time and distance. I grab my "yard sale" change purse, my cross body bag and off we go.

I love all things vintage. I'd much rather find that perfect piece of antique furniture and restore it myself before I'd buy something new.

We hit one particular yard sale and the first thing we noticed were the huge trees in the yard. I mean these suckers were massive. I snapped a pic with my cell phone.

Old Tree

We started talking to the elderly couple and the wife told me that she has lived on the land her whole life. She was raised in the farmhouse out back and bought the house they were in now for $1 from her grandparents. She told us she had the local college come to try and age the trees but the drill bit wasn't long enough. University of Rhode Island estimated that they were somewhere between 500 - 600 years old! Isn't that amazing?

We chatted away with them while I browsed around the garage and spotted a beautiful piece of pottery. I scooped it up the moment I saw it. Arthur Lavoie, the homeowner told me that he made it back in 1975. Sure enough when I flipped the pot over, there were his initials and '75 etched in the back. I asked if he was a potter and he said "no just a tinkerer" and I thought what a great thing to identify as. A tinkerer. I said "Arthur, I'll think of you every time I use it and Mrs. Lavoie said "oh how sweet". I love yard saleing, but I think I love the people and the stories I hear even more.

So I bought that beautiful pot from Arthur and I came home and I immediately roasted garlic in it cause roasted garlic don't need no reason.

Here's to old trees, sweet people and tinkerers everywhere.

Roasted Garlic blog

Roasted Garlic
recipe from Lisa@ The Cutting Edge of Ordinary
PRINTABLE RECIPE

Full heads of garlic
olive oil

There really is no recipe I roast garlic like this quite often. It's great in sauces, smeared on crusty bread, added to sandwiches, in masked potatoes, stirred into soups, in salad dressings. It's just good stuff. Roasting really mellows the flavor and gives it a real earthy, nutty taste.

Oven to 350. Place the garlic heads in a ceramic pan, or you can just place them in a pie dish that you cover in aluminum foil. Chop the tops of the garlic off and drizzle a bit of olive oil into the center so it falls down into the cloves. Top it with a cover or cover with aluminum foil. Bake 25 mins then uncover and roast for another 10 - 15 minutes or under the cloves get soft and mushy. Let cool enough to touch then squeeze those babies out into a jar and keep refrigerated until you are ready to use them.

Wednesday, May 10, 2017

Pickled Eggs

Pickled Eggs blog

I love almost all thing pickled! I'm not a fan of beets so I'd have to say those are out, but pretty much everything else that can be soaked in vinegar is a win for me.

We eat a lot of eggs in this house. I'm talking like 4 dozen a week. I hard boil them for the week and we eat them for breakfast AND I pickle them for snacks! A pickled egg is a wonderful little snack. They are also great chopped on a salad or added to a tuna sandwich.

Pickled eggs blog 2

I often add some onion to mine but I have picky eaters in my house who are not fans of onions so I left them out of this batch. If your craving pickled onions, I have a great recipe for Quick Pickled Shallots. They are also a great addition to a salad and oh so yummy! Click here!

You can certainly half this recipe if a few dozen eggs is too much for you. They do keep nicely in the fridge for about a month though.

Pickled eggs blog 3

Lisa's Pickled Eggs
PRINTABLE RECIPE
24 hard-boiled eggs, peeled
1 large empty sterilized glass jar
4 cups apple cider vinegar
2 tablespoons kosher salt
1⁄3 cup sugar
1 tablespoon pickling spices

Hard boil 24 eggs and place them in a large glass sterilized jar. Bring all the ingredients to a boil in a saucepan. Pour over eggs. Allow jar to come to room temperature then refrigerate. Recipe can be halved.

Friday, April 28, 2017

Nourishing Custard

Nourshing Custard 1

I know the word custard just made a whole buncha people leave. I get it. Custard, Flan, Cream Brulee, it's not for everyone. It's a textural thing for lots of folks. I understand. I happen to love all things custardy.

I get in a breakfast rut. I eat a lot of eggs for breakfast, and try and stay away from carbs which is so hard cause almost all breakfast food is delicious carbs!! There are only a few kinds of breakfast cereal I'll eat because most are just a bowl full of sugar and GMO ingredients. When you think about it, not the best way to start the day off! So in my never ending quest to mix it up and not have the same 4 things for breakfast every morning I did a little online research and found this Nourishing Custard.

This is not a sweet custard that you'd have as a dessert, although if you wanted it to be all you would have to do is add more sweetener to it. I make up a batch of this on a Sunday so I'll have breakfast (and sometimes a snack) all week. For breakfast I'll mix in fresh fruits to really make it a meal, so a snack I'll add a little sweetener like a touch of maple syrup or a sprinkling of Truvia. It's enough to satisfy my sweet tooth and not send me into a sugar coma.

This has become a breakfast I look forward to! With all the fresh fruits that will be available soon I've already decided that I can cook some of them down and make a fruity syrup to mix into the custard. Possibilities endless! You could even call this pudding and I bet your little ones would love it!

This recipe makes a lot of custard, but you can easily half it. I like to make a big batch so I have it at the ready all week. Mix up your breakfast and try this silky custard!

Nourshing Custard

BASIC NOURISHING CUSTARD
slightly adapted from a recipe at Eat Outside the Bag
PRINTABLE RECIPE
6 eggs, from pastured chickens
1/4 cup organic maple syrup or local raw honey (double this for sweeter custard)
2 teaspoons vanilla or 2 vanilla beans
4-6 sticks cinnamon
5 cups milk
dash of salt
ground nutmeg or cinnamon for top if desired

Preheat oven to 325 F for a dish or 350 for cups.

If you want extra healthful and flavorful custard, steep milk with vanilla beans and cinnamon sticks. You can skip this step but it makes the custard pretty darn tasty. Whisk eggs, maple syrup, and vanilla if using in bowl, stir in milk. Pour into a glass baking dish or six custard cups. Sprinkle top with nutmeg or cinnamon if desired. Set the baking dish(es) in a pan of hot water.  Containers nested in a rectangular glass baking dish for large single servings. Bake large dish at 325 degrees for 1 hour; bake cups at 350 degrees for 40 to 45 minutes. Custard is done when a knife inserted off-center comes out clean. Serve warm or cold, add an extra drizzle of maple syrup if you want it sweeter.

You can also make this even more healthful by adding some pumpkin to make pumpkin custard. Essentially all you need to do is swap out half the milk for pureed pumpkin. What a wonderful way to get a serving of vegetables first thing in the morning.

Friday, April 14, 2017

Swedish Almond Cake

Swedish Almond Cake slice BLOG VIN

I love a cake that can be make with everything that you have in your kitchen. A cake you can whip up in the morning when you have an unexpected guest over, or just because you want a little sweetness to end your day.

I have a Swedish Almond Cake under my belt already. One that I quite frequently. That recipe was given to me by a dear friends mother, Marion Bird. You need a special little pan to make that one in, but boy is it delicious! Click here for that recipe.

Back in the late 80's I worked with a Swedish woman named Ferrell Dewell. What an unusual name huh? Ferrell was a sweetheart and she kind of took me under her wing when I first started working. She shared quite a few recipes with me over the years. She even knit a giant stocking for my first born son back in 1995 just before she retired.

Ferrell passed away many years ago. I still think of her every year when I pull out that giant stocking from my Christmas decorations. I stumbled upon a recipe for Swedish Almond Cake that she gave me many years ago. Whenever she would bring a treat into work, she'd type up the recipe to pass out with a piece of whatever goodness she brought.

I'm so glad I have this recipe to share with you and that I still have a little piece of Ferrell with me through it.

This gorgeous little cake has a crispy outer crust and a soft, tender cake in the middle.

Swedish Almond Cake BLOG VIN

Swedish Almond Cake
recipe from Ferrell Dewell via Lisa@The Cutting Edge of Ordinary
PRINTABLE RECIPE
1 cup white granulated sugar
1 cup all-purpose flour
1 stick butter, softened
2 eggs,beaten
1 1/2 teaspoon PURE almond extract
Slivered almonds for sprinkling on top

Preheat oven to 350F. Lightly spray a glass pie plate with cooking spray. In a large bowl, stir together sugar and flour. Add in the butter. This won't be like most cake batters. It's almost like you're making a strudel topping, so add the softened butter and then get in there with both your hands and keep crumbling it until it starts to come together. The mixture will be crumbly and that's ok.

Mix the eggs and almond extract together in a separate bowl. Add to the batter and stir to combine. The batter will be almost dough like. Spread evenly in the pie plate. Sprinkle the slivered almonds on top. Bake for 25-35 minutes or until edges are light golden brown. Let cool. Cut into wedges to serve.

Tuesday, April 4, 2017

Irish Cream Brownies

Irish Cream Brownies BLOG

Oh. My. Word.

Just take a look at that brownie.

I had started a Pinterest board for Easter and as the months passed I'd see something that I thought would be delicious on our Easter table and I'd I pin it and kind of forget about it except when I saw these brownies I didn't forget about them.

As with most recipe that I haven't made before, I like to do a trial run with them to make sure the recipe is good. Nothing worse than trying a new recipe out on a group of people and finding out it's a flop.

These are not flops! A chocolaty brownie topped with a creamy layer with a hint of Irish cream, then topped with Irish cream ganache. My word, it was amazing. I had to give most of it them away so we wouldn't keep them all and eat them!

These will definitely be on our Easter table!

Irish Cream Brownies bLOG 2


Irish Cream Brownies
Recipe by Spend With Pennies
PRINTABLE RECIPE

1 Boxed Fudge Brownie Mix 9x13 size, plus box indicated ingredients or your favorite homemade brownies

For the Frosting
¾ cup unsalted butter (12 tablespoons), softened
⅓ cup Baileys Irish Cream
3 cups powdered sugar

For the Ganache
¾ cup semi­sweet chocolate chips
2 tablespoons heavy cream
½ cup Baileys Irish Cream

Prepare brownies according to package directions. Cool completely. I found a great organic brownie mix at the store, or you could use your favorite brownie recipe.

For the Frosting:
Beat butter on medium speed until fluffy. Add in Baileys and mix well. Add powdered sugar a little at a time until completely incorporated. Beat until soft and fluffy. Spread over brownies and refrigerate while making the ganache.

For the ganache:
Combine Baileys and heavy cream in a sauce pan over medium high heat. Put the chocolate chips in a large glass measuring cup (at least 2 cups). Bring the cream just to a boil and immediately poor over chocolate chips. Let sit 5 minutes without stirring. Don't touch it! Once the 5 minutes are up whisk until smooth and creamy and spread over frosted brownies. Chill until ganache sets.

Thursday, March 30, 2017

Maria's Stuffed Mushrooms (Spinach & Linguica Stuffed Mushrooms)

Marias Stuffed Mushrooms blog 2

I always say the best recipes are handed down from generation to generation. You know the recipe must be good if people want to make over and over again, decade after decade. So when I find one, I want to help preserve it.

The reason I started this blog over a decade ago was because I wanted to have something to pass down to my boys. A written history of the food that makes memories in our family. I swear I'm going to try to start looking at getting a cookbook written. It's something I really need to do.

Until then I'll help pass down delicious recipes like these. My friend Jillian posted a photo of some stuffed mushrooms that she had made, and I immediately asked her for the recipe. I was so happy when she shared the recipe with me, and even happier when I found out it was from her Nonna Maria.

I know Linguica might not be a sausage that is readily available everywhere, so feel free to substitute your favorite sausage in it's place.

These are so tasty mushrooms. Thanks Jillian and Nonna Maria. This recipe lives on a little longer.

Marias Stuffed Mushrooms blog

Maria’s Stuffed Mushrooms
Recipe from Jillian O’Connor's Nonna Maria
PRINTABLE RECIPE
3 - 6oz packages of portobello mushrooms 
10 oz package frozen chopped spinach, thawed and squeezed dry
1/2 cup of ground linguica, (uncooked)
1 egg, lightly beaten
1/3 cup panko or Italian style bread crumbs
3 tablespoons freshly grated pecorino romano cheese
3 tablespoons freshly grated parmesan cheese
Shredded mozzarella for topping
Olive oil for brushing on top

Remove the stem from the mushroom and clean with a damp paper towel to remove any dirt. Place on a parchment or foil lined sheet pan. 

Add the spinach to a large bowl, breaking it up a bit so you don’t have clumps. Add in the linguica and breadcrumbs. Mix until combined. Add in the pecorino romano and parmesan cheese and stir to combine. Beat the egg slightly and add to bowl. Give it one more good stir. Before stuffing, brush the tops of the mushrooms with olive oil. Stuff each mushroom with the mixture. Put a good amount in each mushroom. I used a teaspoon and really packed the stuffing into the mushroom and then piled it up and used my hand to mound it on top. Sprinkle each one with a bit of mozzarella. Bake at 375 for 25 min or until cheese is hot and bubbly!

Friday, March 24, 2017

Peanut Butter Filled Sandwich Cookies

Peanut Butter filled sandiwch cookies BLOG

My husband doesn't ask for much in the way of food from me.

He's a man that eats pretty well and doesn't complain about much. I still can't get him to love eggplant, but I can forgive him that one food aversion.

He does like his cookies though, and he enjoys nothing more than sitting down at the end of a long day with a big glass of milk and some cookies. I don't make sweets every week and I certainly don't make cookies every week, so when I saw him almost grab a package of cookies from the store, I cringed. No, we won't be buying any of those thank you. So he put them back and asked if I would make him some cookies, and I couldn't say no to that.

So I scrounged through some old recipes and found one for these beauties. Now I'm not a big peanut butter fan so I had to rely on my husband for feedback. He took one bite and said "oh my God these is amazing!" He quickly devoured the cookies and proclaimed "that was one fantastic cookie". I'd say based on those reactions, we have a winner.

Just a last note, the filling, which I had all over my hands after filling these, was not sickeningly sweet. Just the perfect peanut butter/confectioners sugar balance.

Peanut Butter filled sandiwch cookies BLOG. 1JPG

Peanut Butter Filled Sandwich Cookies
recipe from Lisa@The Cutting Edge of Ordinary
PRINTABLE RECIPE
1 cup creamy peanut butter
1 stick butter (1/2 cup), softened
1 cup brown sugar, packed
1/2 cup white sugar
2 eggs at room temp
1 teaspoon vanilla extract
1 1/2 cups all purpose flour
1/2 teaspoon baking powder
1/2 teaspoon baking soda

Peanut Butter Filling
1 1/4 cups creamy peanut butter
6 tablespoons unsalted butter, room temperature
1 3/4 cups Powdered sugar
2 -4 tablespoons heavy cream or milk
1 teaspoon vanilla extract

In a stand or electric mixer, cream peanut butter and butter together until very smooth. Add sugars and continue to beat until very creamy. Add in eggs and vanilla and mix until well combined. In a separate bowl, whisk flour, baking powder and baking soda together. Mix dry ingredients into peanut butter mixture just until combined – don’t over mix!

Roll dough into 1 tablespoon balls and place 2-3 inches apart on a baking sheet. I used a cookie scoop and they all came out the same size. Bake cookies at 350 for 12-15 minutes or just until edges are golden (mine took exactly 15 minutes but my cookies were a tad bigger than a tablespoon). Let cool for 5-10 minutes before transferring to cooling rack. Let cool completely.

Peanut Butter Filling:
Meanwhile, make the filling by beating peanut butter and butter together until creamy. Gradually mix in powdered sugar. Mix until well blended. Add the heavy cream or milk a few tablespoons at a time until mixture becomes creamy and spreadable. Add in more cream or milk if needed to reach desired consistency.

When cookies have cooled, spoon a heaping tablespoon of the filling onto the bottom side of half the cookies; top with remaining cookies right side up and push down to spread filling.

Monday, March 20, 2017

Maple Mustard Balsamic Dressing

Maple Balsamic Dressing blog 1

I always feel like a bit of a mad scientist in the kitchen when I'm making dressings. There are bottles and ingredients all over the counter and I'm mixing a little of this and a little of that until I get the perfect potion. I hit a home run with this one.

I love balsamic in everything and anything so the addition of it to this dressing was a no brainer for me.

I tend to like my dressing a little more on the tangy side, so I have to stop myself from making a dressing so tangy that no one else will want to eat it but me.

I always have Simply Asian seasoning my pantry, if you don't have it, no worries. This dressing is just as scrumptious without it. You can always throw a few sesame seeds in for good measure if you have them on hand, or add any kind of spice that you like.

Feel free to make this dressing your own. You can also use any kind of light oil that you like and you can substitute the maple syrup for raw honey or even agave nectar. Make it your own! Add a little of this and a little of that, taste it along the way, make notes, and in no time you'll have a dressing perfect for your taste!

This should keep in the fridge for well over a week, but probably won't last that long!

Maple Balsamic Dressing blog 2

Maple Mustard Balsamic Dressing
recipe Lisa@The Cutting Edge of Ordinary
PRINTABLE RECIPE
1/4 cup pure maple syrup (not pancake syrup please!)
3 Tablespoons of Dijon mustard
1/4 cup balsamic vinegar
3/4 cup flavorless oil (vegetable, canola, sunflower, etc)
1 tablespoon Simply Asian Sweet Ginger Garlic seasoning (optional but delicious)

Put all the ingredients in a jar and shake! Store in refrigerator.

Tuesday, March 14, 2017

Italian Orzo Soup with Sausage and Spinach

Italian Sausage Orzo Soup BLOG 2

I'm at it again.

I'm making soup.

Most Sundays during the winter I make a big pot and we eat it throughout the day and then eat the leftovers, if there are any, for supper Monday night. It's become a little tradition for us. Since we have a blizzard headed our way, I made soup on Sunday for tomorrow. Just prepped everything but the pasta. I'll cook that up separately and we'll be good to go. Thankfully I have a gas stove, so if we lose power, I can still use the stove top.

A few weeks ago I made this Italian Wedding Soup -----> click. Last week I made a little u-turn and turned it into Italian Orzo Soup with little sausage bites in it. So yummy!

The hardest part about making this soup was rolling the sausage into little balls. I cooked up the sausage in the morning so that part of it was out of the way. The rest was a breeze.

Italian Sausage Orzo Soup BLOG

I cooked a whole pound of orzo because we really like our soup with lots of pasta in it, you can cut back on that amount if you'd like it more brothy.

Italian Orzo Soup with Sausage and Spinach
recipe from Lisa@The Cutting Edge of Ordinary
PRINTABLE RECIPE
2 tablespoons olive oil
1 lb. ground Italian sausage rolled into bite­ sized pieces
1 small onion, diced
3 garlic cloves, finely chopped
2 celery stalks, chopped
3 carrots, chopped
1 lb orzo pasta
6 - 7 cups reduced ­sodium chicken broth
1 tablespoon dried Italian seasoning
4 cups lightly packed baby spinach (optional)
Salt & pepper to taste

Add some olive oil to a large pan and lightly brown the sausage. Don't worry if they are a little pink inside. When you add them to the hot soup it will cook the meat. Move to a paper towel lined plate or bowl and set aside. Add a bit more oil to the same pan and cook the onion, celery and carrots until just tender.

Meanwhile in a large dutch oven heat up the chicken broth. See my notes on how to make quick, delicious chicken "stock" below.  Season with salt and pepper, and 1 tablespoon of Italian seasoning. At this point I add in about 4 cups of baby spinach leaves. This is optional, but highly suggested! Slowly bring to boil.

While that is cooking, I boiled some salted water and cooked the orzo until it is al dente. Once the soup comes to a boil, lower the heat, add in the sausage and the orzo, give it a good stir, heat for another 5 - 10 minutes then serve!

Note* You can certainly buy chicken stock but I like to make a quick chicken "stock" by boiling a small 3 - 4 pound chicken carcass. You can even do this with a rotisserie chicken. Just pick the meat off the bones and then throw all the bones and skin into a soup pot, bring to a boil and simmer an hour. Remove the chicken bones and you have a fast chicken stock! I save the chicken meat for another meal or freeze it for my next batch of chicken soup.

Friday, March 10, 2017

My meatballs and sauce

Meatballs and sauce BLOG

Some recipes are oldies but goodies. The ones you've been making over and over again, year after year.
I've been making these meatballs and this sauce recipe for over 30 years. I did post both of these recipes before but it was many moons ago when my blog was in it's infancy stage and I've tweaked the recipes slightly over the year.

I think back sometimes to the many recipes that I never wrote down. I just threw them together. I bit of this and that, and maybe next time a bit more of this and a little less than that. While it worked for me, it wasn't helpful to people who wanted to make my recipes, and as I get older, I'd love to have a written history (maybe dare I say a cookbook) to share with my children, family and friends. Now that life has slowed down a bit for me, I just might have time to work on one!

So this is my sauce recipe, written and re-written from an older version I had.Basically the same recipe but a small addition (grated onion) and something new (panko!). The sauce I've been making the same way for ages. It's just your traditional pasta sauce. I often will cook some kind of meat to throw into it, but it's just fine the way it is too.

The convenience of throwing it in the crock pot and letting it cook low and slow all day makes this a no-brainer!

So written down for my someday daughter-in-laws and someday grandchildren I bring you my meatballs and sauce!

As my Dad always says "Mangia, mangia!!
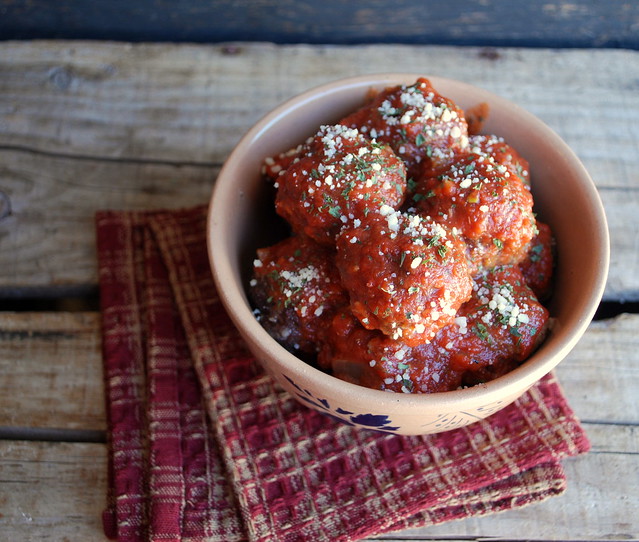
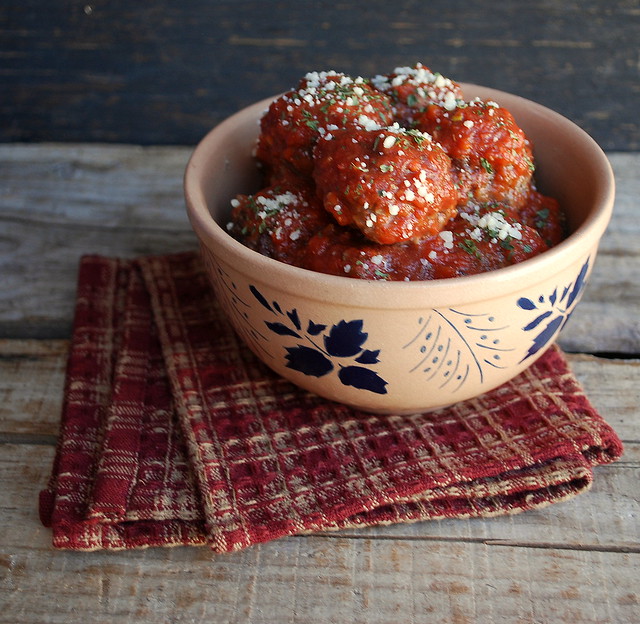
Meatballs and sauce BLOG 1


Lisa's Meatballs
recipe from Lisa@The Cutting Edge of Ordinary
PRINTABLE RECIPE
3 pounds ground chuck
1 cup bread crumbs (I use panko)
3 large eggs
1/2 cup whole milk
1 cup grated Romano cheese (or grated cheese of your choice)
1 small Spanish (red) onion, grated
4 or 5 cloves garlic, chopped
1 tablespoon Italian seasoning
1/3 cup fresh chopped parsley
1/3 cup fresh chopped basil

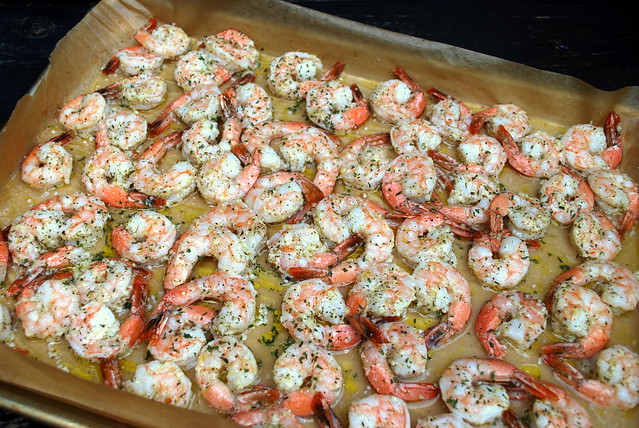
Pre-heat the oven to 350 degrees. Get out a large bowl to mix this all in. The first thing I do is put in the ground beef and then I take my grater and grate as much of the onion as I can. I usually grate te onion over a bowl to capture the juices as well. It's good stuff, put it in the bowl! Mix in the rest of the ingredients and get your hands in there.  Yes your hand.  Just  get them in there and get mixing. Try not to over-mix, stop one the mixture comes together.  If it seems a little loose add a bit more breadcrumbs, too dry add a little more milk.

Line a sheet pan with parchment paper and spray lightly with cooking oil. Roll each meatball the size of golf ball. This recipe makes about 50 meatballs. Cook for approximately 30 - 35 minutes. I usually check them at the 20 minute make and turn them a bit. Don't worry if they are still a tad pink in the center,  thrown them in the sauce to let them cook a bit more.

If 49 meatballs is too much for you (it never is for us), you can freeze them for use later.

*Freezer tip. Place cooked meatballs on a cookie sheet lined with parchment and freeze for about an hour and a half, or until meatballs seem firm. Place in a freezer bag or container. These thaw nicely in a big pot of sauce.

Lisa’s Sauce
recipe from Lisa@The Cutting Edge of Ordinary
PRINTABLE RECIPE
1 large onion, chopped
2 tablespoons olive oil
5 - 6 cloves of minced garlic
3 – 28oz can crushed tomatoes
1 - 6oz can tomato paste
3 tablespoons fresh chopped basil
2 bay leaves
Heaping tablespoon of Italian seasoning
2 tablespoons parsley

In a large skillet heat enough olive oil just to cover the bottom of the pan, about 2 tablespoons. When it’s good and hot throw in your onions and give the pan a good pinch of salt. Cook the onions until they are soft and translucent. When they are almost done, add the garlic and let it cook for about a minute with the onions. Turn heat off and set aside.

Now get your crock pot out and open up 3 can of the crushed tomatoes. As I empty each can, I rinse it out with a little bit of water that I throw back into the crock pot. You don’t want to add a lot of water back in, just enough to rinse the sauce away from the side of the can, maybe about a tablespoon of water for each can. Add in the tomato paste, bay leaves, some fresh basil if you have it, if not dried it fine. I use fresh herbs whenever possible, but sometimes you just can’t get fresh, especially here in the winter. Grab a good heaping tablespoon full of dried Italian seasoning and rub it between the palms of your hands and put that in the pot. This helps release some of the essential oils, and will add more flavor to your sauce. Now grab the pan of onions and garlic and add those in and give it all a good stir. I let this cook on low in the crock pot all day (about 6 hours). You could cook it on high if you are in a hurry, but I would still let it cook a minimum of 4 hrs.

Things I add in from time to time:

Most times I will cook up some spare ribs, or pork chops, or a cheap cut of steak and add that in. Really any meat will do. I always cook the meat about ½ way through before. Sometimes I will grab a stick of pepperoni and chop it into big pieces and throw it in. Experiment with what you like and make it your own. This recipe makes a lot of sauce but you can freeze what you don’t use then just defrost it and re-heat.

Tuesday, March 7, 2017

Bacon Brussel Sprouts au gratin

Brussel Sprouts Gratin blog 2

Brussel Sprouts! I love them!I know lots of you don't, and I'm sorry for that, you'll just have to wait for the next recipe. But let me tell you this about this particular recipe. My friend Mitchell, who does not like brussel sprouts ate this and loved it, so don't knock it till you try it!

I saw this recipe on one of the many little video recipes on Facebook and I immediately put brussel sprouts on my shopping list. I made this for a small dinner party and everyone went nuts over them. Even the sprout haters!

It's so good that I'm adding it to my Easter menu.

It cheesy and delicious and I can't wait to make it again!

Brussel Sprouts Gratin blog
Bacon Brussel Sprouts au gratin
slightly adapted from a recipe at 12 Tomatoes
PRINTABLE RECIPE
2 lbs pounds brussel sprouts, halved and tough end trimmed.
2 tablespoons extra virgin olive oil
6 slices of bacon, cooked and crumbled
3/4 cup heavy cream
1 egg
1 teaspoon garlic powder
1/2 teaspoon red pepper flakes, optional
1/2 cup mozzarella cheese for sprinkling on top
1-1/2 cups sharp cheddar cheese, grated
Kosher salt and freshly ground pepper, to taste

Oven to 400. Toss brussel sprouts in olive oil and season generously with salt and pepper. Place them in a 8x8 baking dish and roast for 15‐20 minutes, or until semi‐softened.

In a large bowl, whisk together the heavy cream, egg, and garlic powder and red pepper if using. Stir in cheese.

Remove brussel sprouts from oven and add 3/4 bacon to the baking dish. Pour cheese mixture over the top and stir everything together, then top with remaining bacon and mozzarella.Reduce oven temperature to 350º, return baking dish to oven and bake for 20‐25 minutes, or until cheese is bubbly and just set. Remove from oven and let cool 5 minutes before eating.

Friday, March 3, 2017

Light and Fluffy Cornbread

Light Fluffly cornbread slice blog 1


Growing up we didn't eat a lot of corn bread. It just wasn't something my Sicilian family made. I never really thought about it until I went to a restaurant once and had it as a side. Man, it was delicious.

Fast forward to a few months ago. My husband and I traveled to Massachusetts for a little adventure and we ended up in this little bar and grill. When we walked in we were greeted by a friendly hostess who immediately asked us if we wanted the corn bread starter. No charge, we give cornbread to all our customers. What??? Well who are we to say no. So a few minutes later she brings two little mini loaves of cornbread to the table. We dig in. Oh. My. Word. John and I ate every crumb of those little loaves. It was moist and fluffy and melted in your mouth and ever since that day I've had cornbread on the brain.

I have to bring up the one thing that I know I will be taunted about. I have southern friends. As most of you know, southerns don't put sugar in their cornbread. Well, I'm not southern and we do put sugar in our cornbread. It's just sugar people. I know we can get along and not argue about sugar in cornbread right? So if you are southern and you're reading this shaking your head, I apologize but this Yankee will always put sugar in her cornbread!

This is the best cornbread I've ever made and I've tested quite a few recipes that didn't end up being posted. It's so light and airy. My go-to cornbread recipe from now on.

Light Fluffy Cornbread slice BLOG

Light and Fluffy Cornbread
recipe from Lisa@The Cutting Edge of Ordinary
PRINTABLE RECIPE
3/4 cup yellow cornmeal
1 cup flour
2/3 cup sugar
3/4 teaspoon salt
3 1/2 teaspoons baking powder
1 cup milk
1 egg; beaten
1/4 cup vegetable oil

Oven to 400. Stir together all the dry ingredients and make a well in the middle. Pour the milk into a 2 cup measuring cup. Add the oil and eggs and mix with a fork until the egg is broken and the milk and oil start to blend. Pour into well. Mix gently with a rubber spatula. As soon as the ingredients start to come together pour the batter into greased 8x8 pan or pie pan. Bake for 22 - 25 minutes, or until golden brown.

Monday, February 27, 2017

Cheddar and Sweet Corn Pie

Sweet Corn Pie Slice blog

We had some unusually warm weather for New England in February this year. Warm weather makes me go into spring cleaning mode. Since it's still a bit chilly to get outside and do much in the yard, I started to purge my kitchen. I tried to get my cupboards and drawers down the only the essential things I need. Not an easy task, but I think I did a good job.

Next I turned my attention to our two freezers. We have two refrigerators, one in the kitchen (of course) and one in your garage to hold "extras". Gallons of milk, water, beer, wine, etc. It's pretty much the beverage fridge. Well I got the hankering to really clean out the freezers in both fridges. It wasn't too bad, but I did notice I had an over abundance of steak. Sirloin tips and rib eyes mostly. I tend to buy in bulk when the price is right and then I vacuum seal them. Well it was time to use up some of the steaks and since the weather was nice, we decided to grill them.

Cheddar and Sweet Corn Pie blog 1

I try and watch my carbs so I was trying to think of a side to go with the steaks that wasn't heavy on carbs. I saw a recipe for Cheddar and Sweet Corn Pie and I knew I had a winner.

This is such an easy pie to throw together. I used frozen sweet corn from Trader Joe's. I can only imagine how good this will taste when I make it with fresh summer corn.

It's cheesy and sweet with a crispy topping. A keeper for sure!

Cheddar and Sweet Corn Pie blog

Cheddar and Sweet Corn Pie
adapted from a recipe at Natural Comfort Kitchen
PRINTABLE RECIPE
2 tablespoons butter
1 medium yellow onion, chopped
2 cloves garlic, minced
4 cups fresh or thawed corn kernels (6 large ears)
⅔ cup milk ­
1-1/2 cups (about 8 oz.)shredded soft cheese -­ I use half cheddar and half fontina
1/2 cup panko bread crumbs
salt & pepper
3 tablespoons chopped fresh chives, optional
3 eggs, whisked

For the topping:
1 tablespoon of butter
1/4 cup panko bread crumbs
1/2 cup shredded cheese
pinch salt & pepper
1 tablespoon fresh chopped parsley

Preheat oven to 375 (F) and move rack above middle position. Lightly spray standard sized pie plate with cooking spray. Melt 2 tablespoons butter in a medium skillet over medium high heat. Add onion and cook about 4 minutes until slightly browned at edges. Turn heat down to medium, add garlic, and cook 2 to 3 minutes, until garlic is fragrant but not browned. Combine onion/garlic mixture in a medium mixing bowl with corn, milk, 1½ cups cheese, ½ cup panko, good pinch of salt and pepper, and chives (if using). After stirring, whisk the add eggs in a separate bowl and then add to corn mixture. Pour into pie plate.

For the topping: Melt 1 tablespoon butter, let cool slightly, then combine with ¼ cup panko, ½ cup cheese, and a pinch of salt and pepper. Sprinkle over the pie filling. Bake (on a rimmed baking sheet for easier handling) about 35 minutes, until slightly puffed, set, and beginning to brown. Cool 5 to 10 minutes before serving.

Tuesday, February 21, 2017

Smothered Crispy Chicken with Baby Bok Choy and Mushrooms.

Chicken and Bok Choy Blog 1

I'm a teeny bit addicted to baby bok choy. Every time I go shopping at the Asian market, which is usually about once a month, I get a big bag of baby bok choy.

I eat it stir fried with some sesame oil, soy and garlic or I crisp it up in a pan with some oil, salt & pepper and just shovel it in my mouth. It's sooo good. Seven years ago I posted my Simple Baby Bok Choy recipe and I still use it to this day.

A few weeks ago I bought another giant bag of it and decided I needed to try something new. This crispy chicken with baby bok choy and mushrooms was amazing!

Don't skip the searing of the chicken. It makes a big difference!

If you can't find baby bok choy in your local market, venture into your neighborhood Asian market. You'll leave with a lot more than bok choy!

Chicken and Bok Choy Blog

Smothered Crispy Chicken with Baby Bok Choy and Mushrooms.
adapted from a recipe at Whisk it Real Gud
PRINTABLE RECIPE
8 chicken thighs (skin on)
Salt and pepper to taste
vegetable oil
2 packages (8oz) baby bella mushrooms, sliced
3 cups of chicken broth
3 tablespoons flour
One bunch of baby bok choy (cleaned dried and cut lengthwise then quartered)

Preheat oven to 375. Pat the chicken dry with paper towel and season with salt and pepper. Get a frying pan really hot, and cover the bottom of the pan with the oil and sear the chicken on each side for about 4­ -5 minutes. You want a nice golden sear on the skin. Reserve the juices from the pan. Place the chicken in a lightly sprayed baking dish and bake for 30­ 35 minutes. Remove pan from the oven and add in the baby bok choy. Place it in between the chicken thighs so you have bok choy in every nook and cranny. Pour the chicken juices over the baby bok choy and place back in the oven for an additional 10 minutes.

While the chicken is finishing cook the slices mushrooms in the same frying pan. You may have to add a bit or olive oil or vegetable oil to stop them from sticking. Cook until just tender and then remove from pan and set aside.

Add the chicken broth to the pan and bring to a boil. Once it's boiling add in the flour and stir with a whisk to get rid of any lumps. At this point I added in some seasoning. You can use any seasoning you like, I added in 1 teaspoon of Mrs. Dash, some garlic powder and some parsley. Turn the heat down on the pan and let the sauce thicken. Once thickened add the cooked mushrooms back into the pan. Remove the chicken and bok choy from the oven, pour the sauce over the pan and return to the oven for another 5 minutes, or until the sauce is bubbling. Let set 10 minutes and then enjoy!

Friday, February 17, 2017

Double Chocolate Chip Oatmeal Cookies

Double Choc Oatmeal Cookies blog 2


Oatmeal Cookies are one of my families most favorite treats.

Don't get me wrong, we love lots of different kinds of cookies, but oatmeal is really up there at the top of the list.

I've made Raisinette Oatmeal CookiesOatmeal Cookie Bars, Oatmeal Peanut Butter Cookies, Thin, Chewy & Buttery Oatmeal Cookies, Oatmeal Chocolate Chip Cookie Pizza, Chocolate Oatmeal Bars, Giant Oatmeal Chocolate Chip Cookies, andGood Ole Original Oatmeal Chocolate Chip Cookies, phew! The list could go on and on. Just when I thought there can't possibly be another kind of oatmeal cookie that I haven't made.....I think about Chocolate Oatmeal cookies and because if one dose of chocolate is good, two or even three is better right? So I start concocting a recipe, a bit from this recipe, a bit from another until I have Double Chocolate Chip Oatmeal Cookies and I want to make them immediately but I wait.

I'm patient.

I knew I had to wait. I waited for a snow storm, which doesn't take very long in February in Rhode Island and last week we got over a foot of snow and I knew I was going to make soup and I knew I was going to make these cookies.

Snowy days are just meant for oatmeal cookies and when they are loaded with chocolate chips and cocoa powder and some espresso powder it takes the little ordinary oatmeal cookie and sends it over the top!

Double Choc Oatmeal Cookies BLOG

Double Chocolate Chip Oatmeal Cookies
makes about 32 cookies
recipe from Lisa@The Cutting Edge of Ordinary
PRINTABLE RECIPE
2 sticks (1 cup) butter, softened
1 cup granulated sugar
1/2 cup lightly packed brown sugar
2 eggs
1 and 1/2 teaspoons vanilla extract
1 and 1/2 cups all purpose flour
2 tablespoons unsweetened cocoa powder
1 teaspoon baking soda
1 teaspoon instant espresso powder (optional but I think it gives the cookies a rich flavor)
pinch salt
3 cups rolled oats (not quick cooking oats)
1-1/2 cups chocolate chips

Preheat oven to 350F. Line a few baking sheet with parchment and set aside. I alternate with 3 baking sheets when I'm making cookies. One for cooling cookies, one in the oven and a third to rotate so I am never putting cookie dough on warm cookie sheet.

In a large bowl, mix softened butter and sugar with a hand mixer on medium speed until creamy. Add in eggs and vanilla and mix it well. In a separate bowl whisk together the flour, cocoa powder, espresso powder (if you are using it) soda, and salt. Add the dry mixture to the wet. Mix until just combined. Mixture will be thick. Fold in oatmeal using a heavy wooden spoon or large spatula, again, this batter is what I call spoon-breaking batter so make sure you are using a strong stirrer. Add in the chocolate chips and mix until just combined.

Use a cookie scoop or drop by rounded tablespoon on the baking sheet. Bake for 11- 13 minutes. Mine we perfect at 13 minutes. Don’t over bake! Remove from oven and let them sit on the baking sheet for about 3 minutes. Transfer to a rack to cool completely.

Monday, February 13, 2017

Italian Wedding Soup

Wedding Soup Blog

You see that picture of soup right there? Oh how I suffered to get that photo. My husband was out shoveling, it was 12 degrees out, and I ran into the garage with this nice hot bowl of soup and my camera and made him hold a spoon in the bowl so you could see all the delicious ingredients in that soup. A dozen or so shots and I was done. It was just too cold! Brrrr!

So we got a whopper of a snow storm last week. Over a foot of snow, and while most people will hate the thought of all that snow, I love it. I mean I really love it. I am a snow lover. I love the way it blankets my whole world in white, the crunch of it underfoot, the coldness in the air. I adore a snow storm.

The absolute best part for me is all of us the house at one time (rarely happens with two college students), big mugs of homemade hot chocolate, warm cookies from the oven and a huge pot of soup on the stove. That is exactly what I did last Thursday.

I made what might have been the best soup of my life that day. I got up early in the morning and made the little meatballs, then I cooked a chicken in a big pot and started on Italian Wedding Soup. One of my faves. I took notes as I was going along so I could share it with you all. So glad I did.

This soup is so good. I mean really so incredibly delicious. I doubled this recipe. By Friday it was gone!

Wedding Soup


Italian Wedding Soup
Recipe from Lisa@The Cutting Edge of Ordinary
PRINTABLE RECIPE
For the meatballs:
1/2 lb. ground chuck
1/4 cup panko bread crumbs
2 tablespoon Parmesan cheese
1 tablespoon parsley
2 cloves garlic, minced
2 tablespoons milk
1 egg
1 teaspoon Italian seasoning
salt & pepper to taste

For the soup:
2 tablespoons olive oil
1 small onion, finely chopped
3 medium carrots, chopped
2 stalks of celery, chopped
7 cups chicken stock * see note
salt & pepper to taste
1 tablespoon of Italian seasoning
1/2 cup acini di pepe pasta (or any other little pasta)
4 cups, fresh baby spinach leaves, lightly packed
1/4 cup Parmesan cheese

In a medium bowl, combine all meatball ingredients and mix together. Don't over-mix it though. I use my hands to mix. Roll the meat into small little balls. About the circumference of a dime. Refrigerate until you are ready to use. Heat olive oil over medium heat in a skillet and then add onions, carrots, celery and cook until just tender. About 10 minutes. Set aside.

Put the chicken stock into a large pot on medium heat (*see notes). Once the veggies are tender add them to the stock. Add in the seasonings and heat to a slow boil. Boil for about 15 minutes.

Put the meatballs into the soup and continue to cook for about 4 minutes or until the meatballs float. Lower the soup to a simmer. Now to add the pasta. I cook my my acini di pepe in a separate pot until it's very al dente and then add it in to the pot. I find that cooking the pasta in the soup makes it turn out very gummy and makes the soup too starchy. Add in the cooked pasta and the spinach leaves. Cook until the spinach has wilted. Add the Parmesan, give it a quick stir and your ready to eat! Mangia, mangia! Something my dad always said when the food hit the table!

Note* You can certainly buy chicken stock but I like to make a quick chicken "stock" by boiling a small 3 - 4 pound chicken carcass. You can even do this with a rotisserie chicken. Just pick the meat off the bones and then throw all the bones and skin into a soup pot, bring to a boil and simmer an hour. Remove the chicken bones and you have a fast chicken stock! I save the chicken meat for another meal or freeze it for my next batch of chicken soup.

Wednesday, February 8, 2017

Homemade Mayo

Homemade Mayo BLOG 1'

Homemade Mayo.

It was something that I had on my "to do" list for years, something I knew that I wanted to start making from scratch.

I wish I would have started earlier. It's so easy.

Oil, eggs, a litle mustard, some lemon and a little garlic and you have mayo! Creamy, delicious homemade mayo!

I'm adding this to my "I don't have to buy it, I make it from scratch" list!


Homemade Mayo blog 2


Homemade Mayo
PRINTABLE RECIPE
1 cup oil (I used vegetable oil but you could also use a neutral tasting oil like canola)
2 egg yolks
1/2 teaspoon dry mustard
1 tablespoon fresh squeezed lemon juice
Optional - 1 tablespoon garlic, chopped (adjust amount to taste)
salt & pepper, to taste

Make sure ingredients are at room temperature before starting to mix and use a cylindrical container. You don't want to make this is a wide bowl or container.

Add oil, egg yolks, dry mustard and lemon juice into a blending container. Place hand blender at the bottom of the container and turn on. You will see the mayonnaise start to form at the bottom. It will begin to emulsify and become thick. IMPORTANT: make sure to not lift up blender until most of the oil has been incorporated; then begin to move up slowly. Add in the chopped garlic Add the chopped garlic, salt and pepper. This should keep in the fridge for a week, hence the small batch. I keep mine in a small glass jar.

Tuesday, January 31, 2017

Creamy Baked Asparagus

Creamy Asparagus Blog

Say hello to our new favorite asparagus dish.

We all love asparagus in this house and I use it whenever I can. I roast it in the oven with some olive oil and salt and pepper for most dinners or throw it on the grill in the warmer weather but every once in awhile I like to kick it up a notch and make something a little different.

This creamy, cheesy dish is amazing! I've made it 4 times since I discovered the recipe. I doubled it for an AFC Football party, made it for dinner guests, made it again to photograph and I'm making another double batch for the Super Bowl. It really was a huge hit. There was never a stalk left!

Creamy Asparagus Blog 2

I adjusted the ingredients a bit from the original recipe. The Italian seasoning was a bit overpowering in the original and there was a tad bid too much mozzarella. Did I really just say that? Too much cheese? I did, lol.

Creamy Baked Asparagus
adapted from a recipe at Will Cook for Smiles
PRINTABLE RECIPE
1 pound asparagus, small/medium thickness
1 cup heavy whipping cream
1 teaspoon Italian seasoning
salt and pepper to taste
½ cup freshly grated Asiago cheese
1/2 to 3/4 cup shredded mozzarella cheese (I lean towards the 1/2 cup)

Preheat the oven to 400 and lightly grease an 8x8 baking pan or baking dish of similar size. Trim off the hard ends of the asparagus.  Place the asparagus into the baking dish and spread them out evenly. I used a 2 cup measuring cup, added the heavy cream, Italian seasoning, salt, pepper, and grated Asiago cheese in the cup and poured it over the asparagus. Spread mozzarella cheese over the top. Bake for 20 -25 minutes or  until cheese is slightly browned and bubbly.

Monday, January 16, 2017

Our most favorite Chocolate Chip Cookies

Our Fave CCC Blog 2


I'm sure everyone has their idea of the perfect chocolate chip cookie and I'm also know for sure that there are many, many different kinds of chocolate chip cookies. Not only can you have a chewy cookie, a thin cookie, a crispy cookie, you can have cakey cookies, crunchy cookies, the list goes on and on.

You can make cookies with granulated sugar, brown sugar, coconut oil, Crisco, cookies made with whole wheat flour, all butter, chilled dough, you can see where I'm going here, it's endless.

This is the recipe that my family loves the most. This is the cookie that my kids call addicting, and I have to admit, they kind of are. You can't eat just one because once you put that perfectly chewy, chocolate loaded, caramely cookie in your mouth, once your done with it, you instinctively will reach for another and another. They are that good.

Our Fave CCC Blog

The two things that make this cookie different from a lot of other cookies is cornstarch and maple syrup. I'm convinced that what makes these cookies amazing. I really think you need to use pure maple syrup in these. You can use pancake syrup in a pinch, but I think real maple syrup makes all the difference. You do have to chill the dough before you pop these bad boys in the oven, so a little planning is needed.

I don't remember where I got this recipe. It was on a tattered scrap of paper in my recipe file and I can't tell you how many times I've made these. I can't believe I never blogged them before. Hopefully they will become your favorite chocolate chip cookie too!

Our Fave CCC Blog 3

Our Most Favorite Chocolate Chip Cookies
recipe from Lisa@The Cutting Edge of Ordinary
PRINTABLE RECIPE
1 cup butter (2 sticks) melted and cooled
1 1/2 cups light brown sugar packed
1/2 cup granulated sugar
2 eggs room temp
1 tsp vanilla extract
1/4 cup maple syrup (not pancake syrup)
3 1/4 cups all purpose flour
2 teaspoons cornstarch
1 teaspoon baking powder
1 teaspoon baking soda
1 teaspoon salt
2 cups chocolate chips *see note

In large bowl, stir together melted butter and sugars. Add eggs, one at a time, stirring until combined. Stir in vanilla extract and maple syrup. In separate bowl, whisk together flour, cornstarch, baking powder, baking soda, and salt. Gradually add flour mixture to wet ingredients, stirring until completely combined. Stir in chocolate chips. Cover bowl and allow it to chill for at least an hour.

Preheat the oven to 350. Once the dough is chilled, I used a cookie scoop to make the cookies. I packed the scoop and then placed the dough on a parchment lined cookie tray about 2 inches apart.

Bake for 13 minutes. Don't worry if they look a little under cooked. They will set up perfectly. Allow cookies to cool for about 15 minutes on the sheet pan before moving them to a cooling rack to cool completely. After I put the first batch in I scooped out the rest of the dough onto a platter and then put it back in the fridge. You don't have to scoop all the batter at once, you can scoop it out as you go but make sure to keep the dough in fridge in between batches and do not place cookie dough on a hot cookie sheet. I used 3 cookies sheets so I always had one cooling, one with cookies on it and one ready to go in the oven.

*Note - I use Ghiradelli 60% cacao chips in when I make these. We like the fact that they are a bit less sweet and a tiny bit bigger than regular chocolate chips.